Any console or device can start to feel dull or old if it lacks some customization features, and Oculus Quest 2 is no different. Despite having an extensive collection of exciting games, waking up in the same Virtual Reality room can be tedious.
Thankfully, Oculus anticipated this issue and provided a feature that allows you to choose from a plethora of virtual environments for your VR. 
I used my Oculus Quest 2 for years without realizing there was a method to do this, and you won’t believe my regret after discovering it. You won’t have to experience anything like that.
So, if you or your friend happens to own an Oculus Quest 2 headset, grab some snacks and move on to the next section to start the journey.
Can You Change Oculus Quest 2 Virtual Room?
Yes, you can change the Oculus Quest 2 virtual room by configuring the Oculus settings. One point to keep in mind is that Oculus officially only provides a limited set of pre-installed virtual environments and doesn’t provide a method to import custom-built ones.
Don’t let that discourage you, though, because a developer has been able to develop a third-party app known as SideQuest that contains a massive library of customized virtual rooms, along with several apps and games. 
Since it’s not official software, it’s a little time-consuming to set up, but if you are interested, follow these steps to do it:
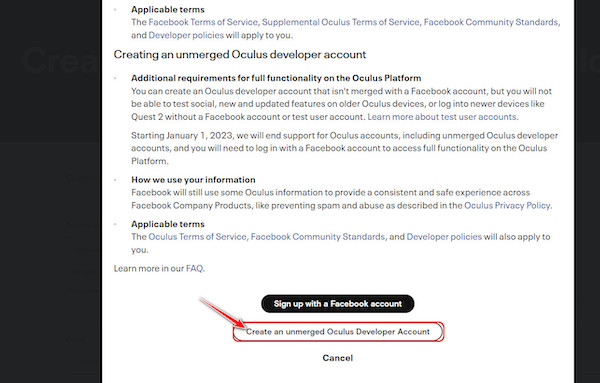
- Put on your Oculus headset and go to the Settings Look for a developer mode toggle and enable it. As soon as you do that, you will be asked to verify whether you are a registered developer. If you don’t already have a developer account. Click this to proceed.
- Scroll to the bottom of the page and select the option that suits your needs. If you are not sure, I suggest clicking Create an unmerged Oculus Developer Account.
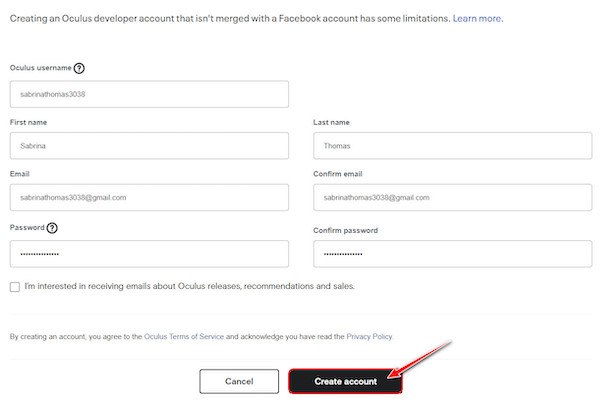
- Type all the correct information in the required text fields. When you are done, click on the Create Account
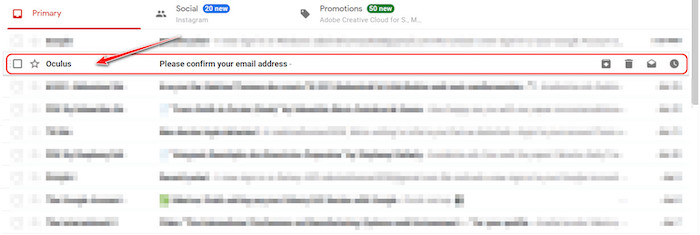
- Open a new tab in your current browser and navigate to com. Refresh the inbox and click on the latest email from Oculus.
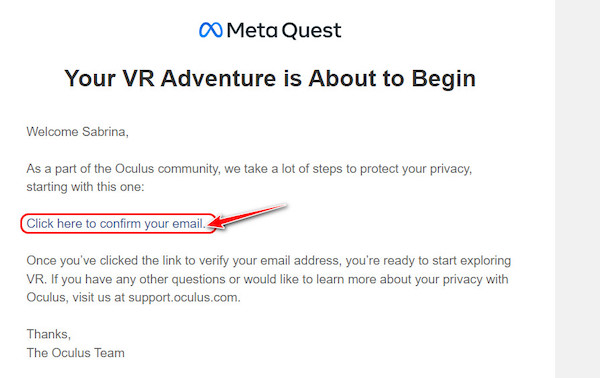
- Select the text ‘Click here to confirm your email’ on the next page to verify your Oculus developer account.
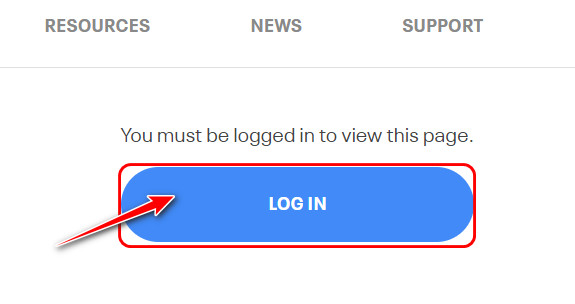
- Wait for a ‘your email has been verified’ text to appear. Once that happens, visit this webpage to proceed to the next phase.

- Look for the login button once the page loads and click it.
- Look for the gray button labeled ‘Have an Oculus Developer account’ on the following page and select it.
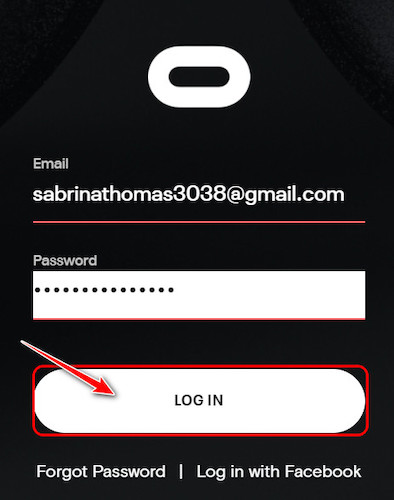
- Enter the appropriate login credentials that you created a while back and select the Login button once you are done. Note that you can click on Forgot Password to reset your password.
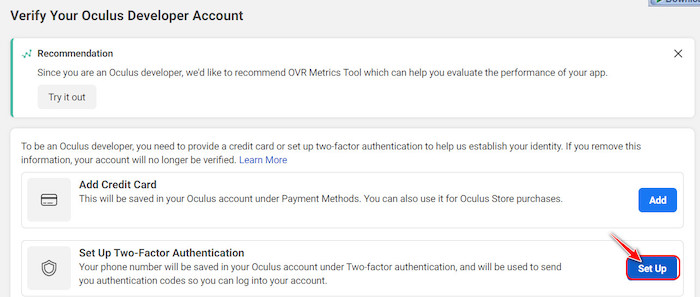
- Find the blue Set Up button next to Set Up Two-Factor Authentication and click on it.
- Select the tiny downward arrow icon and choose your country from the list. Then, type your phone number and click the Submit Note that the phone number needs to be active to receive SMS.
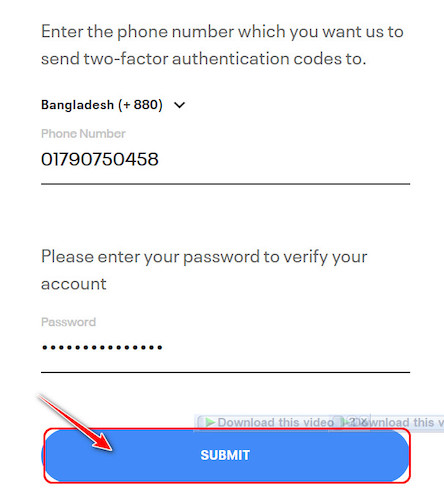
- Grab your phone and wait for a 6-digit verification code from Oculus to appear in your messages. Type that on the next page and click on submit to proceed.
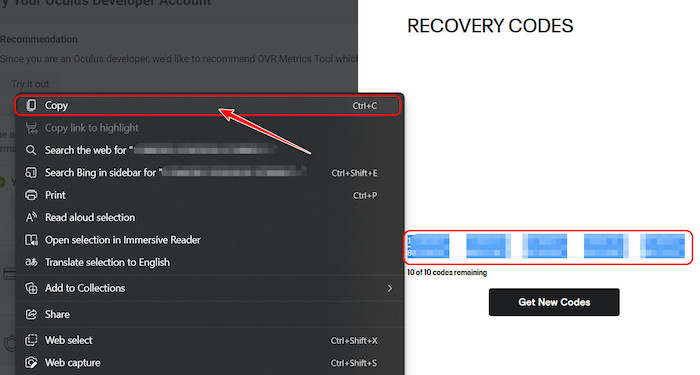
- Select all the recovery codes manually or automatically by clicking on Get Codes. Copy and paste them into a secure notepad to use them and recover your account in emergencies.
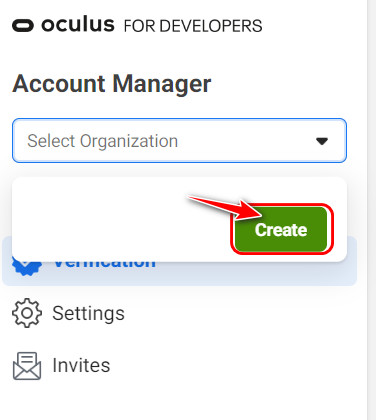
- Go to the drop-down menu on the left side and expand it. Select the green Create
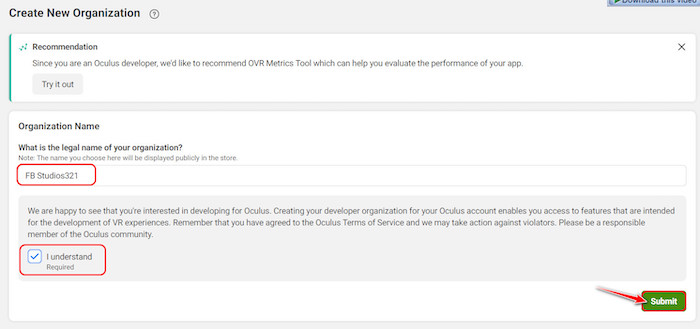
- Type your preferred name for the organization in the appropriate textbox and enable the ‘I understand’ check box before clicking on the Submit
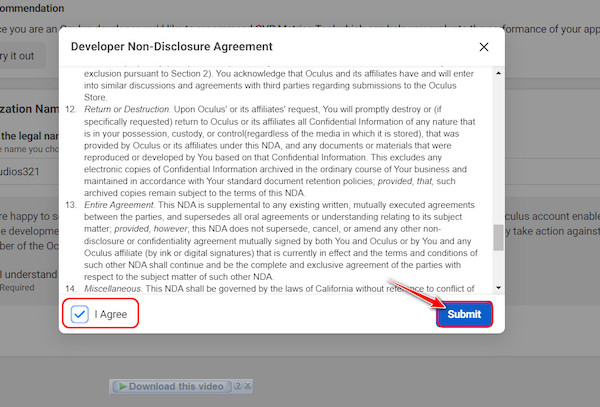
- Scroll down slowly while reading the terms and conditions carefully on the following pop-up window before clicking on the I agree Select Submit once that’s done.
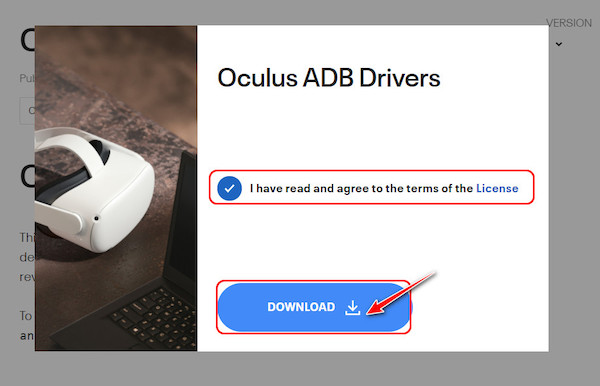
- After that, create another tab in your browser, and visit the Oculus ADB Drivers Once it loads, click on the blue Download button at the top right corner.

- Confirm that you have read all the terms and conditions on the pop-up by toggling the checkbox and select the Download
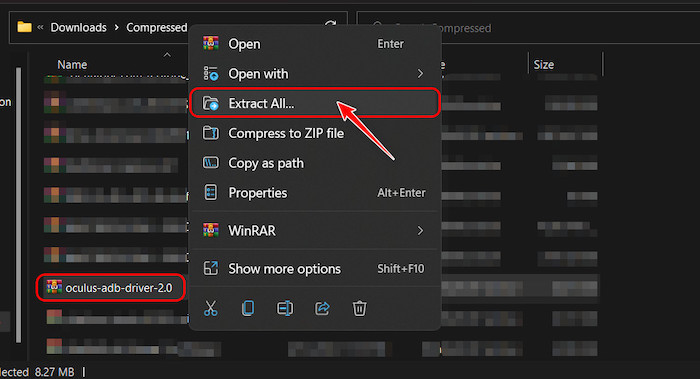
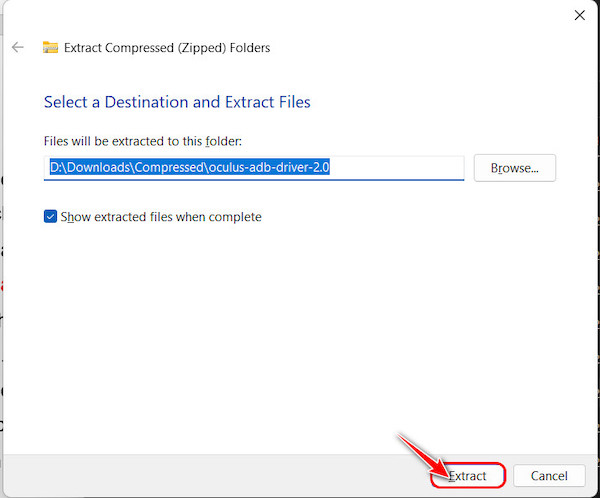
- Navigate to the folder where all your downloaded files are saved and right-click on the file you just downloaded. Select Extract All from the options.
- Select the Extract button on the following window after you have selected the Extract location.
- Navigate to the location you selected earlier if it didn’t open automatically after extraction. Keep navigating inside the folders until you see ‘android_winusb’ or ‘inf’ and right-click on it. Select the Install option.
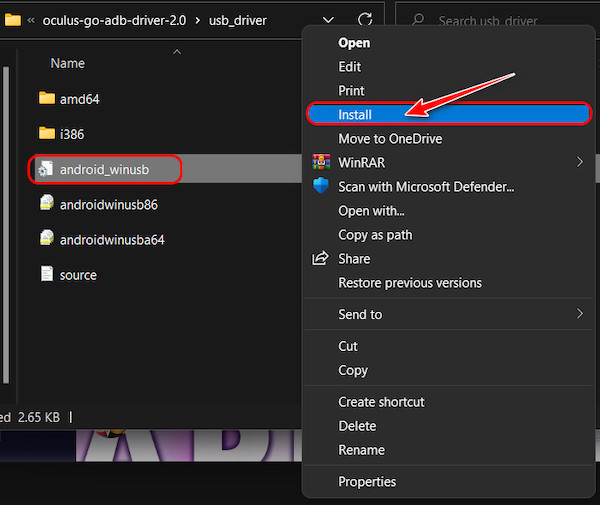
- Click on Install again in the confirmation pop-up window to proceed.

- Go to your smartphone and install the latest Oculus app from the Google Play Store/App Store. Launch it and connect it with your Oculus Quest 2 headset. After that, go to the Quest settings.
- Select Developer mode and turn on the toggle on the following page.
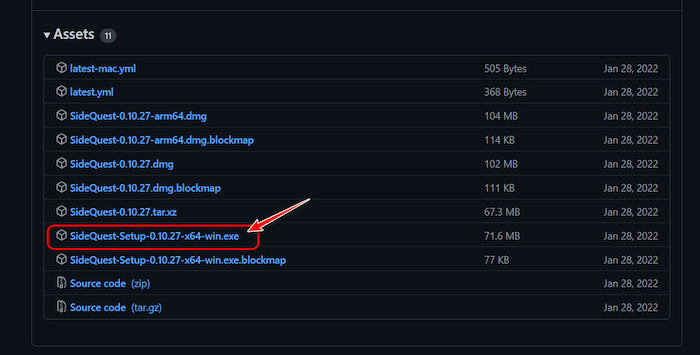
- Go to this website and download the SideQuest app for your operating system. The installers can be found under Assets. If you are on Windows, look for the file that has the .exe extensions.
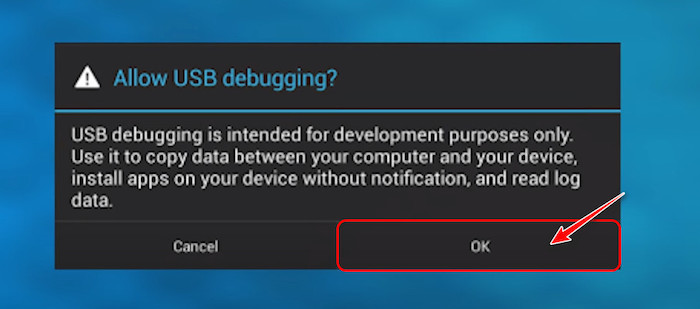
- Launch the downloaded file and install it by following the instructions. Open it and connect your Oculus headset to the app, after which you need to click OK on the USB debugging pop-up.
- Browse through the library of community-developed virtual environments and games and choose one to install. Highlight it and click on Install to Headset in its right corner to find it on your Oculus headset.
This was a long process, but you are not done yet. The next section of this article discusses how you can successfully use these virtual environments after you have added them.
Follow our guide to know can AirPods connect to Oculus Quest 2.
How Do You Customize Your Quest 2 Home?
You can customize your Quest 2 home almost exactly like how you customize other aspects of your Headset, including your wallpaper, icons, and sounds.
Follow these steps to customize your Quest 2 home:
- Wear your Oculus Quest 2 headset and boot it up.
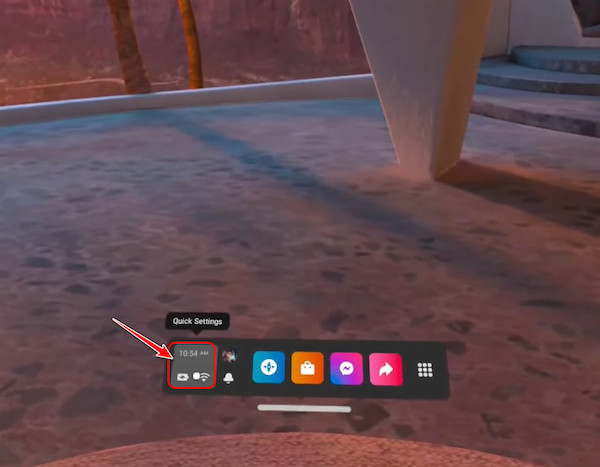
- Turn your head below and locate a dashboard that contains information like the time and Wi-Fi. Move your head around so that the pointer on display is on Quick Settings, and while it’s there, press the controller button.
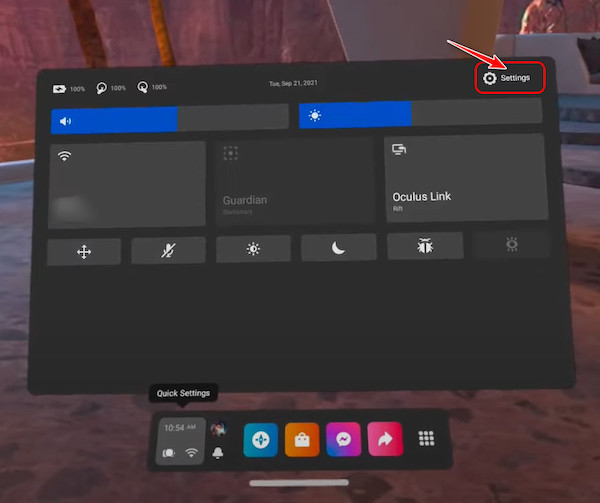
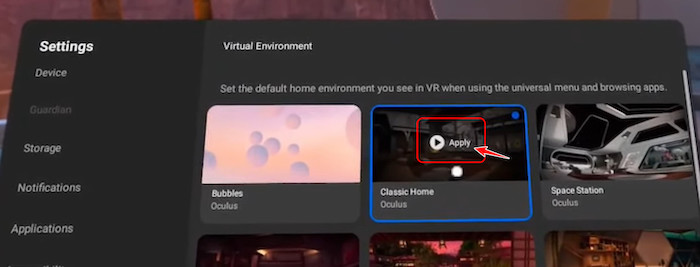
- Find the Settings button on the following window and select it from the top right corner.
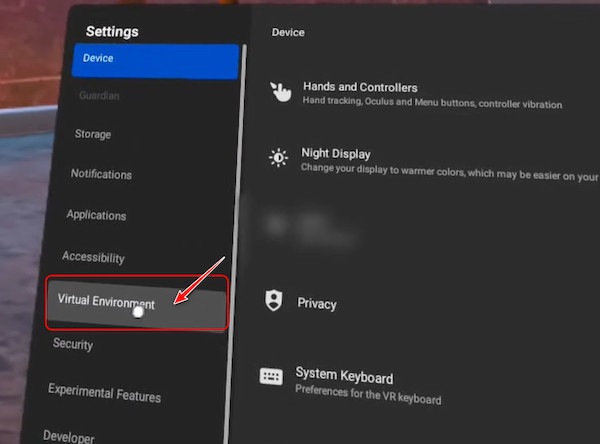
- Switch to the Virtual Environment tab from the options on the left corner.
- Browse all the virtual environments available and choose the one you want to install. Note that you should be able to see all the in-built Oculus environments along with any you imported from SideQuest. Highlight your choice and select Install with the controller to proceed.
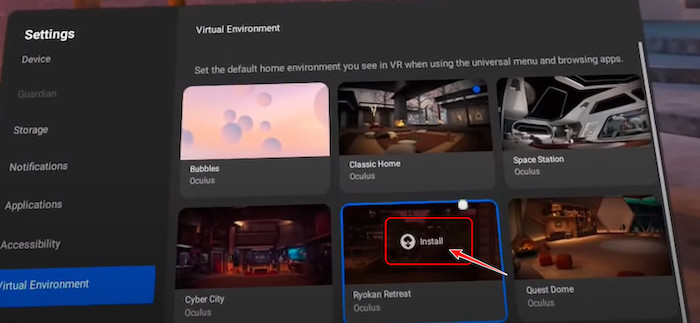
- Apply the installed background by simply highlighting it and pressing the controller button when apply is selected.
Check out the easiest way to fix Oculus Quest 2 controller not pairing.
FAQ
Question: Can you design a house in VR?
Answer: Yes, you can design a house in VR. This can be achieved by several apps, but the best is Live Home 3D, which allows you to create a virtual model of your interior, which can be viewed in VR. This is available on Windows 10, iPhone, iPad, and Mac devices.
Question: Is Minecraft on the Quest 2?
Answer: Yes, Minecraft is available on the Quest 2, despite the fact that it doesn’t appear on the Oculus Quest 2 games page. However, it’s worth noting that it’s the Java Edition instead of the Bedrock Edition. This means you can experience this in proper virtual reality.
Question: What is VR Roomscale?
Answer: VR Roomscale is when you match the functionality of a VR program to a specific physical space. This is done to achieve a more compelling VR experience with a touch more realism. With the help of this, the user’s movements in the real world are translated into the virtual world.
Final Thoughts
Even Virtual Reality devices like the Oculus Quest 2 can start getting old, like your mobile phone. The good news is that it has its unique customization features like your mobile phone.
I hope you discovered them in this article. Please do share this article with anyone who owns an Oculus Quest 2.