As businesses grow and evolve, the need to transfer data from one OneDrive tenant to another can arise.
In the case of OneDrive, moving files and folders between tenants requires careful planning and execution to ensure that all data is transferred securely and accurately.
In this article, I’ll show you how to use a few PowerShell command lines that will automatically move your OneDrive files cross-tenant.
So buckle up and get ready to simplify your OneDrive migration journey!
How to Migrate OneDrive from One Microsoft 365 Tenant to Another
To relocate OneDrive from one tenant to another, you must connect to both the source and target tenants, establish trust between them and verify the relationship. Pre-creating users and groups are necessary before moving on to preparing identity mapping. Then start the migration process.
Finally, you need to complete the post-migration tasks to ensure a successful migration.
Follow the instructions below to migrate OneDrive from one tenant to another:
1. Connect the Source & Target Tenants
To connect two tenants together, you need to be a Microsoft 365 Global admin or SharePoint Online admin. Also, make sure you have the latest SharePoint Online Management Shell installed on your device.
If you don’t have the shell, just follow the instructions I’ve provided below.
Here are the steps to connect the source and the target tenants:
- Open Microsoft Azure and log in to the source tenant account.
- Click Show portal menu and go to the Azure Active Directory tab.
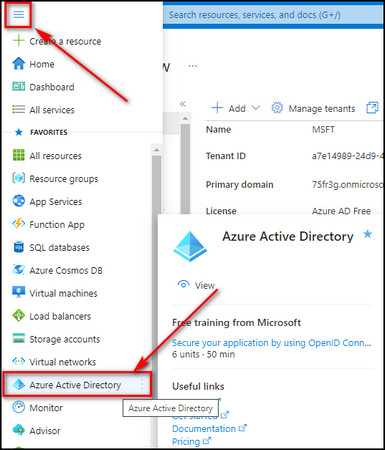
- Note down the source tenant name of the source account.
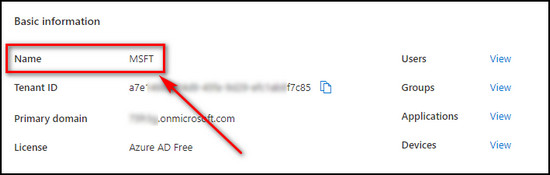
- Sign out & re-sign into the Azure portal with the target account and note down the target tenant name.
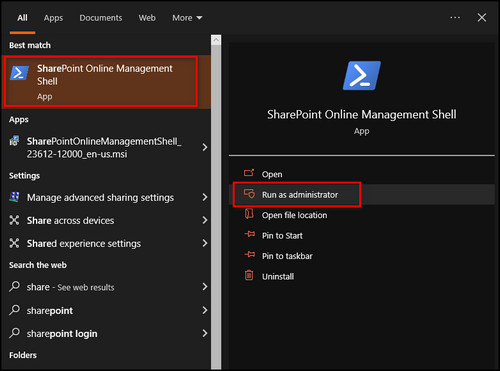
- Download and install the SharePoint Online Management Shell.
- Open the SharePoint Online Management Shell as an administrator.
- Sign in as a Microsoft 365 Global admin or SharePoint Online admin.
- Run the following command to connect to the source tenant:

- Log into the source tenant account using admin credentials.
- Execute the following command line to link with the target tenant:
- Log into the target tenant account using admin credentials.
2. Develop Trust between the Source & Target Tenants
Establishing trust between two Microsoft 365 tenants means running the Trust command on both accounts. But before you do that, you’ll need the cross-tenant host URLs of the source and target tenants.
Below I’ve provided the process for developing trust between source and target tenants:
- Run the following command for both source & target tenants in the SharePoint Online Management Shell and note down the cross-tenant host URLs.
Execute the command below while logged into the source tenant account to request trust from the source to the target tenant:
- Run the following command while logged into the target tenant account to request trust from the target to the source tenant:
Now, the administrators of the target tenant will get emails notifying another tenant is developing trust.
3. Verify the Trust between Tenants
Before continuing the migration process, you need to confirm the trust between the source and target tenants by running a simple command in the SharePoint Online Management Shell.
Here’s the method to verify the trust:
- Execute the following command while you are signed in and connected to the source tenant:
- Compile the script below while you are signed in and connected to the target tenant:
After running the above command lines, if you get the GoodToProceed output in the terminal, it means you’ve successfully established trust between the source tenant and the target tenant and are ready to move on to the next migration steps.
4. Add Users & Groups to the Target Tenant
As part of the migration, you have to create a mapping file to coordinate users from the source to the target tenant, preserving the Onedrive permissions.
You need to identify the users, groups, and OneDrive sites you want to migrate. Then add them to the target tenant from its Microsoft Admin center as guests.
Follow the steps below to add users & groups to the target tenant:
- Go to Microsoft 365 admin center and sign in with the organization admin credentials.
- Select Users > Guest users from the left menu and click Add a guest user.
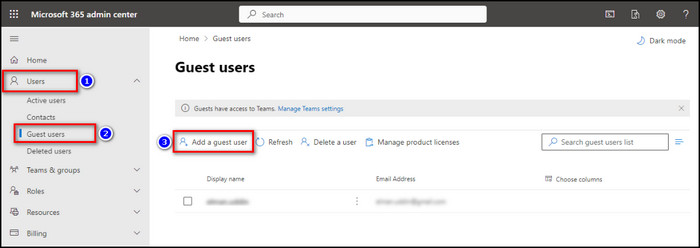
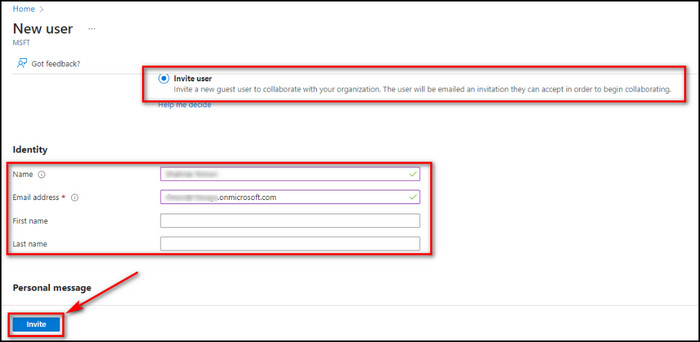
- Check Invite user, enter the user’s email address, first & last name, and click the Invite button.
- Go to the Active teams & groups tab and click Add a group to the target tenant.
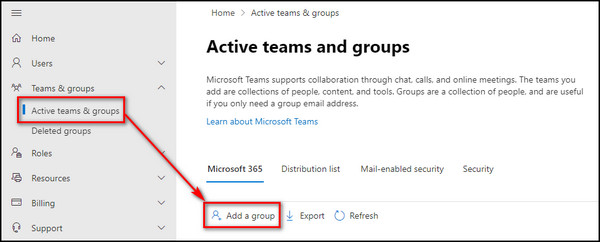
- Add the same owners and members to the group as the source tenant.
- Provide the Group email address for the group and choose its Privacy.
- Click the Create group button.
5. Create Identity Mapping
To create identity mapping, you need the Company ID and Group ID of the source and target tenants. Insert these values in a CSV (Comma Separated Value) file, and a target tenant administrator has to upload the file in SharePoint.
Below I’ve provided the methods for creating identity mapping:
Create the CSV File
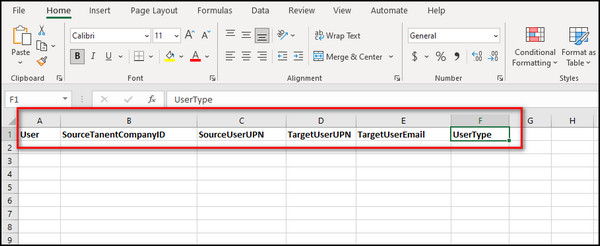
- Open Microsoft Excel.
- Create a file with six columns labeled User, SourceTanentCompanyID, SourceUserUPN, TargetUserUPN, TargetUserEmail, and UserType.
Now in the following steps, you’ll obtain the data for the Excel file.
Get the Company ID of the Source Tenant
- Open Microsoft Azure and sign in with the source tenant admin credentials.
- Click Show portal menu from the upper left corner and go to Azure Active Directory.
- Copy the Tenant ID value. That’s the Company ID you need.
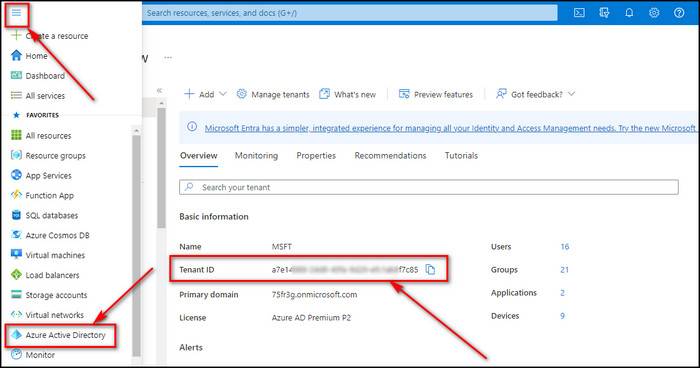
- Paste the value under the SourceTanentCompanyID column in your Excel file.
Obtain the User Principal Name
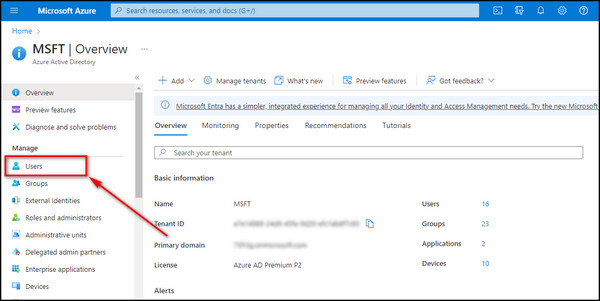
- Choose Azure Active Directory in the Azure portal.
- Proceed to the Users tab from the left sidebar.
- Copy the User Principal Name of the user you want to move to the target tenant.
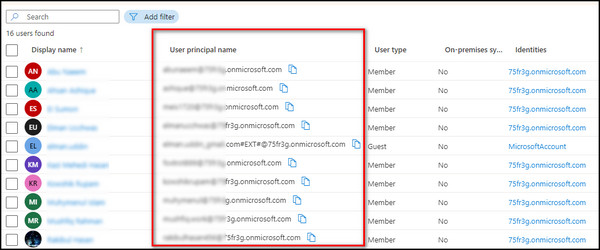
- Paste the value under the SourceUserUPN column.
Obtain the Group Object ID of the Source Tenant
- Go to Azure Active Directory from the Microsoft Azure portal.
- Select Groups from the left sidebar.
- Copy the Object ID of the group you want to move to the target tenant.
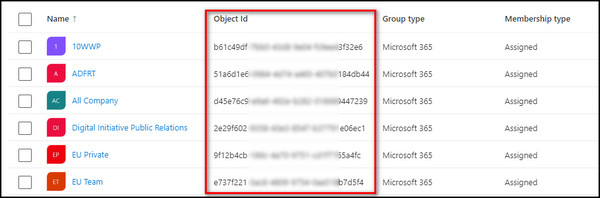
- Paste the value under the SourceGroupObjectID column.
Find the Target Group Object ID
- Sign out of the Microsoft Azure portal and re-sign in as the target tenant administrator.
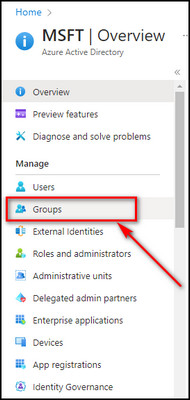
- Select Show portal menu from the top left corner and choose Azure Active Directory.
- Click Groups under Manage.
- Copy the Object ID of the target tenant group.
- Paste the data under the TargetGroupObjectID column.

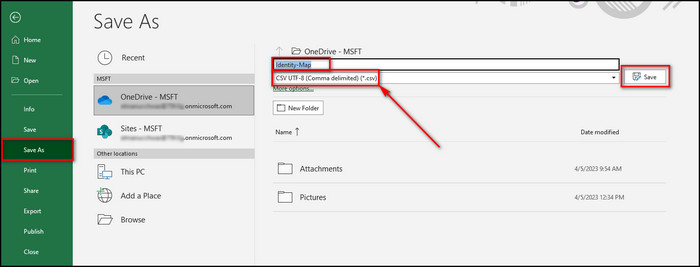
Once you have inserted all the values in the Excel file, rename the file as Identity-Map and save it as a CSV file
Upload the Identity Map
- Open the SharePoint Online Management Shell as an administrator and sign in as a SharePoint Online admin or Microsoft 365 Global admin.
- Run the following command to establish a link with the target tenant:
- Log into the target tenant account using admin credentials.
- Execute the command below to upload the identity map in SharePoint:
Check the Cross-Tenant Compatibility Status
Before commencing cross-tenant migrations, you should ensure that the SharePoint database schemas are consistent and up-to-date between the source and target tenant.
To verify the compatibility status, run the following command in the SharePoint Online Management Shell on your Source tenant:
If the tenant status is Compatible or even Warning, everything is fine. You can go ahead and carry out the migration process. But if the status shows up as Incompatible, you need to check & update the identity map and reupload it in SharePoint.
6. Begin the Cross-tenant OneDrive Migration
Finally, you can execute the command to start the cross-tenant migration process. You’ll need the User principal names of the owners of the OneDrive on the source and target tenants.
Here’s the process to begin the OneDrive migration from one tenant to another:
- Run the command given below in the SharePoint Online Management Shell to commence OneDrive migration:
- Execute the following command to get the migration status:
The cross-tenant migration process is complete when the migration status says, Success.
7. Remove the Trust Relationship
After successfully relocating OneDrive from the source tenant to the target tenant, you should disable the Trust relationship between them.
Follow the instructions below to remove the Trust relationship between tenants:
- Open the SharePoint Online Management Shell as an admin and run the following command to connect to the source tenant account:
- Sign in to the source tenant account as an administrator.
- Execute the command below to eliminate the trust association between the source and target tenants:
- Run the command below to connect to the target tenant and sign in as an admin:
- Execute the following command line to eliminate the trust relationship between the source and target tenants:
Once the transfer from the source platform to the target is finished, a redirect hyperlink is added to the source platform. In case users try to sign in to their source account or website, the hyperlink will automatically steer them toward their new target website.
FAQs
What is cross-tenant migration?
Cross-tenant migration moves all the users, groups, and documents from one tenant to another. Tenant administrators can utilize familiar interfaces such as Exchange Online PowerShell and MRS to transition users to their new organization via cross-tenant mailbox migration.
What is a OneDrive tenant?
The Microsoft 365 OneDrive tenant ID is a unique identifier for your organization. This identifier is a globally distinctive 128-bit number that enables individual identification of your organization.
How do I transfer from one 365 tenant to another?
To transfer from one 365 tenant to another, you must establish connections and trust between the source and target tenants and confirm the relationship. Pre-creating users and groups are also necessary before proceeding to prepare identity mapping. Then the migration process can begin.
Final Thoughts
With the right approach and expertise, OneDrive cross-tenant migration can be a simplified process allowing organizations to transfer data efficiently and effectively while minimizing potential disruptions to business operations.
By following the steps in this article, organizations can smoothly migrate their data from one OneDrive tenant to another, ensuring business continuity and seamless collaboration across teams.
Remember to communicate clearly with your users, test the migration thoroughly, and seek professional assistance if needed.