Aptio Setup Utility is the first thing that springs to mind whenever we upgrade the BIOS or install a new operating system. The majority of us have had issues with the Aptio installation tool.
Are you wondering what Aptio Setup Utility is, where to find it and how to use it on your PC, or even how to restore regular operation when issues arise with the Aptio Setup Utility?
Then, you have come to the right place. Everything you need to know about Aptio, including answers to any questions you might have, is detailed below. If you want to know more, you’d better buckle up!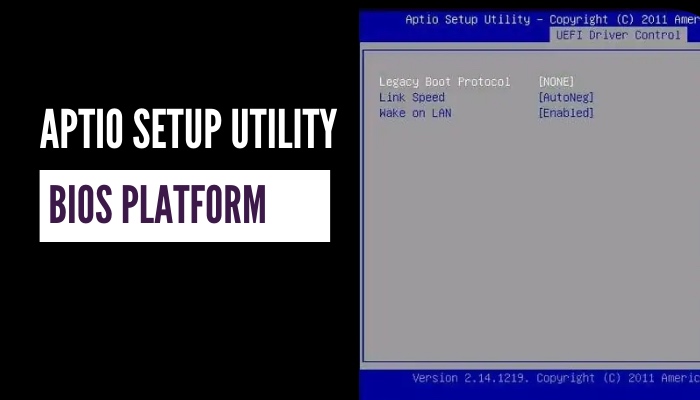
What is Aptio Setup Utility?
Aptio Setup Utility is a renowned firmware platform for embedded systems developed by American Megatrends. It is built on EFI (Extensible Firmware Interface), UEFI (Unified Extensible Firmware Interface), and the Intel Platform Innovation Framework for EFI requirements, making it an excellent choice as a firmware platform.
Aptio’s core comprises eModules, which are modular building blocks that allow for a wide range of configuration options and additional features on modern tablets and embedded systems.
Aptio provides a variety of solutions, such as the FastBoot eModule, touch-enabled BIOS configuration, and readily modifiable Graphical Pre-Boot Interfaces for UEFI, to address the specific needs of tablets and embedded devices.
Developers may switch from Legacy BIOS to UEFI with minimal disruption by using the Visual eBIOS (VeB) integrated development environment, which is compatible with AMIBIOS8 and Aptio.
In addition to all the prior know-how, value-adds, and advancements of previous versions, Aptio now supports the latest UEFI specifications, such as Secure Boot for improved platform security and EDK II support.
The process of accessing the Aptio Setup Utility screen is similar to the process of accessing the BIOS of your device.
Follow these steps listed below to access the Aptio Setup Utility:
- Restart your computer.[aptio options img]
- Keep pressing the F2 / F9 / F12 / Del key continuously.
Your computer will boot into the Aptio Setup Utility screen automatically.
What are the options on the Aptio Setup Utility screen?
The options on the Aptio Setup Utility screen might differ in the boot menu, as it is a highly customizable firmware platform.
For example, some Aptio Setup Utility might contain the IO and Chipset section in the boot menu, and some might not.
Here are the most common options that can be found on the Aptio Setup Utility screen:
1. Main
Your computer’s system information, product information, CPU information, and other hardware details can all be loaded using the Aptio Setup Utility’s Main option.
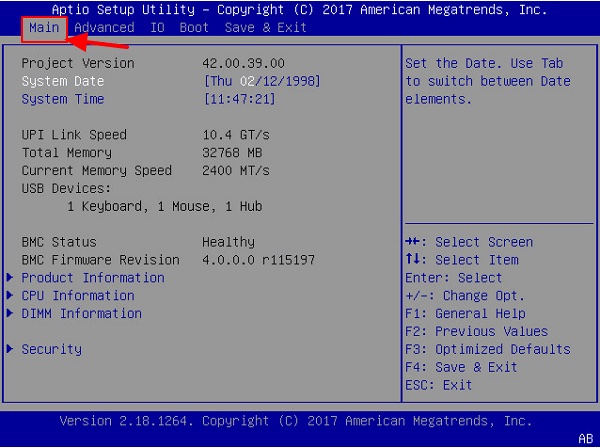
The Main option screen will be the default boot screen of your device when you access the Aptio Setup Utility.
To navigate to the different sections of the Main screen, use your keyboard’s arrow keys, and hit Enter to access them.
2. Advanced
You may access the Advanced menu by using the right arrow key twice on your keyboard after it has booted into the Aptio Setup Utility screen. The main window that loads hardware settings on your computer can be found in the Advanced menu of the Aptio Setup Utility.
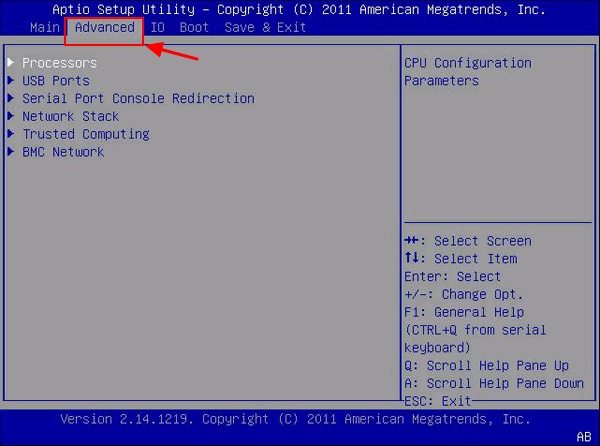
These settings include the Processors, USB Ports, Serial Port Console Redirection, and Network Stack, amongst others.
3. IO
Older versions of the Aptio Setup Utility platform do not provide this option on the boot screen. To access the IO menu, hit the Right arrow key 3 times on your keyboard after entering into the Aptio Setup Utility screen.
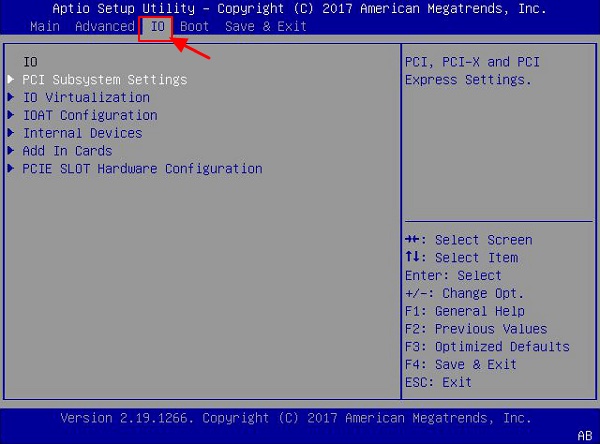
PCI Subsystem Settings, IO Virtualization, IOAT Configuration, Internal Devices, Add-In Cards, and PCIe Slot Hardware Configuration are some of the input and output features included in this section.
4. Boot
Within the Aptio Setup Utility, this is the menu that is visited most often when selecting the computer’s boot sequence or switching the BIOS boot mode.
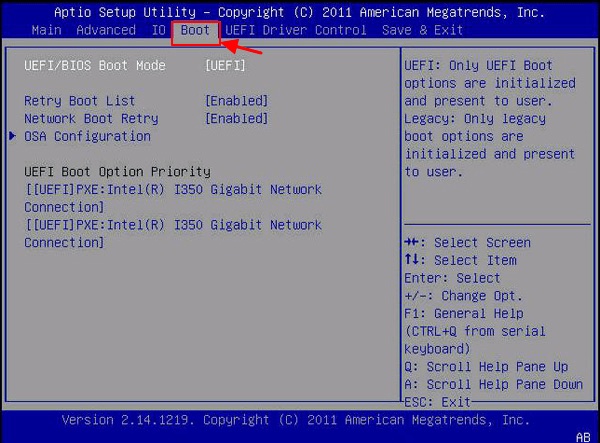
The UEFI/BIOS Boot Mode, Retry Boot List, Network Boot Retry, OSA Configuration, Boot Priority, and other options will be found in the Boot menu.
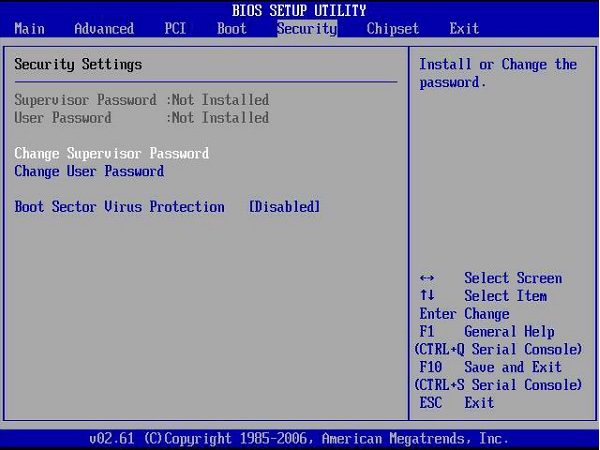
5. Security
The Aptio Setup Utility has a menu titled Security that includes a variety of options that pertain to the protection of the computer, such as Supervisor Password, User Password, Boot Sector Virus Protection, and so on.
6. Save & Exit
When you have finished configuring the changes on the computer using the Aptio Setup Utility and want to save the changes, you may do so by entering the Save & Exit option. This will store and enact all of the changes.
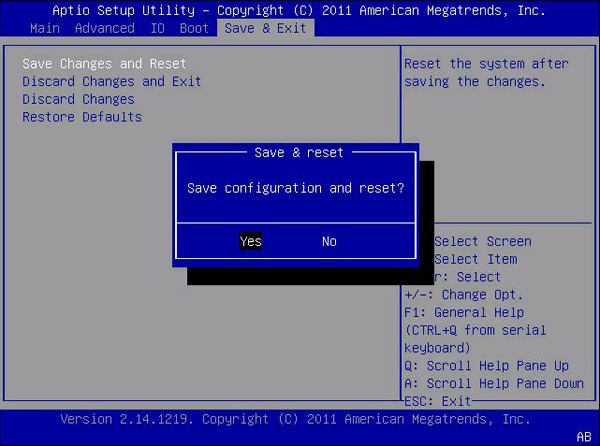
You will find the options to Save Changes and Reset, Discard Changes and Exit, Discard Changes, and Restore Default Settings on this menu.
How to utilize the Aptio Setup Utility to make changes to your PC?
The Aptio Setup Utility can be used to perform a range of changes in your computer’s firmware. Let’s dive into some frequently used configurations in the Aptio Setup Utility screen.
Here are the typical settings changes that you can perform on the Aptio Setup Utility BIOS:
1. Change BIOS boot mode and Boot Order
There is a possibility that the Boot mode is the issue if your computer cannot boot up correctly on an MBR or GPT drive. This problem can be resolved by configuring the system to boot using UEFI or Legacy BIOS.
Remember to choose MBR for Legacy BIOS and GPT for UEFI.
In the Aptio Setup Utility, changing the Boot Mode can be done as follows:
- Restart the computer > Hit F2/F9/F12 or Del continuously while it is starting.
- Ensure that the machine has entered the Aptio Boot Menu before continuing.
- Go to the Boot menu by using the right arrow of your keyboard.
- Select the UEFI/BIOS Boot Mode option with the down arrow key > Hit Enter.
- Select the intended Boot mode, e.g., Legacy or UEFI > Press Enter to continue.
Here is how to change the boot order from the Aptio Setup Utility:
- Use the down arrow key to select Boot Configuration > Click Enter.

- Select Boot Option Priorities to change the disk used to start the computer > Choose the disk you want to use as your boot drive from the pop-up menu.
- Ensure that the modifications are saved before leaving the Aptio Setup Utility > Restart your computer.
You can change BIOS boot mode and Boot priority from the Aptio Setup Utility.
2. Configure your computer to boot from USB on Aptio Setup Utility
Most of the time, we use bootable USB flash drives to update the BIOS or operating system. In that case, your computer must be set to boot from the USB device.
Here is how to configure your computer to boot from USB on Aptio Setup Utility:
- Plug a USB bootable Drive or a USB recovery drive into the subjected computer.
- Restart the computer > Hit F2/F9/F12 or Del continuously while it is starting.
- Wait for the computer to load the Aptio Boot Menu before continuing.
- Turn off the Secure Boot Control feature > Turn on the Load Legacy OPROM option.
- Make sure that Legacy Boot Mode is selected.
- Make sure a USB device is selected as the first Boot Device.
Your PC would boot from the USB device after you have performed all the instructions given in the ordered list above.
3. Reset Aptio Setup Utility settings to the factory default
If your computer is facing the Aptio Setup Utility boot loop or if it directly boots into the Aptio Setup Utility screen while turning on, you might need to reset the Aptio Setup Utility settings to factory default.
Here are the steps that you should follow to reset Aptio Setup Utility settings from your PC:
- Restart the computer > Hit F2 / F9 / F12 or Del continuously while it is starting.
- Ensure that the machine has entered the Aptio Boot Menu before continuing.
- Navigate to the Security menu > Expand I/O Interface Security.
- Go to the Secure Boot Control option > Turn off the Secure Boot option.
- Make a backup and close Aptio > Restart the computer.
After restarting, your computer’s Aptio Setup Utility would be reset to its factory default settings.
What should I do if my PC is stuck in Aptio Setup Utility?
There have been several issues that can cause your PC to boot into the Aptio Setup Utility.
Follow these steps to get out of the Aptio Setup Utility screen:
- Pick the Boot menu > Click on Launch CSM > Adjust the setting to activate it.
- Go to the Security menu > Select Secure Boot Control > Modify the setting to Disable.
- Choose Save & Exit > Hit the Yes button.
- Make sure the device turns off entirely while holding down the power button.
- Turn the device back on > Continue to hold down the F9 button.
- After approximately ten seconds, you should be able to use this method to boot into the Windows Recovery menu.
- Choose the Advanced Start Up option > Wait for the Recovery menu to display.
- Choose the Advanced Options option.
- Navigate to the System Restore menu > Select a date created before the issue was encountered.
This is how you can resolve the issue of your computer booting into the Aptio Setup Utility screen.
Conclusion
Aptio is well recognized as a leading embedded systems firmware platform based on the EFI standard and now conforms to the UEFI 2.0 specification.
Aptio Setup Utility has increased platform security by supporting features like Secure Boot, EDK I, and EDK II. It allows you to modify the BIOS’s boot mode and priority. You can also switch from Legacy BIOS to UEFI without any hassle using the Aptio Setup Utility.