When you are creating a to-do list, planning out a project, or simply want to add interactivity to your document, creating a checklist is the best feature available in Google Docs. It allows you to organize your work, tasks, and collaborative projects with ease.
In this article, I’ll provide different methods to add checkboxes in Google Docs on Windows, Mac, and mobile devices.
Let’s begin!
What is Google Docs Checkbox & When Should You Use One?
A Checkbox in Google Docs is a digital representation of a checklist or tick box. It is typically used for creating to-do lists, task tracking, or survey forms in a document. It allows users to create a list of items or tasks and mark them as completed or not by a clickable checklist.
A fillable checkbox enhances document interactivity and organization. So, you can easily manage tasks and collaborate with others in real time by tracking the status of various items on a checklist.
The checkbox functionality is a simple yet effective way to simplify tasks and increase efficiency within Google Docs.
When using checkboxes in Google Docs, follow its best practices to enhance document organization and collaboration.
Use checkboxes for task lists, agenda items, or any action-oriented content with clear & short labels. Also, maintain a consistent formatting style throughout the document for visual clarity.
To track progress effectively, regularly update checkboxes to indicate completed tasks. It’ll simplify communication and boost productivity when collaborating on documents in Google Docs.
How to Add a Checkbox in Google Docs
To make a checkbox in Google Docs, simply click on the Checklist option on the toolbar. You’ll also find the Checklist menu in the Format section. Additionally, you can press Ctrl + Shift + 9 on Windows or CMD + Shift + 9 on macOS to add a checkbox in Google Docs through a shortcut.
Below, I’ve provided different ways to insert a checklist in your document using Google Docs.
Here are the methods to add a checkbox in Google Docs:
1. Use the Checkbox Menu in the Toolbar
Google Docs has conveniently added the Checklist feature right on the toolbar. So you can quickly access it and create editable checkboxes in Google Docs with just a single click.
Here’s how to use the Checkbox menu in the toolbar:
- Open Google Docs on your computer and access the document to which you want to insert a checkbox.
- Write down the items in your checklist and select them.
- Click on the Checklist icon from the toolbar. If you don’t see the icon, just select the three dots (More) on the top bar, and the Checklist button will appear along with additional options.
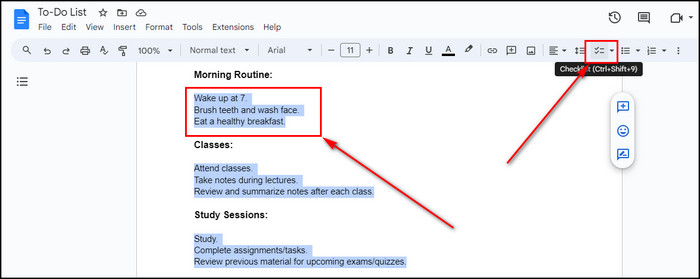
Now, Google Docs will insert a checkbox to the lines you’ve selected.
2. Utilize the Format Tab
The Checklist menu falls under the bullet points category. That’s why Google Docs also included the option in the Bullets & numbering section.
To utilize the Format tab to make a checklist:
- Input the items of your checklist in a Google Docs document.
- Highlight the items.
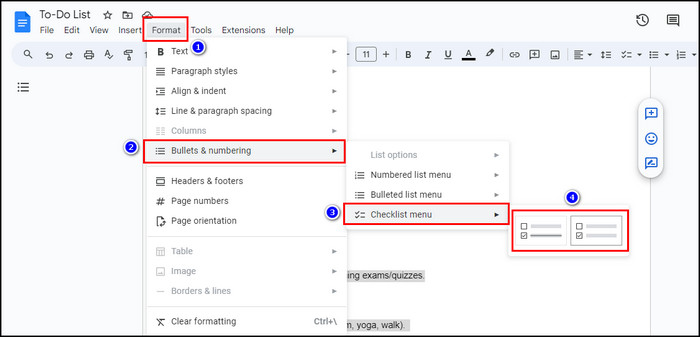
- Click on the Format option from the top menu.
- Select Bullets & numbering > Checklist menu. Then choose the checkbox type – with or without strikethrough.
3. Use Keyboard Shortcut
If you use interactive checklists often, utilize the keyboard shortcut for adding checkboxes in Google Docs, as it is the fastest way to make a checklist in your document.
Here’s how to use the keyboard shortcut to create a checkbox:
- Open your Google Docs document.
- Place the cursor where you insert the checkbox.
- Press the keyboard shortcut Ctrl + Shift + 9 on Windows or CMD + Shift + 9 on Mac to add the checkbox.
This shortcut will instantly insert a checkbox at the cursor’s position on your document.
How to Insert a Checklist in Google Docs on iPhone & Android
Inserting a checkbox in Google Docs on Android and iOS devices is as simple as opening a document and selecting the Checklist option from the bottom menu. This feature enhances document functionality and usability, especially when collaborating or managing tasks on the go.
Here are the steps to insert a checklist in Google Docs on iPhone & Android:
- Launch the Google Docs app on your iOS or Android device.
- Open the document in which you want to create fillable checkboxes.
- Tap on the Bulleted list option on the right side. It’ll insert a bullet point on your doc. But you’ll see additional options.
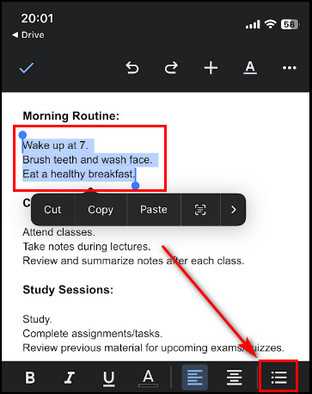
- Select the Checklist option beside the Bulleted list button, and the bullet point in your document will turn into a checkbox.
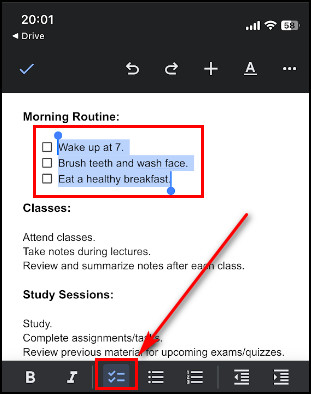
- Enter the items in your list and complete the checkbox.
Now, you’ll have a checklist in your document for creating interactive to-do lists, task trackers, or surveys.
How to Remove a Checkbox in Google Docs
To delete checkboxes from a document in Google Docs, just select the content on your list and click the Checklist button. It is useful when you have completed all the tasks and you no longer need the checkbox or want to reformat your document to maintain a cleaner look.
For more details on how to remove a checkbox in Google Docs, check out the steps below:
On Desktop
- Open Google Docs and access the document with checkboxes.
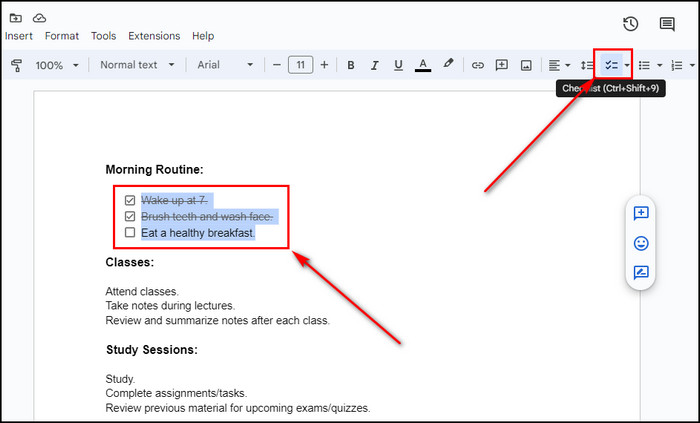
- Highlight the items in the checklist.
- Select the Checklist button from the toolbar on the top, and the checkboxes will disappear.
On iPhone and Android
- Launch the Docs app on your mobile.
- View the document from which you want to erase checkboxes.
- Tap on the Pen icon in the bottom right corner to edit the document.
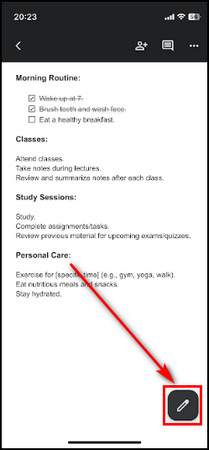
- Select the content in your checklist.
- Tap on the Checklist option from the bottom menu, and the checkboxes will be removed.
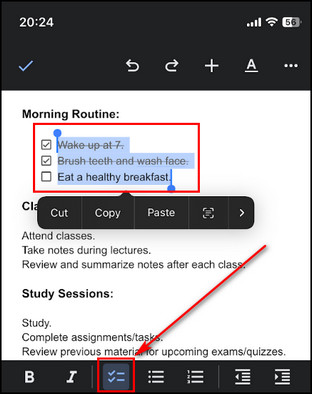
If you have a checklist in your document where you’ve struck through the items, once you remove the checkboxes from the list, the strike-through lines will also be removed.
Important Factors to Remember When Creating a Checkbox in Google Docs
When making a new checklist in Google Docs, be sure to follow a few guidelines for better managing your document. For example, use checkboxes for task lists and agendas, provide a clear & concise label for each task, and once a task is completed, make sure it is checked.
Below, I’ve compiled the important factors to remember when creating a checkbox in Google Docs:
Provide a Clear Label
Your first priority should be assigning a clear & unique label for each option when adding checkboxes in Google Docs. So people can easily figure out the purpose of each checkbox. Don’t put any technical terms, uncommon abbreviations, and conventional labels.
Provide Clear Instructions
Include clear and concise instructions within your document if checkboxes require additional context. Put this instruction either adjacent to the checkboxes or in a designated section. These instructions should guide users on the purpose and usage of the checkboxes.
Group up Relevant Checkboxes
To simplify the user experience and readability, you should group checkboxes that are related. It organizes your task list in such a way that helps users quickly review and choose their options.
Use Checkboxes for Binary Choices
Checkboxes are not suitable for complex decisions or multi-select options. But they are excellent for straightforward binary choices. To prevent user confusion, reserve checkboxes for situations where users need to make simple, clear-cut selections, such as yes or no, agree or disagree.
FAQs
How to add a checkbox to Google Sheets?
To add a checkbox to Google Sheets, select the cells where you want to insert checkboxes. Select Insert from the top menu and choose Checkbox. You can toggle on & off the checkboxes by clicking on them.
How to insert a checkbox in Google Docs without a strikethrough?
To add a checkbox in Google Docs without a strikethrough, click on the Format option, select Bullets & numbering > Checklist menu, and choose the 2nd checklist option, which doesn’t have any dark lines.
How do you insert a fillable checkbox in Google Slides?
To insert checkboxes into Google Slides, highlight the desired text, click on the arrow located next to the Bulleted List icon, and choose the checkbox option from the dropdown menu.
Final Thoughts
Creating checkboxes in Google Docs is such an easy way to organize your work in a document. By now, you’ll be able to incorporate checkboxes to create to-do lists, surveys, and more, making your documents more interactive and functional.
Comment below if you have further questions, and we’ll get back to you.