Getting the best performance out of your computer depends on many factors.
Airflow inside the PC case significantly affects a computer’s performance.

That’s why we need to think about it in detail and lay out the perfect plan before building a PC.
This post will serve as a one-stop guide on optimizing the PC airflow and getting the best performance out of your PC.
So keep reading the post till the end.
Why Do You Need To Optimize PC Airflow?
PC components generate a lot of heat when they run. That’s why you see a big CPU cooler mounted on top of the CPU.
Without the CPU cooler working correctly, your CPU will shut itself off moments after it turns on.
Other PC components like the GPU, SSD, HDD, PSU, and RAM all generate heat to varying extents.
GPU and PSU have built-in fans to remove the heat away from them. RAM and some SSDs have built-in heatsinks for passive cooling. HDD depends on passive cooling too.
Now, all these components are inside the PC case. As the components remove heat from them, it all accumulates inside the PC case, which needs to be removed. That’s why airflow optimization inside the PC case is needed.
Without a proper airflow plan, the heat won’t be removed from the case efficiently. You’d get less performance from the PC than you’ve paid for.
PC airflow optimization is all about buying the right case fans and mounting them inside the case so that you get the most efficient cooling.
You also need to consider the PC case’s environment and how the CPU cooler, radiators, GPU fans, and PSU fans interact with the case fans.
Since components like RAM, SSD, and HDD depend on passive cooling, you should also consider them during optimization.
How Do I Optimize My PC Airflow?
To understand PC airflow optimization, you need to understand some basic facts.
Let’s understand the basics and highlight the critical factors to make the best decision for your build.
Follow the steps below to optimize PC airflow:
1. Learn about the PC case
Assuming you already have a PC case at your disposal, you need to plan the PC airflow depending on the PC case design and its fan support.
Cases with less obstruction and front mesh are ideal for airflow, but not all cases have the perfect design to take advantage of it.
Refer to your PC case manual to learn about the number of fans it can mount and its positions. Typically, a mid-tower case can mount three 120mm fans at the front, two 120mm fans at the top, and one 120mm fan at the back. 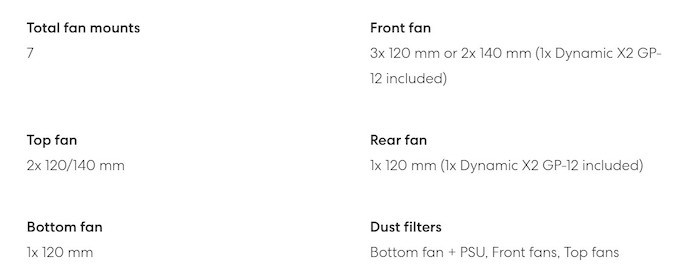
If you increase the fan size (for example, 140mm), you can mount fewer fans (for example, two 140mm fans at the front). Also, consider if the components will obstruct the fans in any way.
2. Consider your PC performance
The number of fans and their configuration will depend on the components.
If you have a gaming PC with powerful components, it’d need more cooling, thus more fans.
There is no need to fill up all available slots if you have a mid-tier PC for general usage.
More fans typically result in more noise, so think about balancing the number of fans with your PC.
3. Decide on the fan size
Most modern PC cases support 120mm and 140mm fans.
Bigger fans will move more air than smaller ones at the same RPM (revolutions per minute). Higher RPM generates more noise.
So consider buying bigger fans (for example, 140mm, if your case supports them) and run them at lower RPM to reduce noise output. There are many ways to control the fan speed, so it’s not an issue.
4. Think about the aesthetics
Most brands offer multiple color choices. Regarding RGB, you can get fans with single-color RGB, multi-color RGB, or ARGB (addressable RGB, you can configure each LED to a different color).
It’ll make the PC look cool but is also more expensive than regular fans.
5. Choose between airflow vs. static pressure
Types of fins will also play a role. Some fins are designed for airflow pressure; the others are for static pressure.
Airflow pressure fans will focus on moving air faster and is suitable for unrestricted areas. Static pressure fans create a pressure difference for moving air and are ideal for restricted areas.
Airflow pressure fans generate less noise and are usually better than static pressure fans.
6. Buy the case fans
Now you have all the facts to make the perfect buying decision for case fans. Search on the market and get the best deal in your budget.
For heads up, here are some suggestions:
- Noctua fans are the best performing with high airflow but pricier.
- be quiet! fans are some of the quietest options available.
- Corsair and NZXT make some of the prettiest RGB (and ARGB) fans.
- Cooler Master, Thermaltake, and Scythe fans are reasonable options and strike a decent balance between price, airflow, and aesthetics.
Learn about the PWM speed, RGB compatibility, noise output, airflow amount of the fans before making the purchase.
7. Plan the airflow of the fans
Now that you have the case fans at your disposal, it’s time to decide how to mount them.
You need to think about the obstructions inside the case, the airflow needs of different components, surroundings of your PC case to make the best plan.
Let’s go through them one after another.
8. Consider the surroundings of the PC case
The PC case surroundings play a crucial role in airflow. Cool air needs to come inside the PC from outside, so the availability of cool air is a big question.
If you place the PC in a hot room, optimizing the airflow won’t do much as there’s less cool air available. Try to put the PC in a cooler surrounding.
Similarly, airflow will take a significant hit if you put the case somewhere with limited space or obstruction.
For example, putting the case very close to the wall, over a carpet, inside any enclosure, or inside the space allocated for a PC case in a “computer table” will lead to less airflow. 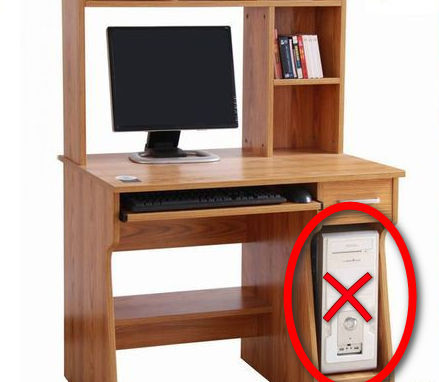
9. Learn about the fan airflow direction
The front side of the fan sucks air in, and the rear side (the one with the grills) will throw the air out.
So if you mount the front side of the fan facing outside, it’s an intake fan. If you mount the back side of the fan facing outside, it’s an exhaust fan.
You have to plan the airflow such that cool air goes inside the case through intake fans, and hot air from the components goes outside the case through exhaust fans (the same fan can be made exhaust or intake depending on mounting orientation, more on that below).
10. Assess the air pressure (positive vs. negative)
Depending on how you mount the fans inside the case, there will be one of the two possible air pressures: positive or negative.
Positive air pressure means air intake is greater than air exhaust, and negative air pressure means air intake is less than air exhaust.
Negative air pressure results in better cooling, but the downside is dust accumulation. As air exhaust is higher, air will pour in through all nooks and crannies of the case – seams of the case, rear extension slot vents, and any gap air finds.
It’ll result in dust gathering at these places, harming airflow. In positive airflow, air pours in only through the intake fans, which have dust covers. So there’s less dust accumulation.
Try to balance between negative and positive air pressure and skew the balance towards positive air pressure if you want less dust.
11. Decide on the intake and exhaust fan positions
The front of the case has the biggest space for airflow. So intake fans are usually mounted at the front. Hot air rises upward; hence the bottom of the case is also used as intake (if it were used as exhaust, the hot air would try to re-enter the PC).
The top and rear are typically used as exhaust.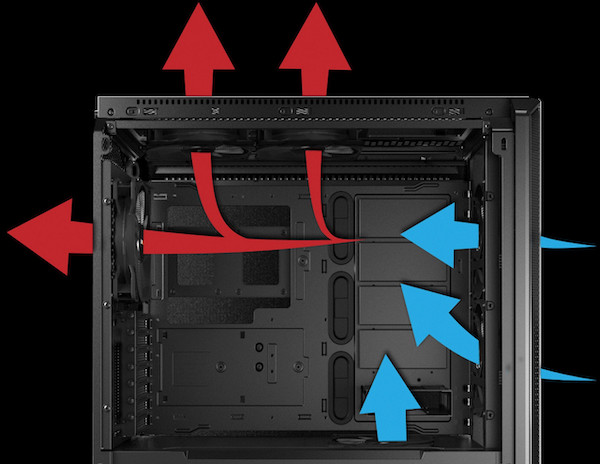
You might be tempted to use the top as an intake, but that puts the rear under significant pressure since it’s the only part for exhaust (and the rear has limited space for airflow).
Think about the components too. The rear exhaust fan is helpful in quickly removing the heat output of the CPU cooler.
The top exhaust fans and the top-front intake fan cool down the RAM, SSD, and such, which depend on passive cooling. The middle-front intake fan pushes out the heat output from the GPU through the rear extension slots.
If any component outputs more heat and needs special attention, make appropriate changes in the plan.
In a gaming PC, you typically mount three intake fans at the front, extra intake fans at the bottom, two exhaust fans at the top, and one exhaust fan at the rear.
But if you have a mid-tier setup, mounting two intake fans at the front and one exhaust fan each at the top and rear would suffice.
One intake and one exhaust are sufficient for a low-end PC without a dedicated GPU.
Remember, these are heavy generalizations, and your exact fan setup will vary depending on your components.
12. Plan for water cooling
If you have an AIO (all-in-one) cooler for the CPU, mount the radiator at the top if possible, and put the fans as exhaust. It will result in the hot air of the radiator moving out (and also taking out some hot air inside the case).
If you have a 360mm AIO and can only mount it at the front, you only have the option to put the fans as intake. It’ll blow hot air into the GPU, so not an ideal choice. The radiator mounted at the front would also cause some obstruction.
Personally, I’d try to avoid buying a 360mm AIO unless I possess a spacious PC case with a side-mounted AIO facility.
13. Clear out obstructions inside the case
Airflow will also depend on the obstructions inside the case. If too many cables and components get into the airflow path, it won’t be efficient.
Airflow between the intake and exhaust lines should be as less obstructed as possible. In our typical setup, air comes through the front and bottom and goes out through the rear and top. So ensure the airflow lines are decluttered.
Follow the default mounting mechanism of components inside the PC case as manufacturers thought out the airflow and designed the mounting orientations as such.
Remove unused drive bays and peripherals inside the case to make airflow much more efficient.
14. Declutter the cables
There are several cable management videos and guides online; you can take help from them to declutter the cables. Most cables come from the PSU as it powers all the components.
PSU shroud keeps the cables aside. But if your case doesn’t have a shroud, take great care of it. Cables coming off the dedicated GPU, motherboard ATX connector should be tucked nicely with cable ties.
You should put all cables connected to the motherboard behind it; most modern PC cases have the space.
15. Adjust the fan speed
Now it’s time to adjust the fan speed. Most BIOS have automatic fan speed control based on the temperature readings. It would modify the fan speed based on the warmth inside the case. You need to connect the fans to the fan header on the motherboard to achieve it. 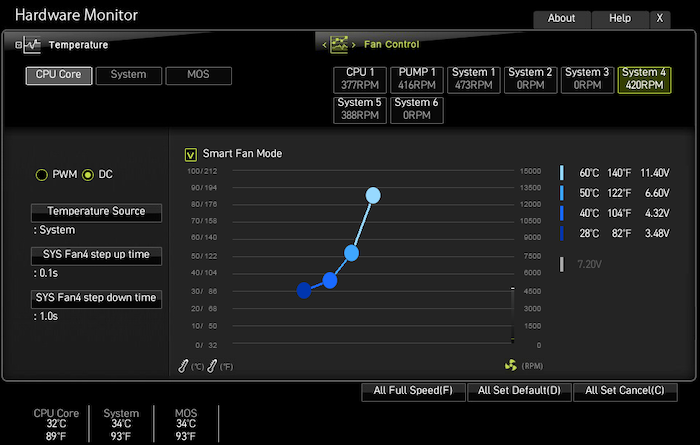
If you have an old BIOS that doesn’t support such features, you can either rely on third-party tools installed on your OS or get a PWM fan controller.
Third-party tools such as SpeedFan can control the fan speed by reading the temperatures from the sensors. You can define a fan curve that tells the speed the fan should run at a specific temperature.
PWM fan controllers are external devices that can be mounted inside the case. You’d connect all the fans to the PWM fan controller, and it’d control the speed based on the temperature readings.
16. Think about dust
Even if you have configured the fans for a positive airflow that accumulates less dust, it would still gather some dust over the months.
Ensure all fan vents have a dust filter installed. Dust filters are usually magnetic and removable from the outside without tools. So you can clean them often.
Every 4-5 months, open the PC side panel and blow air inside the PC to remove dust. You must frequently clean the dust if you live in a relatively dusty environment.
Dust restricts airflow and makes the PC look dirty too. If the fans have dust that won’t go away through blowing air, take them off and clean them thoroughly.
FAQ
Question: Does airflow increase FPS?
Answer: Better airflow will remove heat quickly, increasing the efficiency of the components. It will lead to an increase in performance, resulting in slightly better FPS.
Final Thoughts
PC airflow needs to be optimized to get the most out of your PC. Without a well-thought-out airflow plan, your PC components would suffocate inside the case, resulting in bad performance.
You need to consider factors such as fan size, case compatibility, components, and PC performance while buying fans.
After that, keeping the basics of airflow in mind, you’d come up with the most optimized airflow. Consider where to put intake and exhaust fans and whether you should go for positive or negative pressure.
Lastly, remove the physical obstructions to airflow and regularly clean dust.
What is the final plan for your PC airflow? In my mid-performance PC, I went for positive air pressure. I’ve put two 120mm fans at the front as intake, one 120mm fan at the rear-top position as exhaust, and the rear 120mm fan behind the CPU cooler as exhaust. It keeps my PC at a reasonable temperature without creating much fan noise.