The anticipation of an upgraded Java version becomes confusing as a pesky roadblock named Error 1603 halts your progress. The situation is widespread among Java users.
However, don’t let this unwanted error overshadow the benefits of a smoother, more secure Java environment. As this is a standard error, I arranged this article to discuss the causes and show you the effective methods to fix Error 1603 when updating Java.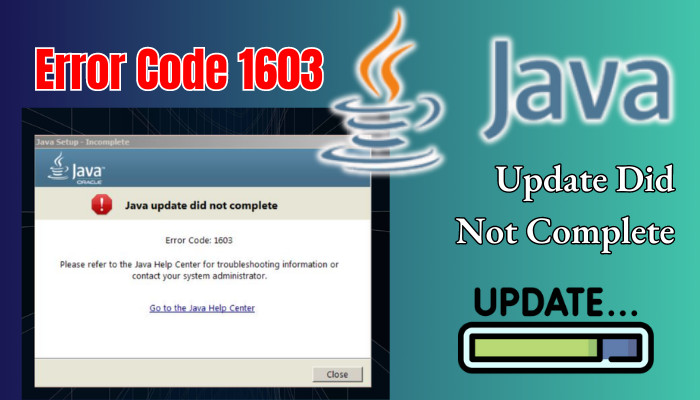
Therefore, let’s begin and solve this error 1603.
What is Java Error Code 1603?
The error code 1603 means the Java update was not complete. Error 1603 pops up when you perform the installation. This error code is frequently associated with software installations, such as operating system updates, application installations, or driver updates.
Error 1603, also known as a fatal error during installation, occurs when an update or installation process encounters an unexpected problem and fails to complete successfully.
Why does Java Show the Update Error 1603?
The update error 1603 occurs when a necessary file is missing from the installation. Additionally, the error code may also appear if Java is installed, the required permissions are not granted, or if Java runs in the background when the update is attempted.
Moreover, the previous remnants of Java can cause this error code 1603 when you try to update Java in the newer version.
Here are some frequent reasons for Error 1603 while updating Java:
- Necessary Installation File is Missing: When you try to update Java, but a file is missing on the installer, the update will hold for an infinite time or show you the error code 1603.
- Java Already Installed: You have Java installed on your Windows PC and try to update to a newer version. However, it’s one of the ordinary issues to raise the error 1603 when the same version is already installed on your system.
- Java is Already Running: Your browser and other applications require Java to function correctly. When Java runs in the background, and you try to update it, this error may occur, displaying the code 1603.
- The Clash of Background and Third-Party Software: Your antivirus or firewall software can occasionally clash with the Java update process and cause the error 1603.
- Abrupt Downloads and Derailed Updates: Interrupted downloads, like sudden shutdown, accidental pause, or other glitches, can cause your Java update to halt and remain incomplete.
Java is a core element for developers and is used in many popular games such as Minecraft. If Java is not installed or up to date, these games may not work correctly and display errors.
You understand why you get this error code 1603 when trying to update Java. Now, let’s start fixing this issue.
How to Fix Java Update Error 1603
The most effective way to resolve error 1603 while updating Java is to download the offline installer from the official website and then update offline. In addition, before you begin the update, turn off your antivirus or Windows Firewall and close other resource-intensive applications.
Java update or installation failure with error code 1603 is an unexpected obstacle to progress. As I have previously mentioned, it is a common and frequent glitch in Java, and the fix is also quite simple.
Here are the methods to fix update error 1603 in Java:
1. Restart Your PC
Java update error is ordinary in Windows 10 or 11. Even if you use an older version of Windows, like Windows 7 or 8, and use Java, you may face this error.
Most of the time, a simple restart solves many buggy situations and removes temporary glitches. Therefore, give your PC a proper reboot first.
Pursue these steps to restart your PC:
- Click on the Start menu icon and select Power.
- Pick Restart.
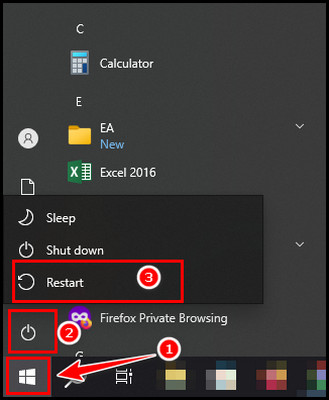
Your system will restart automatically. After the restart, try to update your Java and look for the issue.
2. End Conflicting Processes from Task Manager
Before you start updating, first end the memory-hungry processes and apps. It will free up the memory and help you to update Java without encountering the error code 1603.
Follow the below methods to turn off conflicting processes and apps:
- Press Alt + Ctrl + Delete together and choose Task Manager.
- Click on the Memory tab once. (which will show the most consumed processes on the top)
- Right-click on each app or process and choose End Task.
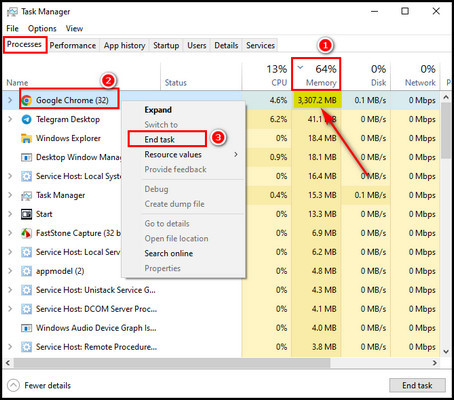
One by one, delete all the major apps. While you end the apps from the taskbar, you must also turn off the apps that require Java to operate, like browsers. So, turn off those apps. They consume a manageable amount of memory.
After turning off the apps, try to update or install Java. In case you still face the issue, then try the following troubleshooting.
3. Reinstall the Graphics Driver
You might be surprised to see this troubleshooting in Java. However, it’s a practical solution, and numerous reports reinstalling the GPU driver fix the error code 1603 while updating Java.
Follow the below steps to reinstall the graphics driver:
- Launch Device Manager.
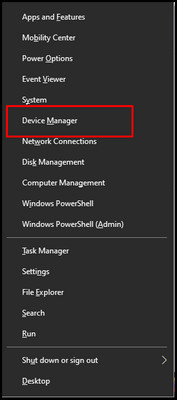
- Double-click on the Display adapters to expand drivers.
- Right-click on the driver and pick the Uninstall device.
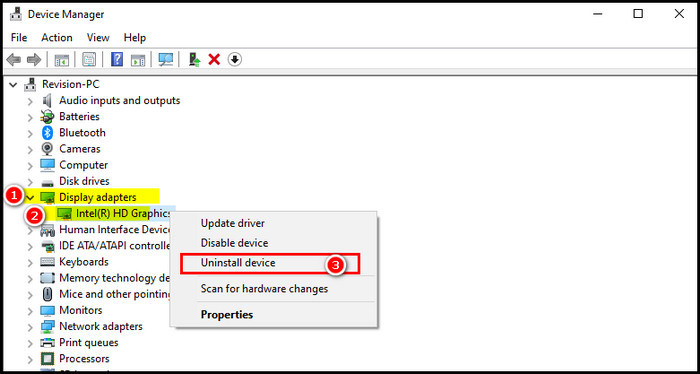
- Pursue the on-screen instructions to uninstall the graphics driver completely.
- Restart your PC to install the Graphics driver again.
When you restart your PC, it will install the graphics driver while booting. After completing the procedure, update your Java and look for the issue.
4. Delete User Variables
One potential solution to fix the error 160 during a Java update is to delete the user variables associated with Java.
Follow these steps to delete user variables:
- Press the Win + R to initiate the Run dialog box.
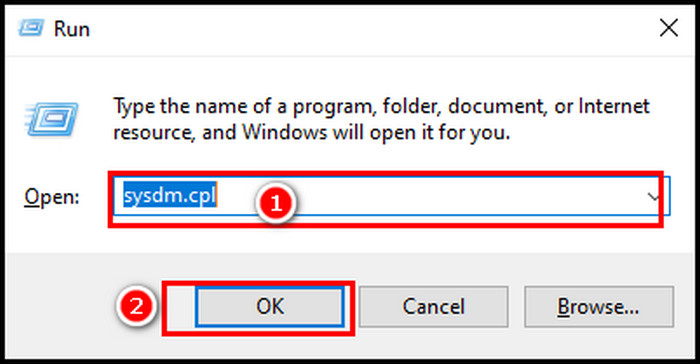
- Type sysdm.cpl and press Enter to open the System Properties window.
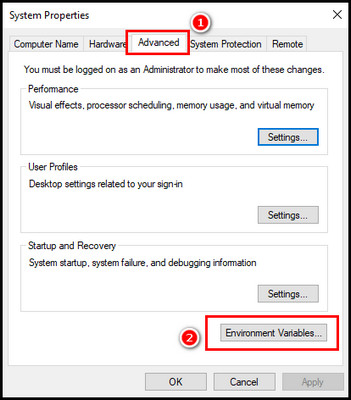
- Click on the Advanced tab to find the Environment variables and look for any Java variables.
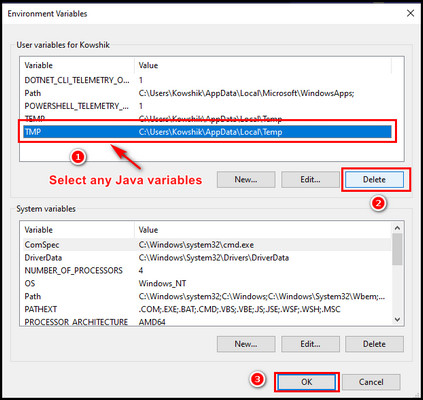
- Select the Java variables (if there are any) and select Delete.
5. Uninstall Old Java Version
When you try to give an update, and another version already exists, you will face the error code. While the error is persistent, it’s best that you uninstall Java from your machine.
Here are the methods to uninstall Java from your PC:
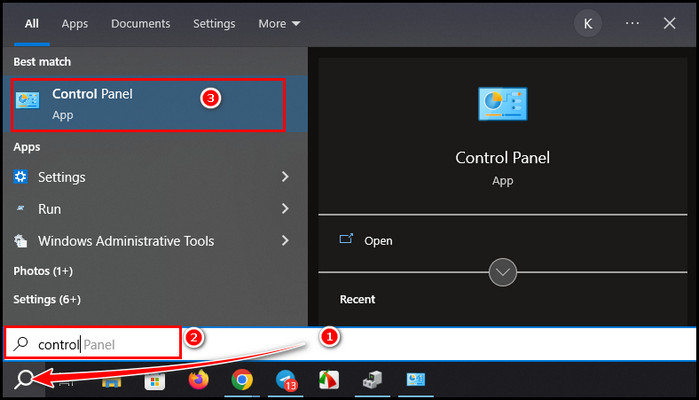
- Search for control on the search bar and select Control Panel.
- Choose Programs and Features.
- Locate Java, right-click on it, and choose Uninstall.
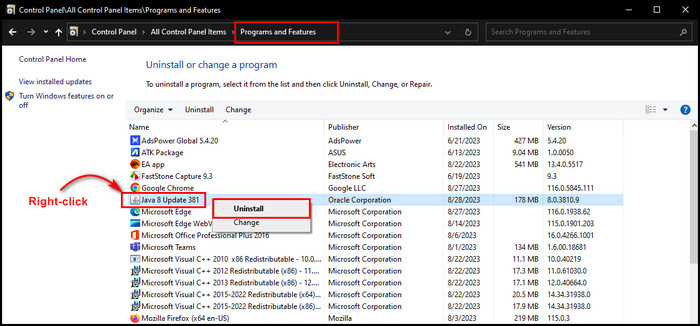
Complete the prompt instructions to delete the old iteration of Java.
6. Reinstall Java
Now you have completely uninstalled Java, let’s reinstall Java on your machine. You need to install the JRE (Java Runtime Environment or JRE) from the official Java site. You can download the online installer or offline installer to install Java.
After downloading either installer, double-click on the installer file from the download folder and pursue the prompt instructions to complete the process.
7. Disable Java Content via the Java Control Panel
You will encounter the update error 1603 when Java runs in the background. You might turn off the browsers and apps. However, it’s best to turn them off from the Control Panel.
Follow the below steps to turn off Java content with the Control Panel:
- Click on the Search icon from the taskbar, type control, and select Control Panel.

- Select the View by launch-control-panel button from the top-right corner and choose Large icons.
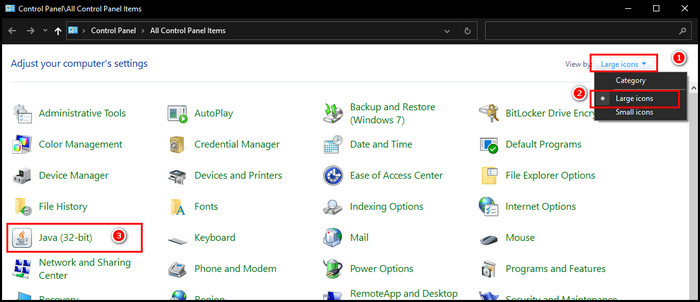
- Locate Java and click on it to launch the Java Control Panel.
- Select the Security tab and remove the tick mark from the Enable Java content for browser and Web Start applications.
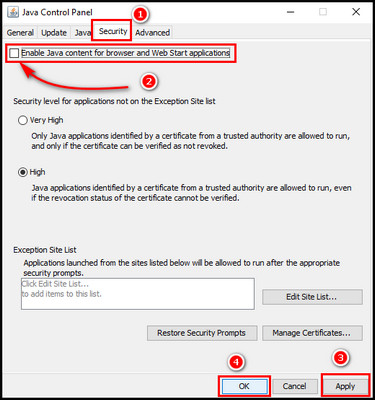
- Click Apply and OK to complete the process.
Now, restart your PC so that Java can be properly disabled from all the apps, and try to update Java. If you are still having issues, your Firewall might cause the issue.
8. Turn Off the Windows Firewall
Windows Firewall ensures protection from unauthorized network access. However, the Firewall makes conflicts when you try to update Java. I always have to turn off the Firewall when I update Java or most other software.
Pursue the below methods to turn off Windows Firewall temporarily:
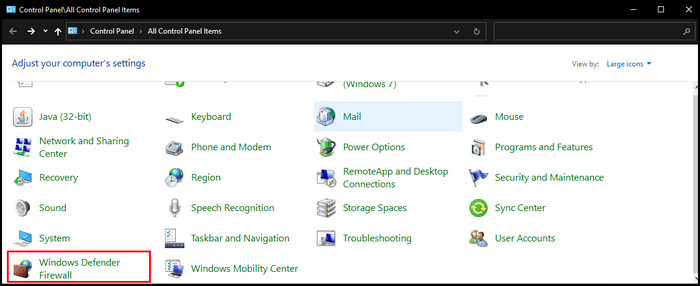
- Launch Control Panel and pick Windows Defender Firewall.
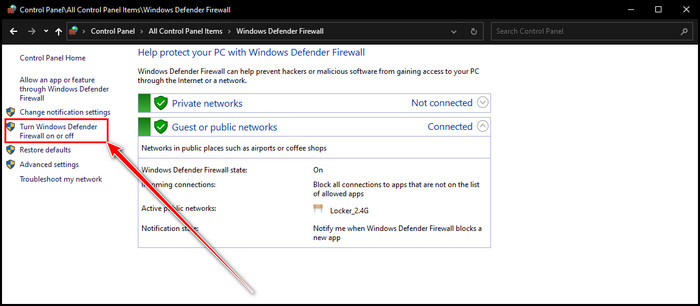
- Select Turn Windows Defender Firewall on or off.
- Choose Turn off for both Private and Public and click OK.
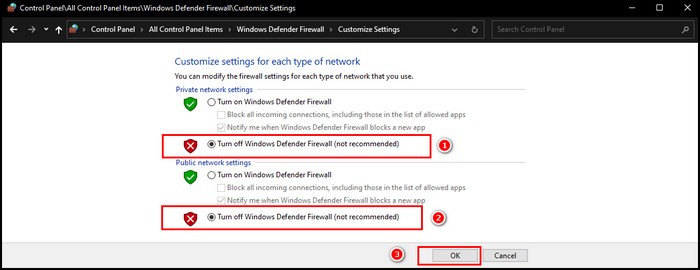
Now, give an update to your Java. Remember, after the update completes again, turn on the Windows Defender Firewall.
9. Install with Offline Installer
While the attempt to update Java online shows frequent errors, you can download the offline Java installer file and try to update using the offline installer. Sometimes, online updates raise issues for networking bugs. That’s why first install Java from the offline installer and then update again.
10. Change the Installation Directory
You can change the directory of your Java installation. This ensures better installation and helps you avoid the error code 1603 when you install and update Java.
Here are the steps to alter the installation directory:
- Right-click on the Java installer and choose Run as Administrator.
- Put a checkmark on the Change destination folder and click Install.
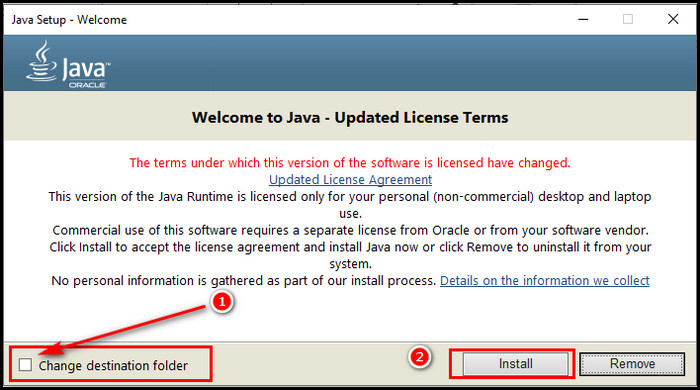
- Pick the appropriate directory and select Next.
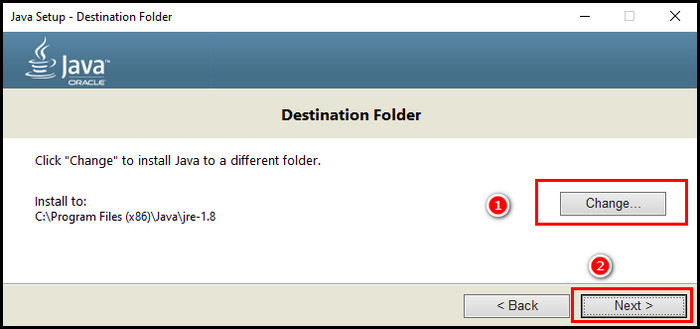
After completing the installation, update your Java and check for the error 1603 issue.
There you have it. These simple steps can work wonders in taming the unruly Java update. By following these steps, you can ensure that your Java is always up-to-date and not affected by any potential security vulnerabilities.
FAQs
Is it necessary to update Java?
Absolutely, keeping Java up to date is vital for ensuring applications run smoothly and securely. When you update Java, it fixes many internal bugs as well as boosts your overall performance.
Why does your security software impact Java updates?
Security software is designed to be cautious, sometimes leading to flagging update processes as potential threats. It can hinder updates, which highlights the delicate balance between security and seamless updates.
Can you skip Java updates altogether?
While tempting, skipping updates is ill-advised. Updates frequently contain crucial security patches that shield you from vulnerabilities. Staying up to date is your frontline defense against potential cyber threats.
Will uninstalling Java affect other applications?
Indeed, removing Java could impact applications dependent on it. If uninstalling is necessary, make a list of affected applications, then consider a reinstallation of Java to ensure smooth functionality.
Wrap-Ups
While Java update error 1603 may seem like a formidable opponent, it does not match the solutions presented in this guide.
You can quell the frustration accompanying such errors with a deeper understanding of the issue and step-by-step strategies.
Remember, persistence and methodical troubleshooting are crucial to success. So, update Java seamlessly and keep the code flowing without missing a beat.