Tables are an organized way to present information to your audience. But when the tables span across multiple pages, you will need to scroll all the way up every time if you need to reference what the information corresponds to.
Thankfully table headers exist to make your life easier. Once you format the table this way, everyone will digest the information more easily.
So, let’s take a look at how you can repeat table headers on your Microsoft Word document.
How to Repeat Header Row in Microsoft Word
To repeat the header row in MS Word, first, click the very first row on your table. Now click on the Layout tab at the top and press the Repeat Header Rows icon. You can also go into the table properties and do the same thing from there.
Let’s look at how you can do the same thing in two ways.
These are the methods to repeat the header row in a Microsoft Word Table:
1. From the Layout Ribbon Bar
The ribbon bar has all the options you can use to customize your document. That also includes the ability to use table headers on your docs.
Follow these steps to set up a header row on Microsoft Word:
- Open your Microsoft Word document.
- Click on the first row of your table. You can also select the entire row’s text, which would do the same thing.
- Click the Layout tab under the Table Tools ribbon group.
- Press the Repeat Table Header Rows icon.
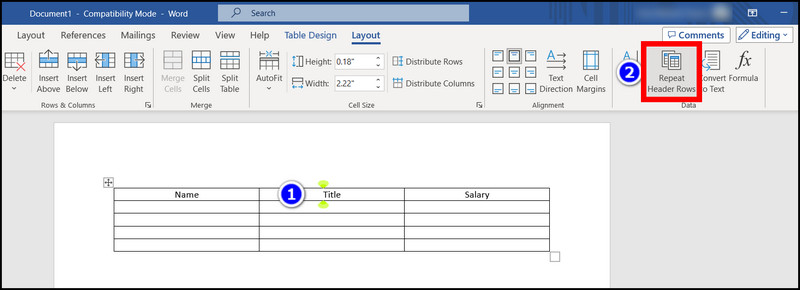
Now scroll down the entirety of your document. You should see that the very first row repeats across all pages.
2. From Table Properties
Guess what? The table properties will also allow you to set table headers. But the first method that we used is more straightforward and easy to use.
For those customizing table borders and indentations, they need to open table properties often. In such cases, setting the header row from there can save you some time.
So, let’s see how you can do it.
Here are the steps to set header rows from the table properties:
- Place your cursor right in the top row of the table.
- Right-click and select Table Properties.
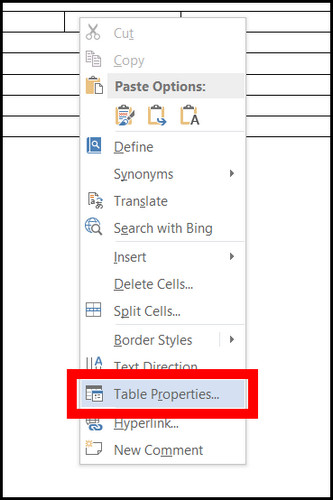
- Go to the Rows tab.
- Ensure the checkbox next to Repeat as header row at the top of each page is checked.
- Click Ok.
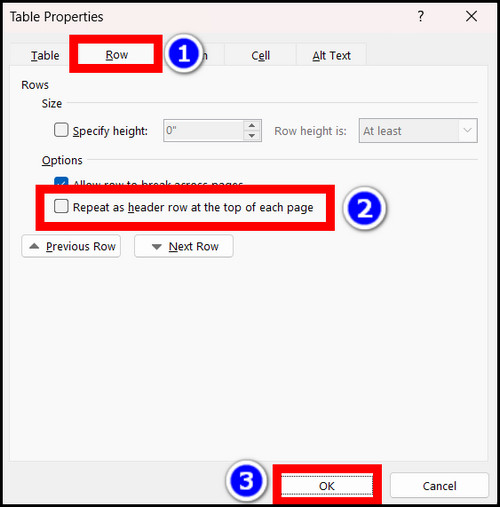
Now your document should contain the table headers on every page of the table.
What to Do When MS Word Table Header Won’t Repeat?
Most of the time, table headers work instantly. But if it does not show up properly, either there is more than one table present or the table text’s formatting is messing up Microsoft Word’s settings.
Here are some things you can do to check why this is happening.
Follow these methods to fix MS Word Table Header Not Repeating:
1. Ensure There Are No Breaks in the Table
When you apply table headers, Word assumes it to be a single table. That means table headings are repeated on top of each page as long as the table is there. So, when multiple tables are present, the top headers appear only on the first table.
This is a common issue as most of us do not know how long the tables will span out. So, when we run out of rows, our instinct is to create a new table and continue to insert the data there. What this introduces is table breaks. And that does not play nice with table headers.
So, to ensure the header row appears across all tables, you need to join all the table breaks so that there is only a single table present.
Follow the steps to merge two tables on Microsoft Word:
- Open Microsoft Word.
- Right-click on a row in your table and open Table Properties.
- Set Text Wrapping to None.
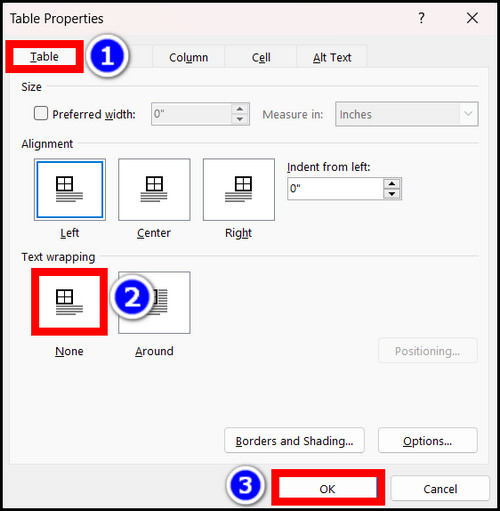
- Repeat the same procedure as above with the other table.
- Hover the mouse over the second table until you see the move icon pops up.
- Click on it and drag the second table to the bottom of the first one.
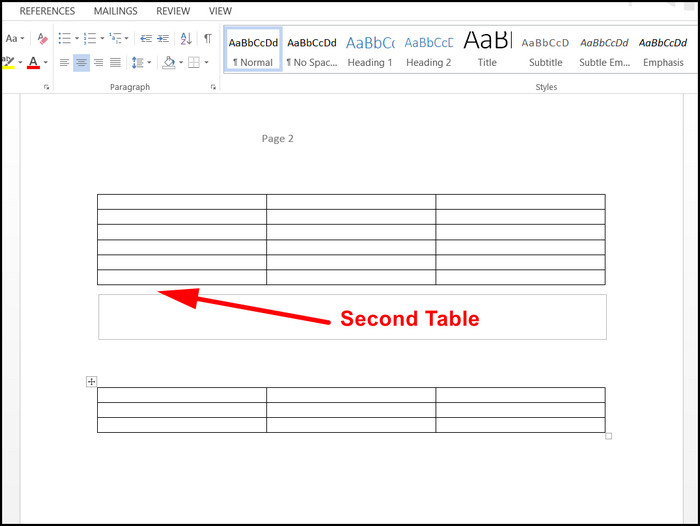
Once you release the second table, you will see the two tables merge together. Now headers should work on both of them as you wanted before.
2. Turn Text Wrapping to Auto
If the table’s text wrapping is set to Around, that messes up Word, and you will not see table headers repeated across your document.
To check this, open Table Properties and navigate to the Rows tab. Here you need to set the text wrapping to Auto. This should fix the top headers on your table.
3. Create a New Table
If you copied the table from somewhere else, its fonts and formatting may not align with Word’s default Settings. This can cause issues such as the table formatting incorrectly.
In that case, delete the existing table and create a new table in Microsoft Word. Then copy the texts into the new table. That will save you a ton of time troubleshooting wrong fonts or text sizes. And the table headers will start working properly.
Frequently Asked Questions
Where is the repeat header row icon in Microsoft Word?
The repeat header row icon is placed in the layout tab. If you have a table opened, this will fall under Table Tools.
How to remove the repeat header row from the top of each page?
If you do not want the header row on every page, click on the first row in your table. After that, go to the Layout tab and press the active Repeat Header Row button. This will remove it from all the pages on your document.
Final Words
The header row is a nifty tool that can save you precious time when copying the same heading across the entirety of your table. For small tables, you can get by doing it manually, but imagine the pain you would have to endure if you had a large table consisting of hundreds of rows.
I hope this guide adds value to your ever-increasing Microsoft Word skillset. We also have guides related to MS Word, which you can go check out here.
With that said, it is time to bid goodbye.