When you attend an online meeting, you cannot expect just to turn on the mic & webcam and nothing else. You might also have to show a presentation or take notes; in other words, you have to multitask.
Simply minimizing the Zoom meeting and taking notes allows you to do both things simultaneously.
But wouldn’t it be easier to always keep the meeting up on the side and do other tasks in the background?
Fortunately, the Always on Top option in Zoom does exactly that. And in this article, I’ve explained how you can enable it.
Let’s begin!
Quickly check our epic post on how to add recording timestamp in Zoom.
How to Enable Always on Top for Zoom on Windows
You can make your Zoom meeting stick on top of your window at all times by simply enabling the Keep on Top option. You can find it in your Zoom menu. After turning it on, your meeting will be on top, no matter what you do and where you click.
Follow the steps below to make a Zoom floating window at the top of your screen.
Here are the steps to turn on always on top for Zoom on Windows:
- Launch the Zoom app on your Windows PC.
- Join a meeting or host a new meeting.
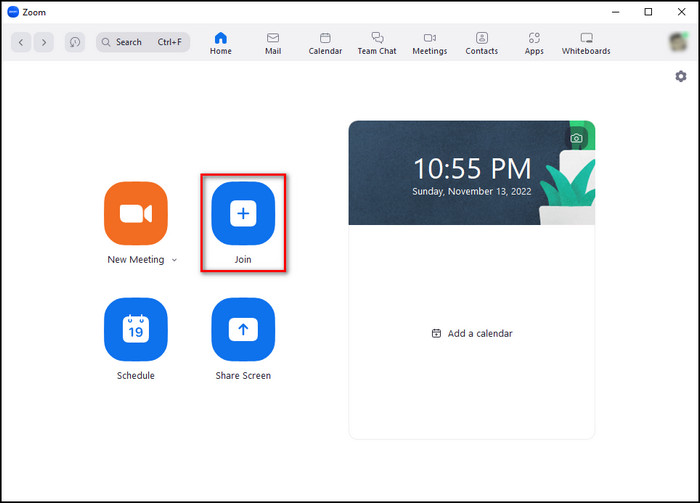
- Click on the Zoom icon at the top left corner.
- Select Keep on Top, and a checkmark will appear beside it.
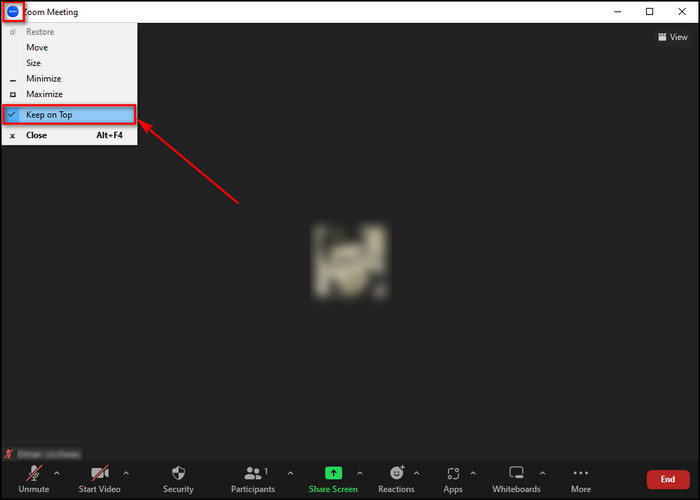
That’s all you have to do. Now your Zoom meeting will always be on top of the window.
If you are a Mac user, go to the next section, where I’ve explained the process of keeping Zoom on top of the screen on a Mac.
Also read how to update Zoom.
How to Keep Zoom Window on Top for Mac
Just like the Windows version, the Zoom app of the Mac version also has the option to let you keep your Zoom meetings at the top of your screen. You can enable it by turning on the Float on top option, which you can find in the Meeting menu.
Follow the instructions below to stick your Zoom meeting on top of all other apps on your Mac screen.
Here’s how to keep the Zoom window on top using a Mac:
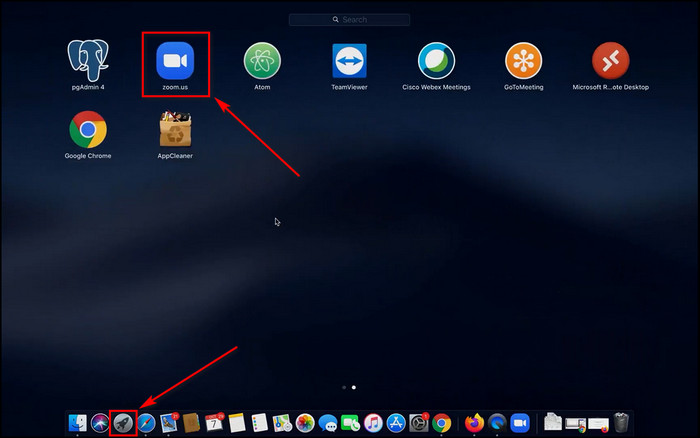
- Click on Launchpad and select us.
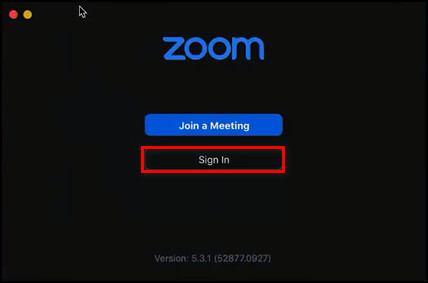
- Sign in to your Zoom account.
- Click on Meeting at the top bar of the Zoom application.
- Choose Float on top.
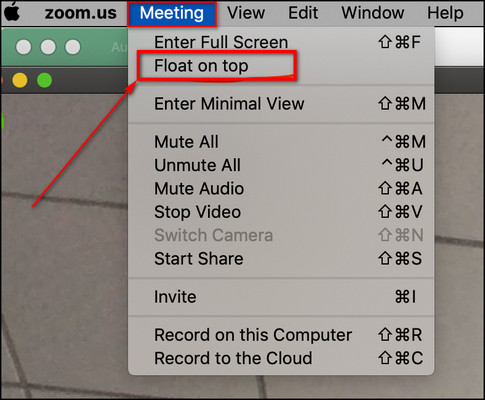
From now on, whenever you join a Zoom meeting, the meeting window will be on top of all other tasks running on the Mac.
Similar to keeping the Zoom window fixed on top of the screen, you can also use Zoom as a mini-floating window that will stay on top of other apps. In the following section, I’ve described how to float the Zoom window.
Here’s a complete guide on Adobe Reader change default Zoom setting.
How to Turn on Floating Window in Zoom
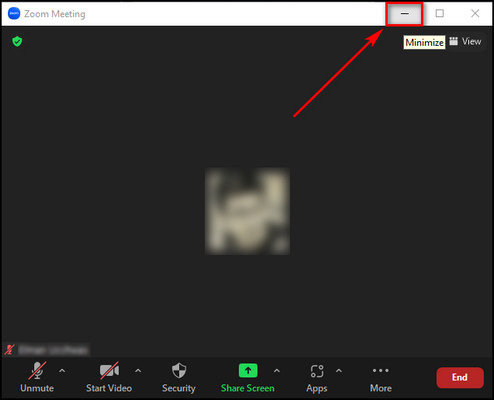
If you just Minimize your Zoom meeting window, you can use Zoom as a small floating thumbnail window, and you can control your video & audio from there. It will always stay on top of the screen, and you can drag it anywhere you like on the window.
Below I’ve provided the steps to use Zoom as a floating window.
Here are the steps to turn on the floating window in Zoom using Windows & Mac:
- Open the Zoom app on your computer and join a meeting.
- Click on the Minimize button at the top right for Windows or the top left corner of the macOS, and you will switch to a floating thumbnail view.
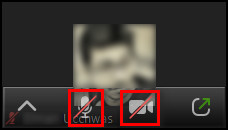
- Click on the Up Arrow to hide your video, making the Zoom window even smaller.

- Mute/unmute yourself and turn on/off the video by selecting the microphone and video camera icons, respectively.
- Click on the Exit Minimized Video icon to return to the main Zoom meeting window.
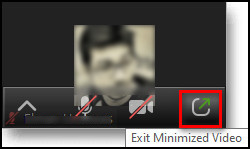
This floating Zoom window is a great way to look over yourself while you multitask. But if you want to concentrate on someone else, you need to pin them in the meeting.
In the next section, I’ve explained how to pin a meeting participant in Zoom so the user takes up most of the screen and stays on top, allowing you to concentrate on him/her easily.
Check out some of the best ways to pause your video on Zoom calls.
How to Pin Someone on Top on the Screen in Zoom
You can pin a participant in a Zoom meeting by selecting the Pin option in the users’ menu. When you pin someone in the Speaker View and with the Keep on Top enabled for Zoom, the user will take most of the screen real estate and always be on top.
Follow the steps below to pin a meeting participant in different versions of Zoom.
Here’s the process to pin someone on top of the Zoom meeting screen using Windows/Mac:
- Join a Zoom meeting on your device.
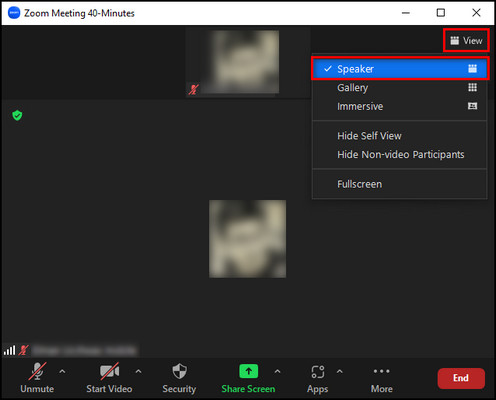
- Click on View at the top right corner and choose Speaker.
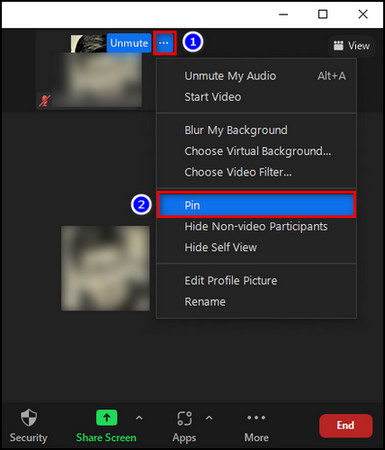
- Hover over the user you want to pin.
- Click on the 3 dots and select Pin.
Here are the steps to pin someone on top of the Zoom meeting screen using Android/iOS:
- Enter a Zoom meeting on your mobile device.
- Double-tap on the participant you want to pin.
You can double-tap on the participant again to unpin the user and return to the classic meeting view.
Check out our recent article on limit framerate when sharing screen on Zoom.
FAQs
How do I keep the Zoom toolbar visible?
To keep the Zoom toolbar visible, open Zoom, go to Settings and click on Always show meeting controls in the General tab.
What is the difference between Pin and Spotlight in Zoom?
When you Pin someone in Zoom, it highlights the user only on your screen. On the other hand, Spotlighting someone highlights the user for all the meeting participants. Only the meeting host or co-host can Spotlight.
Can you pin multi screens on Zoom?
Only a Host or Co-Host can pin up to 9 screens that will be visible simultaneously to everyone in the meeting.
Final Thoughts
Allowing Zoom to stay on top lets you observe the meeting while you do other tasks in the background. Also, the Pin and floating window feature combined with the Always on Top option makes Zoom an ideal application for multitasking.
That’s why I’ve described how to enable the Always on Top feature in Zoom and what you can do to get the most out of it.
Let me know if you have further questions regarding Zoom or other apps. See you in the comment section.


