Of all the parts in your computer, the RAM has to be one of the most delicate components. And it would be wise to keep an eye on the RAM.
Thankfully, there are tools to help you do that.
 Windows Memory Diagnostic and MemTest are two of the most common memory testing tools. Both are straightforward enough that anyone can operate them, and both are very good at their job.
But which is the better tool?
In this article, I’ve described what Windows Memory Diagnostic & MemTest is, how they work, and their pros and cons to determine which one is the better choice.
Let’s begin!
Why would you Need a Memory Testing Tool?
It’s always a good idea to check if your PC is healthy or not. You have nothing to lose but a few hours.
The BIOS executes the POST test whenever you start up your device to find memory issues. But it is just a quick and simple test. It doesn’t test every single bit of your RAM.
If you are facing problems like the PC restarts randomly, getting error messages when booting your PC, sudden program crashes and getting the Blue Screen of Death (BSOD), all these problems are related to your RAM going bad.
The memory is clashing with the motherboard.
Why?
Because maybe a RAM stick is loosely connected, or the port is broken. Perhaps you’ve overclocked your RAM, or it cannot handle the pressure of hundreds of Chrome tabs that you are opening.
The faster you find out why your computer has memory issues, the better it is for you. And only a memory checking tool can tell you that.
How does a Memory Testing Tool Check your RAM?
Ram is the active memory of your computer. The programs running on your computer are constantly writing bits of data on the RAM and reading it back.
When RAM goes bad, the computer will write data on the RAM but will find different data when it goes to read it, which leads to program crashes, BSODs, the computer hangs, data corruption and other issues.
The RAM checking tools work by writing data to each part of the RAM installed on your device and then reading the data sequentially. So the tool that can write on every bit of your RAM is the better memory checker.
The best RAM checking tools run in a unique bootable system, so they don’t require an operating system. It also ensures that the tools can have full access to the RAM.
What is Windows Memory Diagnostic?
Windows Memory Diagnostic is a free application that checks your RAM. Microsoft made the software, and it comes preinstalled with Windows. But you can also download this small size software.
It works at the highest performance taking the RAM through robust tests to find out if something is wrong with the memory.
It’s pretty simple to run because you just set it up and restart your PC, and the test is run by itself
Although it’s old software and Microsoft doesn’t work on it anymore, it still does what it’s supposed to do without any issue.
Don’t be fooled by the name because Windows Memory Diagnostic tool has nothing to do with Windows and can be run on any operating system. But you’ll need a bootable CD or flash drive.
Here are the Windows Memory Diagnostic tests that are run by default:
- MATS+ (cache enabled)
- Stride6 (cache enabled)
- INVC
- WINVC
- LRAND
- WMATS+
Here are the additional tests Windows Memory Diagnostic can perform:
- MATS+ (cache disabled)
- Stride6 (cache disabled)
- ERAND
- WStride-6
- Stride38
Advantages & Disadvantages of Windows Memory Diagnostic
Although Windows Memory Diagnostic has many test options, not all of them are needed for a memory test.
It doesn’t require any operating system as it runs in the BIOS mode.
Below I’ve explained the things I like and the things I don’t like about Windows Memory Diagnostic.
Here are the advantages of Windows Memory Diagnostic:
- The application is entirely free and can run on any operating system.
- The software size is extremely small.
- It comes preinstalled in the Windows operating system.
- Easy to run, so anyone can use it.
- The software runs automatically. You don’t need to moderate.
Here are the disadvantages of Windows Memory Diagnostic:
- It requires additional steps if you create the startup disk and CD image.
- You cannot use the PC when the program is running.
- It only checks the first 4GB of your computer’s RAM.
But, before that, do check our latest post on how to use password instead of a PIN to log into Windows 10
What is MemTest?
MemTest is a free memory-checking tool. It is a very small size with an easy-to-understand interface.
With the press of one button, the software will start checking the RAM by testing recovery processes and data storage. The same test can run multiple times; the more times you run the tests, the more precise the result will be.
Only the Windows operating system supports MemTest. However, MemTest86 runs on Windows 10, 8, 7, XP, Intel x86-based Macs and Linux. It works with 32-bit and 64-bit computers.
MemTest86 is a powerful app created by PassMark. It’s also free, can run 13 separate RAM tests, and supports all types of RAM.
Microsoft verifies the software’s boot system. It can run from a bootable USB flash drive, so it doesn’t require an OS.
Advantages & Disadvantages of MemTest86
MemTest86 runs multiple tests to find the most hidden memory issues. It can just keep running in the background while you do other things on your computer. The developers continuously update the software to support the latest memory and computer types.
Below I’ve explained the factors I like and the factors I dislike about MemTest86
Here are the advantages of MemTest86:
- MemTest86 provides the same memory test used by professionals.
- It can check up to 64GB of your RAM.
- The software has updates and bug fixes.
- Easy to run, so anyone can use it.
- It is a completely free memory-checking tool.
- The app is extremely small size.
Here are the disadvantages of MemTest86:
- The advanced features of MemTest86 can be complicated for someone who doesn’t know much about computers.
- The software doesn’t support discs, only USB flash drives.
How to Use Windows Memory Diagnostic
If you are using Windows operating system and your computer starts just fine, you don’t need to download the Windows Memory Diagnostic. It’s already installed.
Follow the steps below to run the program correctly.
Here are the steps to run the Windows Memory Diagnostic tool:
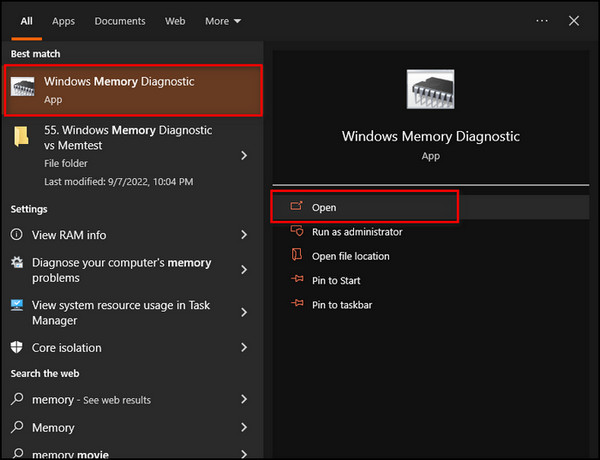
- Click on the Search icon, type Windows Memory Diagnostic and open it.
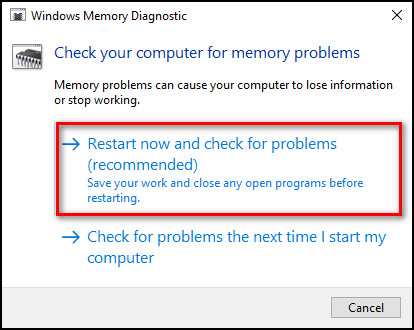
- Choose the Restart now and check for problems (recommended) option.
That’s all. Your computer will immediately restart, and the Windows Memory Diagnostic will start running. You will see a progress bar indicating the percentage of completion of the tests. If any errors are found, you will see them in the status section. 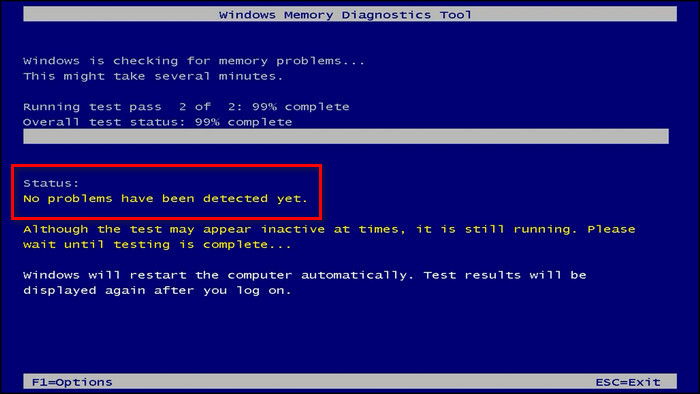
When the test finishes, your PC will start normally, but you won’t see the diagnostic result. Follow the steps below to find the result.
Some more guides on solve outlook rules not working in windows 10.
Here’s how to see the Windows Memory Diagnostic result:
- Right-click on the Windows icon and choose Event Viewer. event-viewer
- Expand Windows Logs from the left pane and pick System.
- Select Find from the right pane, type Memory Diagnostic in the box, and click on Find Next.
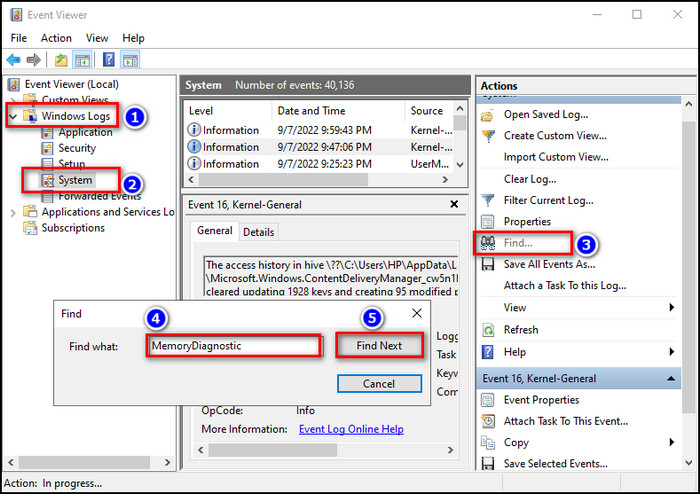
After these steps, the most recent test result will open at the bottom of the Window.
In case you are not using Windows operating system or your PC is not booting up, then you need to perform a few extra steps before you can run the Windows Memory Diagnostic tool.
Below I’ve described those additional steps.
Here’s how to run Windows Memory Diagnostic if it’s not installed on your PC:
- Download the Windows Memory Diagnostic software from another computer.
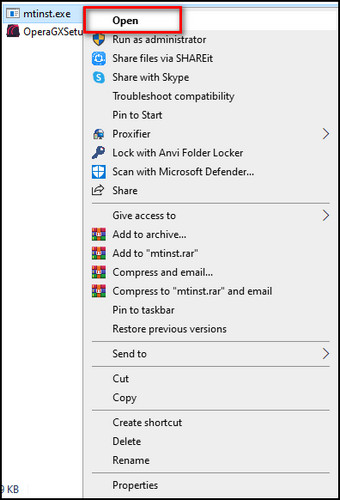
- Right-click on the mtinst.exe file and select Open.
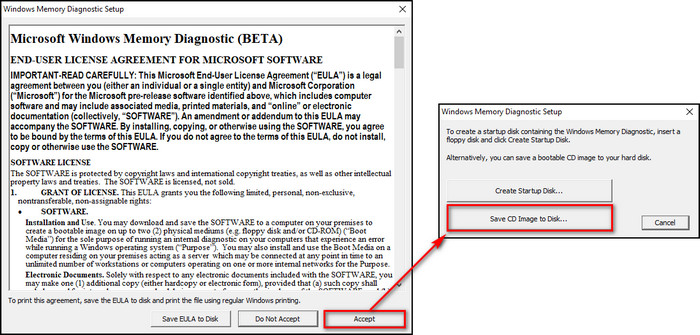
- Click on Accept and select Save CD Image to Disk.
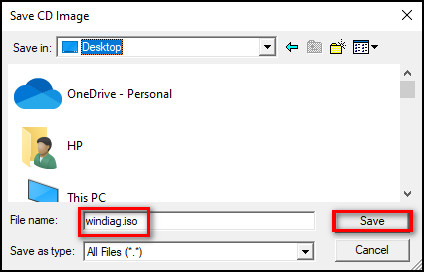
- Save the windiag.iso ISO image to your desktop and click on the Save button.
- Burn the ISO image file to a disk or a USB flash drive.
- Boot the CD or flash drive on the computer you want to run the memory test, and the Windows Memory Diagnostic will start running.
How to Use MemTest86
MemTest has been mostly replaced by MemTest86, the superior version. Unlike MemTest, which has a free and paid version, MemTest86 is completely free to use all the tests and is more reliable.
If you want to run the latest version of MemTest86, you’ll need a USB flash drive as it doesn’t support CDs. But if you have to use a CD, you should download MemTest86 version 7.5 or earlier.
Below I’ve described the process step by step showing how to use the MemTest86 memory tool.
Here are the steps to run MemTest86:
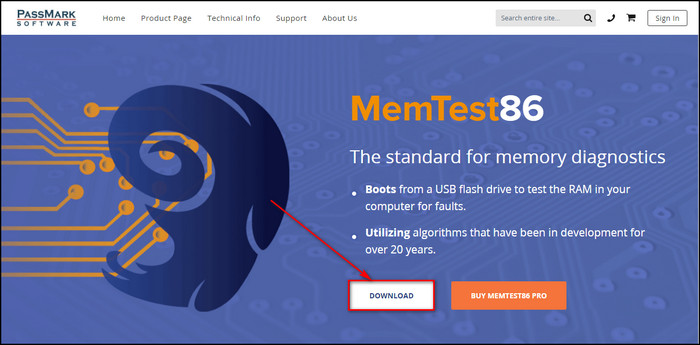
- Open your browser, go to MemTest86 and download it.
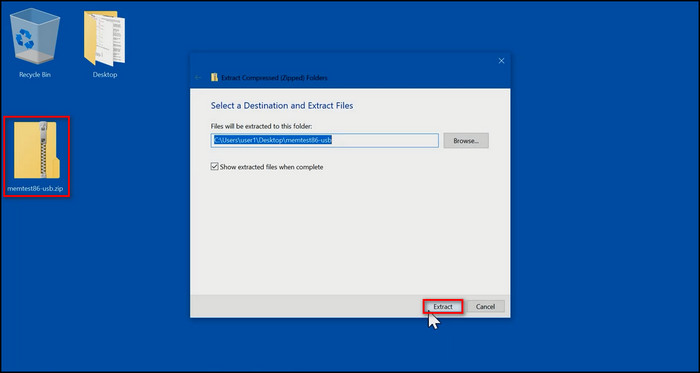
- Extract the memtest86-usb.zip file.
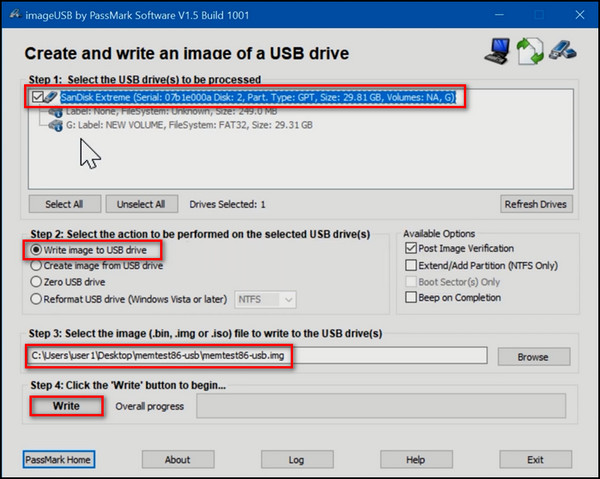
- Insert a USB flash drive into your computer. You are going to write all the extracted files on the flash drive. Be sure to back up the existing files in the flash drive before writing because this process will delete the existing files.
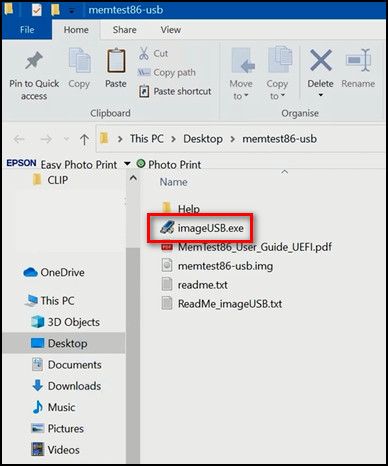
- Double-click on imageUSB.exe.
- Pick the correct USB drive in Step 1, and select the memtest86-usb.img file in Step 3 and click Write.
- Boot the device when the bootable USB is available.
- Click the Config button when the Memtest86 screen appears.
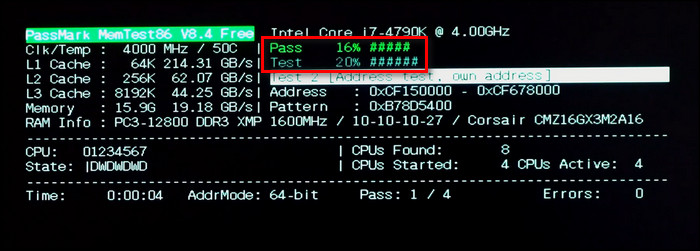
- Select Start Test. you’ll see a Test bar showing the progress of the current test and a Pass bar showing the progress of the whole test.
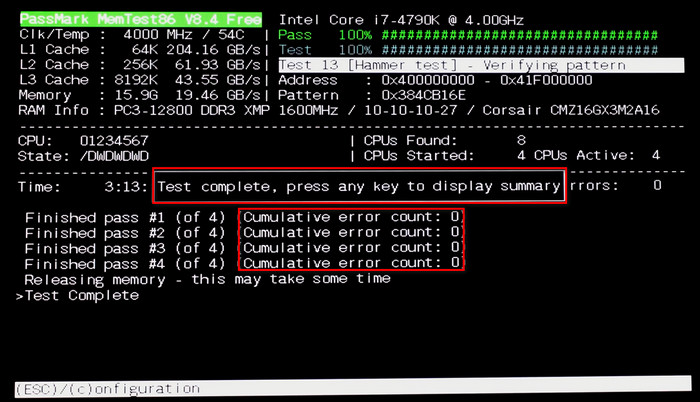
- Check for errors when the Pass bar completes. If there’s no error, it’ll say Pass complete, press any key to display summary.
- Press Esc to exit the program and restart your PC.
Read more on how to get windows 10 for free as a student.
Windows Memory Diagnostic vs MemTest: Who Wins?
Windows Memory Diagnostic and MemTest both have their advantages and disadvantages. One is old, and developers support the other. One is free, and the other has free and paid versions.
Let’s compare the two considering some essential factors.
Here’s the direct comparison between Windows Memory Diagnostic & MemTest:Windows Memory Diagnostic MemTest It is developed by Microsoft. It is developed by PassMark. Old software and developers no longer work on it. It gets updates, and developers support it. It scans on the first 4GB of total RAM It can scan up to 64GB RAM. It doesn’t require CDs or flash drives to run on Windows. It requires CDs or USB flash drives. Preinstalled in Windows. You have to download it. It performs 6 tasks by default. It can perform 13 tasks. It is completely free. It has both free and paid versions. It can run on any OS. MemTest is only supported on Windows. But MemTest86 can run on all operating systems. You cannot use the PC when it’s running. You can use the PC smoothly while it’s running in the background. It runs in BIOS mode. It doesn’t require BIOS mode. It gives less accurate test results. It can run multiple times, providing more accurate test results.
Although Windows Memory Diagnostic is an easy-to-use free memory checking tool, considering the fact that MemTest86 free version can run more tests and gives more accurate results, I’d say the winner is MemTest86.
FAQs
Is Windows memory Diagnostic tool reliable?
Yes, Windows Memory Diagnostic is a reliable tool. It runs multiple tests thoroughly, providing the correct condition of your RAM.
Is MemTest86 better than Windows memory Diagnostics?
Yes, MemTest86 is better than Windows Memory Diagnostic because MemTest86 can run more tests and perform the same tests multiple times, providing more accurate results.
Does Memtest repair RAM?
No. MemTest only detects errors in your RAM. It cannot repair them.
Final Thoughts
Windows Memory Diagnostic and MemTest are both splendid tools when it comes to checking your RAM health, and you can use either of the two to get the best test results.
But if you had to choose one, this article will help you find the memory testing tool that is best suited for you. Because here, I’ve discussed how each tool works, their benefits and drawbacks regarding crucial factors.
Comment below and let me know which memory diagnostic tool you use. See you in the comment section.