The most common reason your MSI laptop headphone jack is not working is because of some driver issues, property issues or maybe the device is disabled.
You can fix it just by reinstalling the device driver, adjusting some headphone property settings, or enabling the device.
After hours of searching, I have finally come up with some quick fixes that work like a charm for any MSI laptop. These steps can be performed by you even if you are not that tech-savvy.
So without further delay, let’s dive in!
Why doesn’t the MSI Headphone Jack Work?
MSI headphone jack does not commonly work due to problems with the motherboard circuit error and damage to the outer audio jack port. On top of that, bugs in the audio device software and outdated audio drivers can also cause MSI headphone jack failure.
Let me clear things up for you here.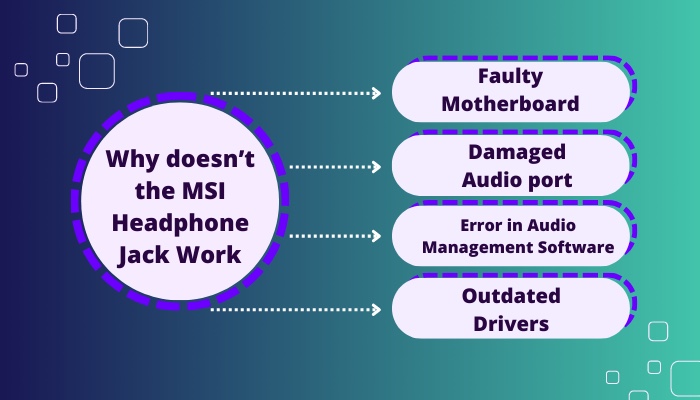
Here are the reasons for the headphone jack not working in MSI:
Faulty Motherboard
If your motherboard has short-circuit problems, your headphone jack will not get connected. Your motherboard can not pass signals, and headphones do not get recognized.
Damaged Audio port
When your audio port is broken or damaged, your earphone will not work. After inserting it into the port, you’ll see the headphone jack is loosely connected and can’t receive the proper signal.
Error in Audio Management Software
The headphone jack will not work if your default audio software is wrongly configured. You don’t get any output when the motherboard’s audio panel is not properly selected.
Outdated Drivers
In case the driver software is outdated, the headphone jack may not work properly.
Here’s a complete guide on FPS average min and max not showing MSI Afterburner.
How to Fix MSI Headphone Jack Not Working
You can fix the headphone jack not working in MSI by running windows audio troubleshooter and updating the audio and sound driver. Furthermore, you can also solve this issue by checking the connection of the motherboard audio jack and the device settings.
I’ve found that MSI GS63, GS65, GS70, and Z390 model laptops frequently face earphone not working problems. And after spending some time on different forums, I come up with a stupid yet workable solution.
If you restart your device after holding down the power button for 30 seconds, you’ll see this technique surprisingly works out. Because some capacitors need to be drained once in a while.
However, This method does not work for all machines. There are some quick fixes for other devices as well. I will explain them in the below section.
Here are the methods to fix the MSI headphone jack not working:
1. Disable Front Panel Jack Detection
You can solve the problem by simply removing front panel detection. It does not control the chance of using the front panel jack in the future.
This procedure can help you fix your laptop headphone jack issue that isn’t working.
Here are the steps to disable front panel jack detection:
- Go to your search box, and type Control Panel.
- Select it from the results list.
- Using the drop-down menu in the window’s top-right corner, change the view mode to Large icons.
- Scroll down to your Audio Manager and click on it. If you don’t see this option, you either don’t have the correct drivers.
- Select the Connector Settings icon from the drop-down menu.
- Press the OK button to enable the Disable front panel jack detection option.
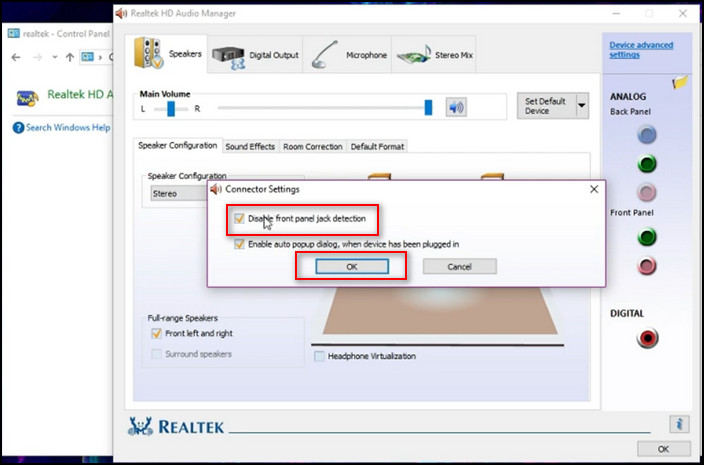
Your computer will be restarted. After that, put your device into the headphone jack and listen to some music.
2. Run Windows Audio Troubleshooter
The audio troubleshooter may be able to resolve audio issues automatically. A built-in troubleshooter in Windows scans the system and suggests possible remedies.
Here are the steps to run the windows audio troubleshooter:
- Press and Hold the Windows + I buttons to access the Settings
- Select Update & Security from the drop-down menu.
- Select Troubleshoot from the left-hand menu.
- Under the Getup and running category, select Playing Audio.
- Click on the Run the troubleshooter button to run the troubleshooter.
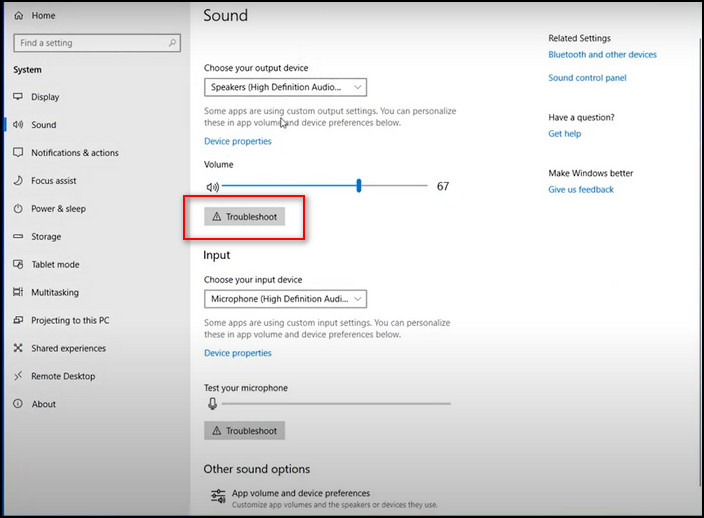
Wait for the troubleshooter to complete its investigation. If anything is found, you can choose to have it fixed automatically.
Check out some of the best ways to fix Headset keeps disconnecting.
3. Change Default Sound Format
You might not hear the audio as well if the format of the audio you’re playing doesn’t match the default option.
Here are the steps to alter the default sound format:
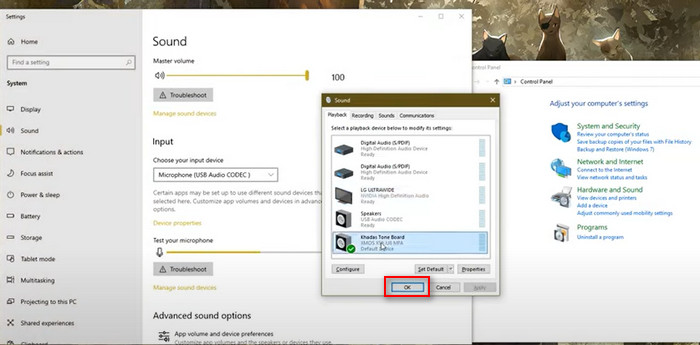
- Click Sounds after right-clicking on the sound icon in the lower-right corner of your screen.
- Select the Playback tab from the drop-down menu.
- Select Headphones > Properties from the context menu.
- Click on Advanced. Then, one by one, choose from the list and click Test to see whether you can hear sound from the format you chose.
- Click Apply > OK if any of the formats work.
4. Enable Default Playback Device
If you don’t get any response from headphones, try to enable the default playback device.
Here are the steps to enable the default playback device:
- Go to the Search box.
- Type Control Panel, and then select it from the list of results.
- Using the drop-down menu in the window’s top-right corner, change the view mode to Large icons.
- Select the Sound tab from the menu.
- Make a sound selection.
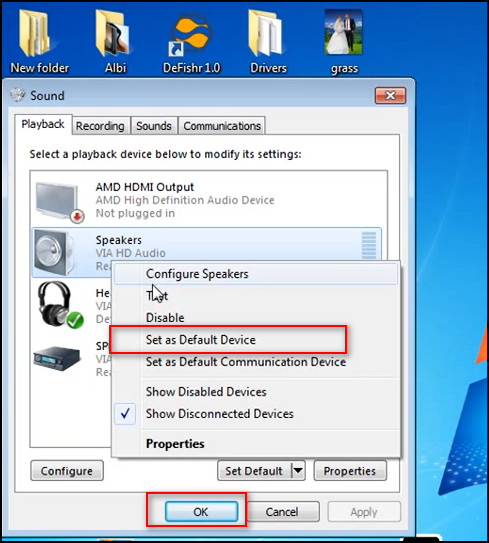
- Right-click anywhere in the Playback tab and select the Show Disabled devices It will bring up your device.
- Right-click the headphone device that isn’t working and select Properties.
- Choose Enable to make sure it’s not restricted from playing audio from your PC.
- Click the Set as Default button, which is now available.
- Press OK to restart your PC.
Check to see if your headphones or headphone jack are in good functioning order.
5. Update Audio and Sound Driver
You must update your drivers regularly. Audio drivers that are out of date might create a lot more problems than you think.
Here are the steps to update the audio and sound driver:
- Press and hold the Windows key + R. It will start the Run program.
- Type devmgmt.msc to open the Device Manager.
- Hit the OK button.
- Click the arrow icon to extend the Sound, video, and gaming controllers section.
- Select Update Driver.
- Select Automatically search for updated driver software.
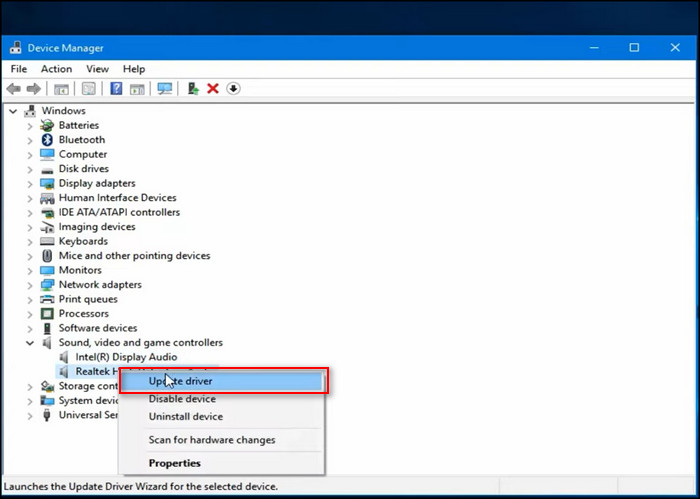
If Windows detects an updated driver, it will automatically download and install it on your computer.
Restart your machine and see whether the headphones or headphone jack issue has been resolved.
Follow our easy step-by-step guide to fix MSI Mystic Light not launching or responding.
6. Clean Dirt From Headphone Jack
The headphone jack can get blocked with dirt or lint over time, and cleaning it might help with the connection issue.
Here are the steps to clean dirt from the headphone jack:
- Power off your laptop and get a cotton swab.
- Remove some of the cottons from the swab until it can fit inside the headphone jack.
- Wet the swab with a drop of cleaning alcohol.
- Gently clean the port and wait for a couple of minutes before it dries before plugging in the headphones again.
- Another good option is to use canned air to clean and remove any particles that might be interfering with the connection.
7. Remove Any Bluetooth Connection
Your device may have been associated with a wireless device such as a speaker or wireless headphones. And your operating system can deactivate your audio jack.
Here are the steps to remove the Bluetooth connection:
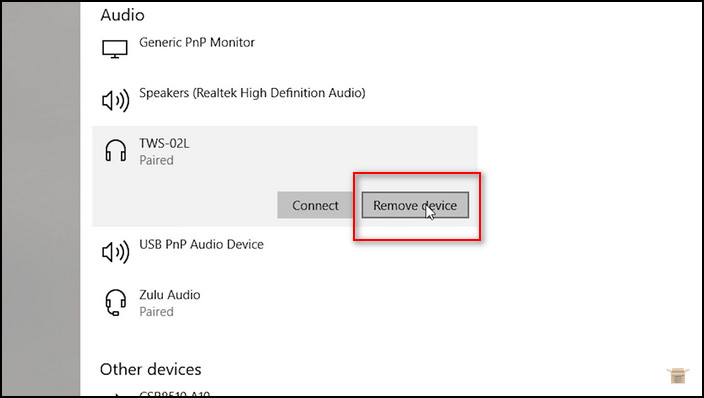
- Go to the Search bar and type Bluetooth & Other devices.
- Click on the Paired device you want to remove.
- Click on Remove device.
- Click on Yes to remove the device.
8. Check Device Settings
Bluetooth settings have the potential to destroy your experience. Your audio settings may have the same effect too.
Here are the steps to change the device settings:
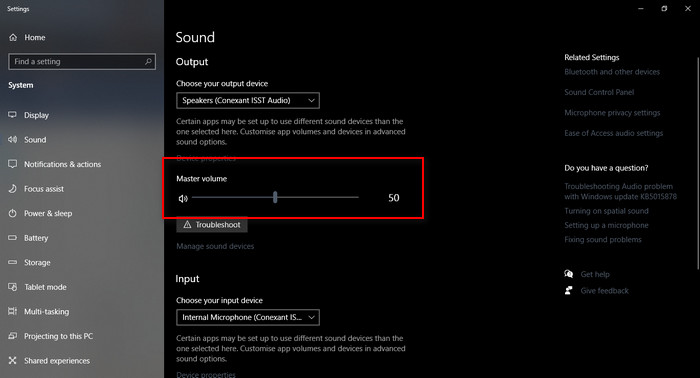
- Go to your device’s Settings section and select Sound or Audio.
- Check things like the volume level and any other issues that could cause the sound to be muted.
- Try rebooting your device if this isn’t turned on.
- Many troubles can be resolved by turning your rig on and off again. It takes a concise amount of time to complete.
- Check your device’s system settings to see if any software updates are available.
Sometimes, a firmware update may fix an issue that prevents audio from playing correctly on your device.
9. Change Audio Board
The audio board on your laptop can also be faulty. And if none of the other solutions work, this is most likely the issue.
You can replace the audio board to fix the issue once and for all.
FAQs
Why don’t my headphones work on my PC?
Your headphones do not work on your PC because of having a corrupt or outdated driver, faulty audio ports, an error in the connection or an issue with the headphones.
How do I enable my headphone audio jack?
To enable your headphone audio jack, go to your Taskbar >Sounds tab >Playback tab > right-click on the Headphone device icon >Enable option.
A Final Thought
After reading this article, now you know how to fix the headphone jack not working in MSI laptops by following the steps disabling the front panel jack port, running windows audio troubleshooter, changing the default sound format, updating the audio and sound driver and many more.
I am sure this article has answered all your queries and helped you to fix your problem without difficulties.
If you have any further questions, feel free to comment below.