Baffled, looking for all the blocked emails in Outlook? Well, you’re not alone.
It can be intimidating seeing all the different menus and options in Outlook thrown at your face. No worries though, as in this guide, I’ll show you how to find blocked emails in a flash, regardless of the versions.
So without further ado, let’s start.
How to Find Blocked Emails in Outlook
Get to the Home tab in Outlook and access the Junk menu from the ribbon, choose Junk E-mail Options, and switch to the Blocked Senders tab to find blocked emails. From the new window, you’ll notice the list of restricted email addresses and domains.
Here is how to find the blocked email list in Outlook:
Find Blocked Emails in Outlook 2013/2016/2019 & 365
Different desktop versions of Outlook share the same DNA with a few tweaks here and there. So the procedure to locate blocked emails is similar.
Here are the steps to find blocked emails in Outlook 2013/2016/2019 & 365:
- Launch Outlook.
- Click on the Home tab.
- Click on Junk > Junk E-mail options.
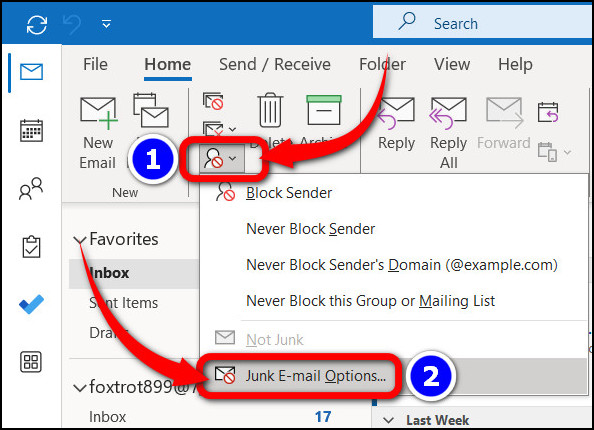
- Select the Blocked Senders tab from the Junk Email Options dialog box.
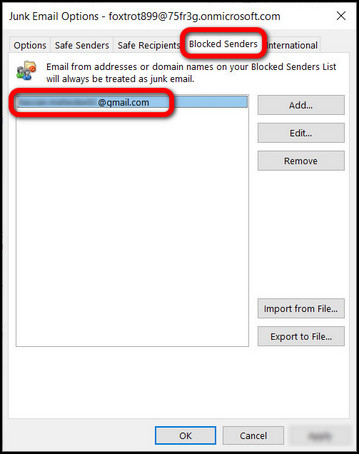
You’ll see all the blocked email addresses and domains as a list here.
View Blocked Emails in Outlook Web App (OWA)
Outlook Web Application also known as the online version presents a modern interactive user interface. Hence, finding the blocked emails is slightly different yet super simple.
Here is the process to view blocked emails in Outlook Web App:
- Go to Outlook Live.
- Sign in with your credentials.
- Press the View tab.
- Click on View Settings.
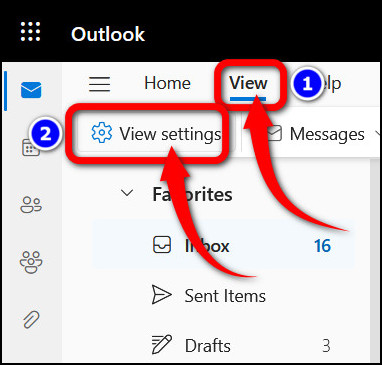
- Select Junk email from the Settings pop-up menu.
Once you are inside, you’ll see all the blocked senders under Blocked senders and domain.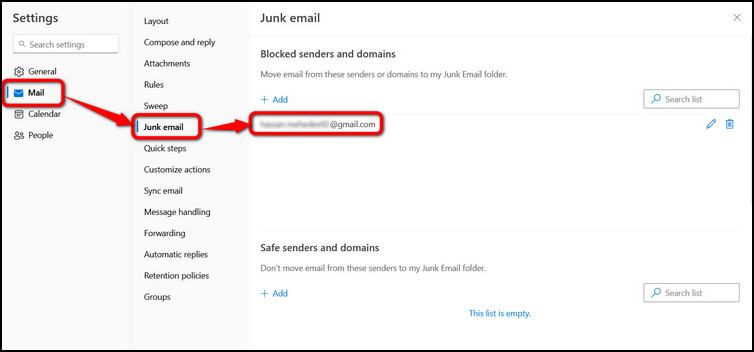
Find the list of Blocked Senders in Outlook Mobile (iOS & Android)
The mobile versions of Outlook be it iOS or Android are identical to navigate. Just get to the Junk folder to find the list of blocked email senders.
Here are the steps to find the list of blocked senders in Outlook mobile:
- Open Outlook.
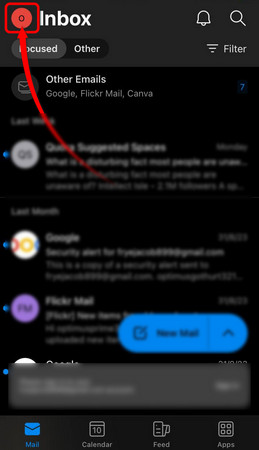
- Tap on the account avatar at the top left corner.
- Press on Junk.
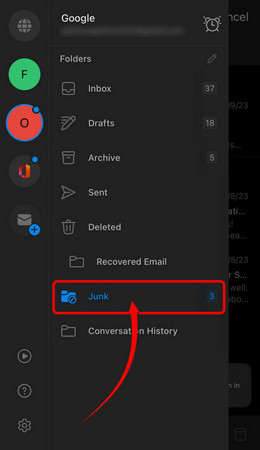
And there you have it! All the blocked emails are in one place.
Block or Unblock Emails in Outlook
When you are in Outlook, go to Home > Click on Junk and then access Junk E-mail Options. Get to the Blocked Senders tab and press the Add button. Write the email address and click on apply to block it from sending you emails. Similarly, click on the Remove button to unblock when needed.
Here are the steps to block or unblock emails in Outlook:
Outlook 2013/2016/2019 & 365
- Select the Home tab.
- Click on Junk.
- Choose Junk E-mail Options.
- Navigate to the Blocked Senders tab.
- Click on Add and type an email address to block it.
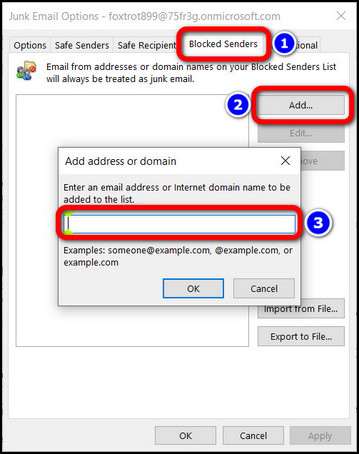
- Hit Apply to save the change.
Now, if you want to unblock the email sender, go to the same location, select an item from the blocked list, and press the Remove button.
Outlook Web Application (OWA)
- Access OWA and log in.
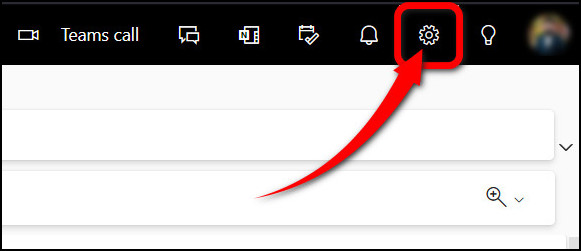
- Click on the Settings indicated by a wheel icon.
- Choose Junk email.
- Press +Add under Blocked senders and domains.
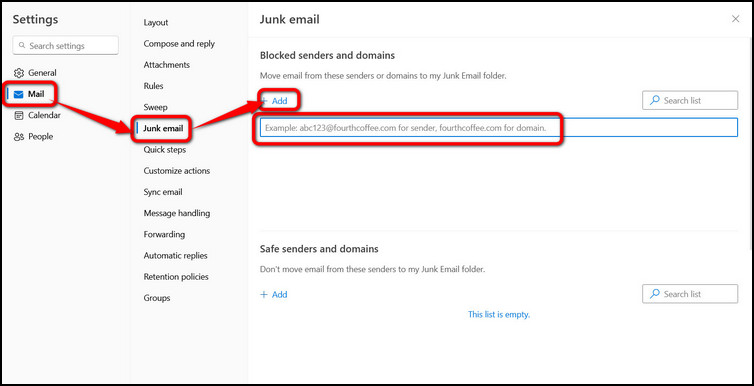
- Type a sender’s email address and hit Enter.
- Click Save.
This email is now in the block list. To unblock, press the Delete icon next to it.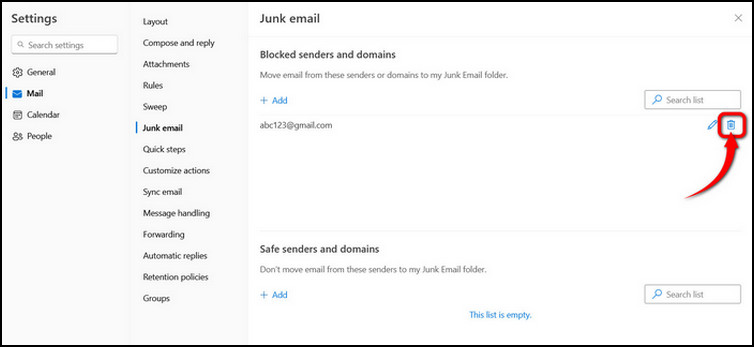
Frequently Asked Questions
Is It Possible to Retrieve Blocked Emails in Outlook?
It is possible to retrieve blocked emails. When emails are blocked, they get stored inside the Junk folder in the first place. Simply move it to your inbox or any other folder to access it.
What Happens When You Get Blocked on Outlook?
When someone blocks you on Outlook, your mail is going to be forwarded to the Junk folder. Microsoft does not bother users with unwanted or annoying emails. But they leave a backdoor open to access it when needed.
Closing Thoughts
So, that’s a wrap on viewing blocked emails in Outlook. No matter what platform you are in, just locate the Junk folder to find the blocked emails.
Let me know how it went for you, and if you face any difficulty, reach out in the comments. Ciao!