Before Facebook Messenger unveiled its audio/video calling feature, everyone used Skype for it. Although most users prefer alternative apps like WhatsApp and Google Duo these days, businesses still rely on Skype for their day-to-day activities.
One of those activities includes being able to send important files to entire teams in an instant. However, this particular feature has been acting up in the last few weeks, according to reports from multiple users.
After replicating this issue on my PC, I spent more than eight hours coming up with some reliable solutions. I prepared this extensive guide as soon as I finished testing them on multiple PCs.
So, if you don’t want to switch over to another application for transferring files, grab a cup of coffee and go through each of the fixes below.
Read more on why does Skype randomly start.
Why Can’t I Send Files in Skype?
You can’t send files in Skype because of several possible reasons. If the internet connection is unstable or disconnected, Skype won’t be able to upload the file to its servers. It might also be a temporary issue from the client itself, which should get solved automatically after a while.
Apart from this, some restrictions set by Microsoft will interrupt the uploading process midway.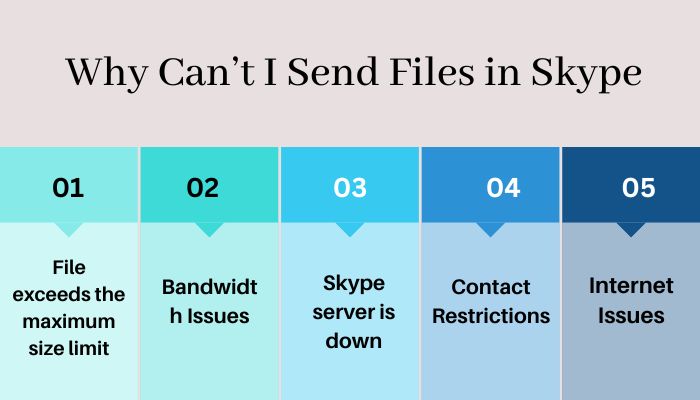
Here is a list of possible reasons why you can’t send files via Skype:
- File exceeds the maximum size limit – Skype allows you to send any number of files on Skype freely as long as they are lower than 300MB in size. If your file is larger than this, the file won’t upload.
- Bandwidth Issues – If you try to transfer a file on Skype while on a call, Skype will automatically allocate most of the bandwidth for the call. This may decrease the file transfer speed, which can lead to errors.
- Skype server is down – Occasionally, Microsoft takes Skype servers offline for maintenance purposes. A notice is usually sent to all users, but if you missed it, you could check if the server is offline on Skype Status.
- Contact Restrictions – Before you can start sending files to someone on Skype, you need to be friends first. If the other person hasn’t accepted your friend request, you won’t be able to transfer any files to that particular contact. You should be fine sending files to other contacts.
- Internet Issues – As Skype is a communication software, it needs an uninterrupted internet connection to work correctly. If your internet is unstable, Skype may get disconnected in the middle, which causes a file transfer error.
Now that you can understand what’s causing this issue let’s look at how you can get rid of this headache.
Read more on Skype Randomly opens Windows 10.
How To Fix Error in Transfer on Skype for Business?
You can fix errors while transferring files on Skype for business by tweaking some Skype settings or modifying Windows configuration files. In most cases, this will be a temporary issue, so you shouldn’t face any significant problems while rectifying it.
Follow these steps to fix errors in transfer on Skype for Business:
1. Clear Skype’s Cache Data
The first step to fixing any application errors is ensuring the cache storage is empty. An essential point people overlook here is that this won’t be able to solve anything if the issue is coming from the server side.
However, if the Skype client is at fault, then there’s an excellent chance of this fixing it.
Follow these steps to clear Skype’s cache data:
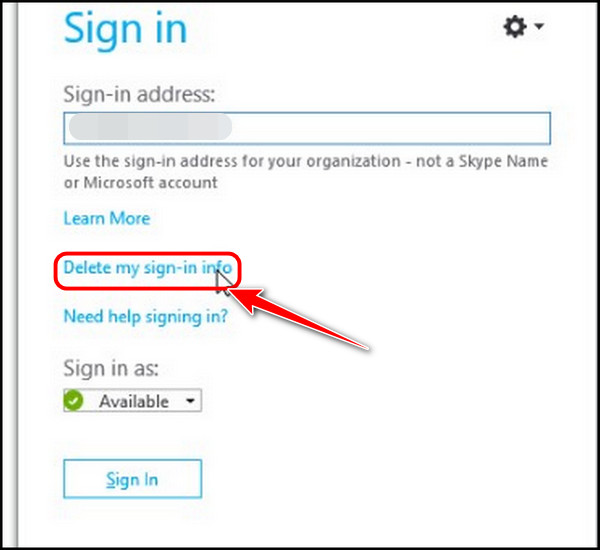
- Launch Skype and sign out of your account if you are logged in.
- Select Delete my sign-in info from the next page.
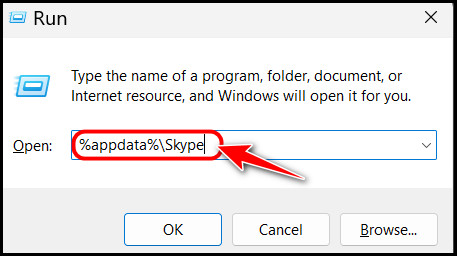
- Press the Windows and R keys at the same time to launch a Run window.
- Type %appdata%\Skype and press the Enter key.
- Look for the folder that has your Skype account name, right-click on it and select the Delete icon.

- Reboot your PC once it’s done to apply the changes.
If this does not work, it’s possible your internet connection may be the cause so try the following method to solve that.
2. Flush DNS Cache
If clearing Skype’s cache didn’t work, deleting the DNS cache might do the trick.
DNS is commonly known as the ‘phonebook’ for all internet addresses, and it frequently caches data on your PC to speed up your browsing experience.
These files usually don’t interfere with memory since they are kilobytes of data, but they can still cause problems with the internet, especially if it hasn’t been cleared in a long time.
Follow these steps to flush the DNS cache:
- Press the Windows and X keys at the same time to launch a context menu at the bottom left corner of your taskbar.
- Select ‘Windows Terminal’, ‘Terminal’, ‘Command Prompt’ or ‘Windows PowerShell’ from the list of options. The options will vary depending on your Windows version.

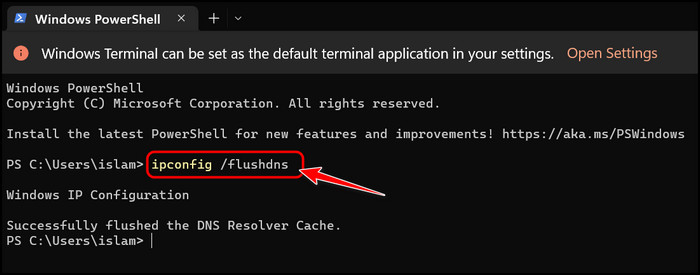
- Type ipconfig /flushdns in the window and press the Enter key to execute the command.
Keep in mind that there may be other things interfering with your connection. For example, if your router is not providing internet access or it’s configured incorrectly, flushing DNS won’t make any difference.
3. Review the File’s Extension
Since Skype for Business is made with large companies in mind, it’s also more secure than other instant messaging applications. One of those security measures includes restricting some file extensions from being transferred through the app.
This is done to prevent viruses and spam from being sent through the platform.
Here are the file extensions that are currently unsupported on Skype:
ade, adp, app, asp, bas, bat, cer, chm, cmd, com, cpl, crt, csh, exe, fxp, grp, hlp, hta, inf, ins, isp, its, js, jse, ksh, lnk, mad, maf, mag, mam, maq, mar, mas, mat, mau, mav, maw, mda, mdb, mde, mdt, mdw, mdz, msc, msi, msp, mst, ocx, ops, pcd, pif, pl, pnp, prf, prg, pst, reg, scf, scr, sct, shb, shs, tmp, url, vb, vbe, vbs, vsd, vsmacros, vss, vst, vsw, ws, wsc, wsf, wsh.
Follow these steps to check the file extension for your file:
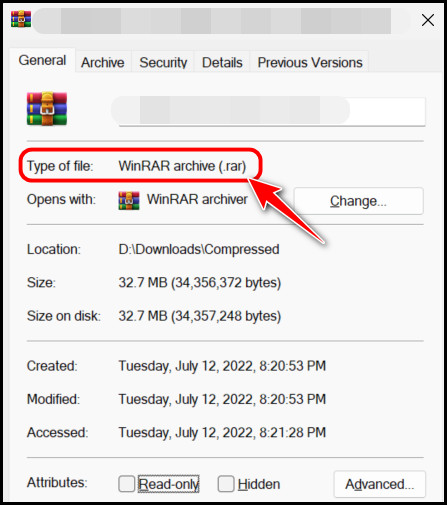
- Open the File Explorer and navigate to the location where the file is being stored.
- Right-click on the File and select Properties from the list.

- Look for the text next to Type of File. Check if the file extension matches with the list of unsupported formats above.
These simple solutions should be enough to fix your Skype problems. If you are still facing the issue, I recommend checking the previous section and visiting the Skype Status website to verify that the Skype servers are not offline.
Read the FAQ section below if you still have questions.
FAQ
Question: How do I enable File Transfer on Skype?
Answer: You can’t enable File Transfer on Skype manually because it’s already enabled by default, and you won’t find any option to disable it. You can start transferring files as soon as you create your account by selecting the Share Files button and choosing your file.
Question: Is Skype file transfer secure?
Answer: Yes, Skype’s file transfer, along with its voice, videos and instant messages, is encrypted, so it’s pretty safe against hackers. In about 19 years of operation, Skype hasn’t had any major security issues.
Final Thoughts
No matter what anyone says, Skype is still a reliable platform for communication, especially for large companies. While you may face issues at times, it’s only a matter of time before you find a solution on the internet.
The first section of this article discusses the reasons behind the error while transferring files, and the next should help you fix them.
Let me know in the comments which method worked for you.