The wait is finally over. Your new gaming PC has just arrived. But you need to assemble it before enjoying the smooth frame rates.
Installing a PSU is just one of the many parts of the assembly process.
This step-by-step guide for connecting the PSU to motherboard will ensure you don’t encounter any hiccups.
Let’s start, then.
How To Connect Power Supply To Motherboard
If you have already unboxed the PSU unit, you will see that the power supply provides many cables. The cables are attached to non-modular power supply or semi modular power supply. Modular power supplies don’t have the cables attached and are instead put inside a separate bag.
At the end of each cable that comes with the PSU are the respective ports or connectors attached. The PC power supply connectors attach to the components in only one way. For example, the power cable to the motherboard also incorporates a notch so that you know which way to connect it correctly.
The PSU provides power to the different components of the computer through the connectors. So you need to connect the power supply cables to the motherboard.
For the motherboard, you have the largest connector comprising 24 pins. Then comes the processor and the graphics cards with 4/6/8 connectors depending on how much they retain power.
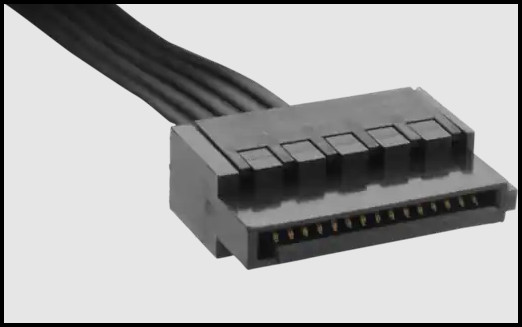
The SSD and hard drives are powered using the SATA power connector. It has a distinct shape; you can easily identify it by looking at the following picture.
Finally, the fans and RGB modules have separate 4 pin attachments where they attach to the motherboard.
Before connecting PSU cables or any components, it is wise to think about managing all the cables to connect inside the computer’s case. You don’t want it to look like a mangrove forest, after all.
In most PC cases or chassis, you can route the cables from the back using the holes/grommets that are present on the motherboard tray.
Once you learn how to connect the cables you need, you can learn to manage the cables instead of having cables everywhere inside the case. The rest of the cables which are not connected will also need proper management. Hence some cable management tips might be useful as well at the end of the process.
Check out our recent article on what Power Supply do I have.
Now we have everything covered. It’s time to connect the components.
Here are the steps to connect the PSU to motherboard:
Step 1: Place the PSU inside the case
First, identify how your computer case allows you to install a power supply. Older cases used the top mount. The newer cases have a shroud at the bottom where you can install the PSU and bring all the connector cables to your motherboard through the back.
For both types of cases, place the PSU in position and align it with the holes on your case. Use a Phillips head screwdriver to attach it securely to the computer’s casing. You need to remove the back panel to insert the PSU if your chassis employs a bottom-mounted design.
As a reference, this is what my case with the installed PSU looks like.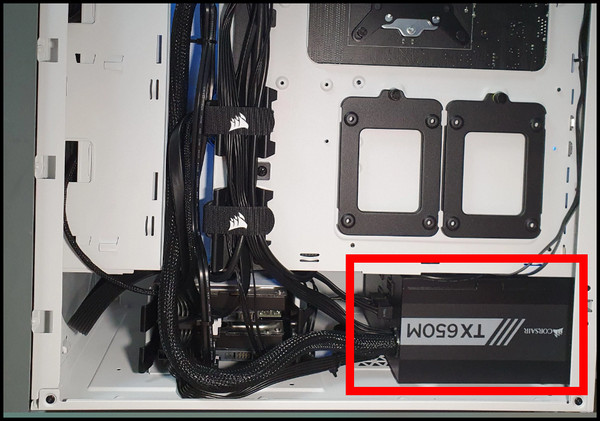
Now it is time to connect the cables that supply power directly to the motherboard and other components.
Also, check out our separate post on what happens if your Power Supply is too weak.
Step 2: Connect the 24-Pin ATX Cable
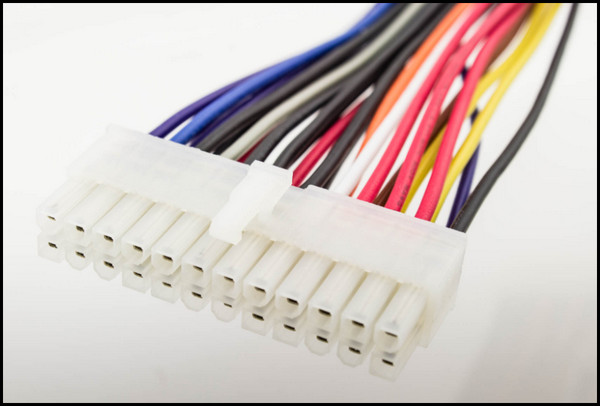
You can easily spot this connector among the sea of PSU cables. The 24-pin cable is the main power cable and supplies power to the motherboard.
The older motherboards used a 20 pin motherboard power connector. But the newer motherboards use 24-pin. Hence the ATX power connector is designed as a 20+4 pin connector. It ensures compatibility across all generations of motherboards with varying power requirements.
The 24 pin motherboard slot is present near the RAM slots, although the placement varies in different manufacturers.
When you insert the connector completely, the clip will ensure that the cables securely fit with the motherboard.
You can pull the connector to see if it has a secure fit. Once done, move on to the next step.
Follow our guide step-by-step to fix Computer not turning on Power Supply.
Step 3: Attach the CPU Power Cable
Now identify the power cable for your central processing unit or CPU. The CPU cable is very similar to the motherboard ATX cable, except it has 4 or 8 pins.
Processor with less TDP employs a 4 pin power supply header as they require power a lot less. Higher-end CPUs such as i9 12900K require a single 8 pin CPU power connector or dual connector if overclocked.
The header to connect the 4 or 8-pin CPU power cable is present next to your processor.
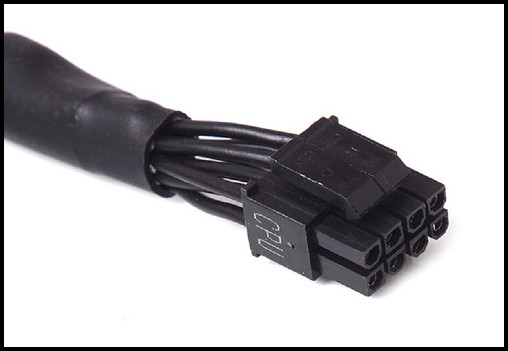
Even if your motherboard supports an 8-pin connector, you can connect a 4-pin connector here. Just insert the connector by following the notches and it will secure automatically with the built-in clip.
Check out the easiest way to fix computer turns on and off repeatedly.
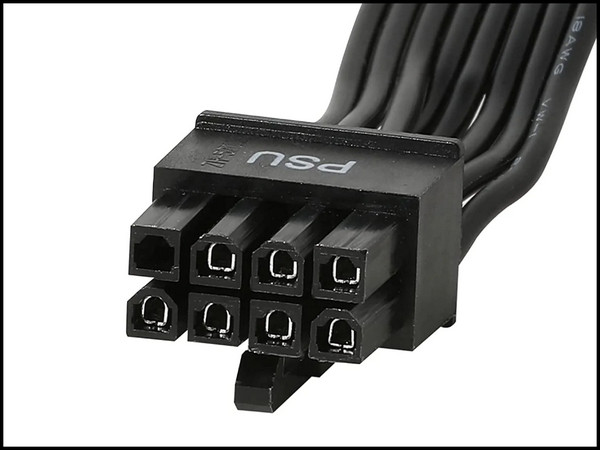
Step 4: Connect the GPU Using a The 6/8 Pin Cable
Next up is the star of the show, the Graphics Processing Unit, or GPU.
An entry-level card does not require a direct power connection through cables to function. It draws power from the motherboard.
For midrange cards, you need to provide power using a 6 or 8-pin power connector. High-end cards do not get enough power using a single 8 pin power connector. Hence they need two 6 or 8-pin connectors. The header is usually on the graphics card, which you find below its shroud.
Now insert the GPU on the motherboard PCI-e slot and secure it using screws. Once you identify what connectors you need to plug into, route the cables from the case opening nearer to the GPU.
Align the connector with the header present on the graphics card and push it firmly till you hear a click.
Step 5: Connect the Disk Drives
Disk drives have two connectors that need to connect to the motherboard and PSU separately. This is true for both HDD and SSDs. Among them, the SATA power cable connects with the PSU to give power to the disk drives.
The SATA power connector is keyed, so you can only connect the SATA connectors to the motherboard in one orientation. Just align the connector with the drive and push it inside the slot. Check the SATA cable for wobble, and ensure a secure fit.
If you have multiple drives, you can connect them too. 4 SATA ports on the motherboard are usually present to accommodate the extra drives. 4 pin Molex power cables were used in the early days, but now they have become almost obsolete.
Follow our guide step-by-step to fix Motherboard temperature high.
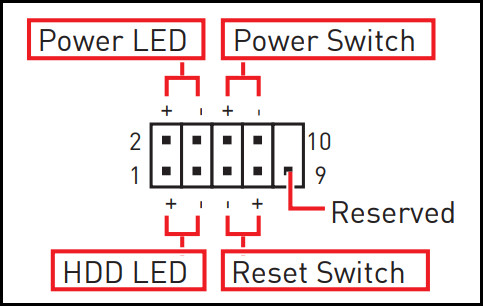
Step 6: Connect the Front Panel Headers
This may be the most tricky part of this entire guide, and I am not even joking.
The front headers include the connections of the power and reset buttons along with the microphone and earphone jacks if your case sports one.
Every motherboard has these headers labeled so that you can connect them easily. The problem lies in the fact that their arrangement varies for different manufacturers. Scan through the entire motherboard to find the headers.
Also, the connectors themselves are microscopic and require the precision of a surgeon for proper installation.
Once you know the arrangement of all the headers, you can sort them in the correct order and insert them all together. Do not forget to tuck in the loose cables using cable ties.
Here is a simplified image I use to connect the headers from my motherboard’s manual.
Step 7: Attach the Case Fans and RGB
For the case fans, you have the SYS_FAN and CHA_FAN headers to connect the fans. In case of multiple fans, you can daisy chain (connecting serially) 3 fans to a single header. The header usually has 4 pins, and they are labeled on the PCB of the motherboards.
If the fans come with RGB support(which is the rage these days), you need to plug the RGB connector into the ARGB header on your motherboard. That way, you can control them using the software that comes with the motherboard. For example, you can use Aura Sync software if you are rocking an ASUS motherboard.
Congratulations. You have connected all the cables you need to run the PC. Now let us learn how to manage the cables for a clutter-free PC build.
Cable Management Tips
Cable management is highly recommended to ensure there is no unnecessary clutter at the back of the case. It will help you in the future to work inside the PC and avoid dust buildup.
As we have discussed earlier, you need to think about cable management before starting to connect them. So I’m assuming you have done it and have put the cables through the holes and grommets at the back of the case.
Now you need to tie up the cables using zip ties. Some cases have cable ties and velcroes built into the casing, which helps a lot. Once you have finished tying up the cables, tuck them in the grooves and cable management channels present at the back of the casing.
You can also tuck in the extra cables inside the PSU shroud (most modern PC cases have one). It will keep them away from the view.
Once you have finished tidying up the messy clutter of cables at the back of the PC case, close the side panels of the case, and turn on the power switch of the PSU (accessible from the rear of the PC case).
Finally, you can start the PC and see the success for yourself.
Frequently Asked Questions
Which power cable usually connects directly into the motherboard?
The ATX 24 pin power cable from the PSU is responsible for powering the motherboard. It connects to the largest header that is present.
Does PSU have to be plugged into the motherboard?
If you are looking to test the PSU, you can insert a paper clip on the 16 and 17th pin and then plug it into the mains. This should power the PSU and is only good for testing the individual components.
Which way should I install my PSU?
The best way to properly install the PSU is to face the fan downwards. This way, the exhaust fan on the power supply will draw the hot air from the case and expel it outside.
Conclusion
The assortments of cables emerging from PSUs can give anyone nightmares if you’re baffled. And it’s totally okay if you’re looking for help to connect the PSU to the motherboard.
This guide aimed to make PSU installation as easy as possible when building a PC. And once you get to know the cables and connectors, you’ll connect the power supply into the motherboard in no time.
Once the cables that you need are attached, set up Windows and drivers for the gaming sessions.
It’s exciting to be a PC enthusiast and enjoy your own PC builds, isn’t it?