Microsoft SharePoint is a powerful tool for maintaining lists and libraries. When the organization relies much on the list information, you can’t just afford to make a mistake.
With the SharePoint column validation formula, you can ensure the users provide accurate and consistent information in specific values by maintaining the data integrity and rules.
In this article, I’ll explain different types of SharePoint validation and show how you can create and use them in your list.
So, let’s begin.
Microsoft SharePoint validation refers to the process of verifying and ensuring that the provided data is entered correctly and meets the specific requirements. It allows the user to set rules or conditions that must be satisfied before saving or updating a value.
The validation rules and conditions are similar to the Excel formula. With the validation formula, you can input and gather information without an error.
There are two types of validation in SharePoint. They are:
- Column validation.
- List or library validation.
Column Validation: In SharePoint column validation, you can define conditions for each column value. The column will accept only the values which fulfill the condition. It will show an error message if the input value doesn’t satisfy the requirement.
List or Library Validation: With the list or library validation, you can use more complex conditions that involve other or multiple-column and cross-column validation.
Consider reading the following passage to create and validate the data in Microsoft SharePoint
Users can set up conditions in the SharePoint column by editing the cell and inputting formulas in the Column validation option. Also, you can use list or library validation if you need to include other or multiple columns and do cross-column validation with the formula.
Depending on your output and requirements, the choice will be different for the validation. If you want to work with a single column, you can go with the column validation, and for multiple columns, choose list or library validation.
Read the methods below to validate a column a SharePoint:
1. Use Column Validation
The column validation works for all types of SharePoint columns. It can only take conditions that don’t involve other columns in the formula.
Use cases/ Examples:
- Users want to set a renewal date, but the date will be a future date. It can’t be a past date or today.
- Users want to take values between 1000-10000. It can’t be more or less than the range.
There can be countless conditions for column validation. The following steps will show how to set a column validation for a SharePoint list.
Here is the process to set column validation in Microsoft SharePoint:
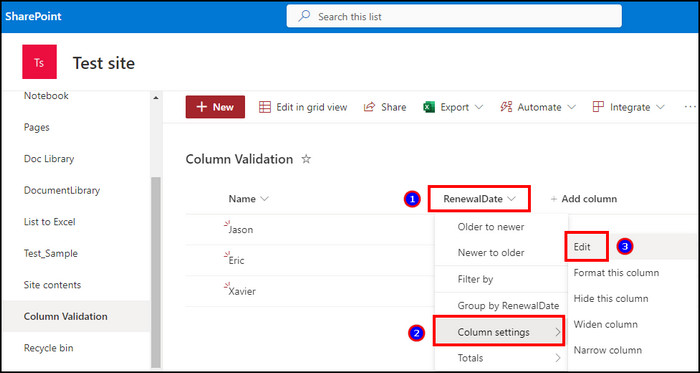
- Go to your SharePoint list.
- Press on the column.
- Click on Column settings.
- Press on Edit.
- Expand More options.
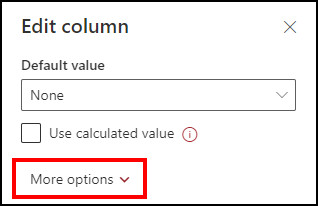
- Click on Column validation.
- Type your preferred formula.
- Provide User message press on Save.
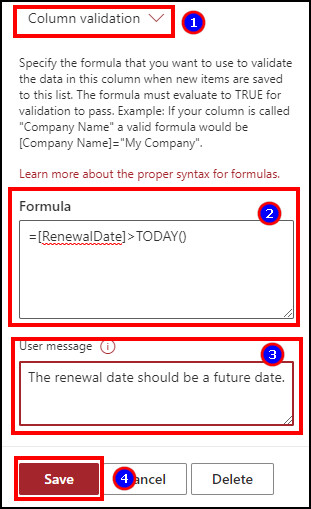
Now the SharePoint list cell will take values if you input it correctly. Otherwise, it will show an error with the user message.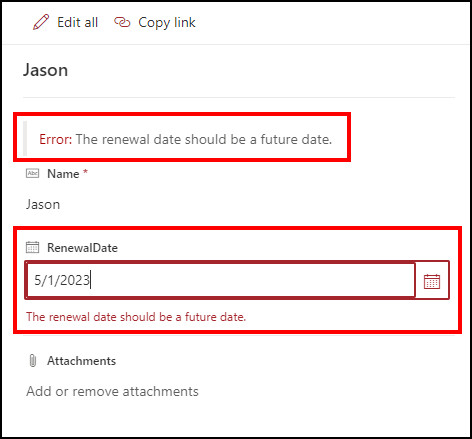
2. Use List or Library Validation
If you want to set up data validation in a SharePoint list that has metadata from another column, you must use list validation instead of column validation. List or library validation is necessary for the SharePoint column validation based on another column.
Use cases/Examples:
- Users need to input the renewal date which is before the expiration date (another column).
- Users need to provide values between the minimum range (first column) and the maximum range (second column).
You need to access the Library settings and input the condition there. Consider following the procedures below to create a list/library validation.
Here are the steps to set a list or library validation in SharePoint:
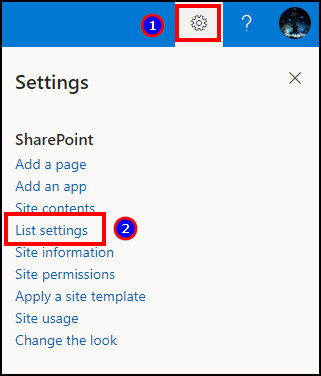
- Go to your Microsoft SharePoint list.
- Click on Settings from the top.
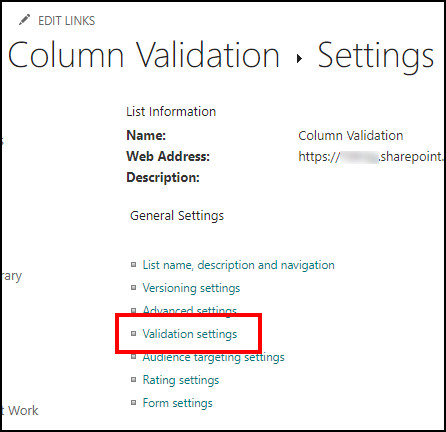
- Press on List settings or Library settings.
- Click on Validation settings.
- Type the formula and User Message.
- Press on Save.
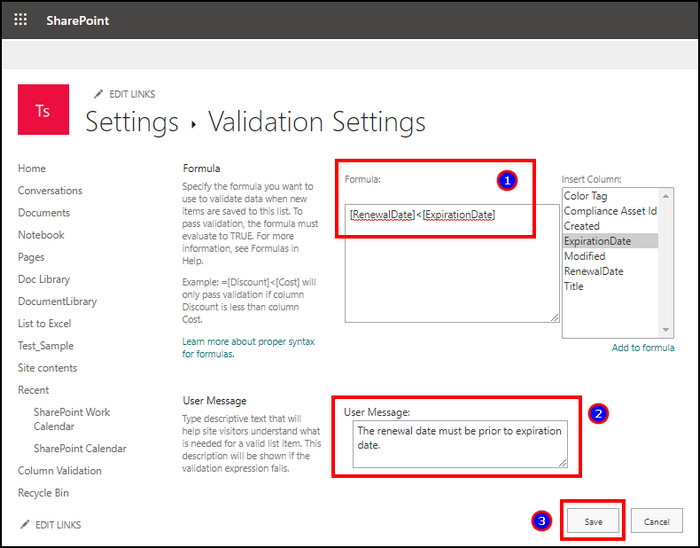
If you input a date later than the expiration date, the renewal date will show an error message. 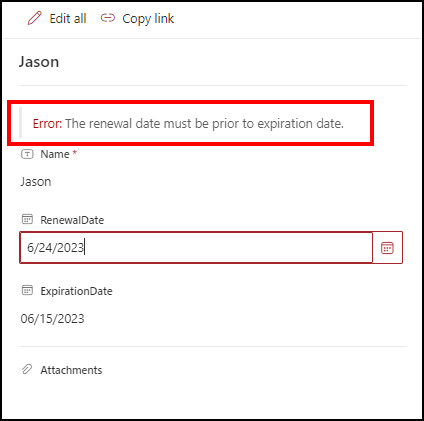
With the column and list or library validation, you can use your preferred formula and customize your list in SharePoint.
Frequently Asked Questions
What is the character limit for SharePoint column validation?
The character limit for Microsoft SharePoint column validation is 255 characters. You must write the formula within the limit.
Can I use column validation for two SharePoint columns?
No, you can’t use column validation for two or more SharePoint columns. You need to use the list or library validation to use formulas for multiple columns.
Can I input incorrect values in SharePoint column validation?
No, you can’t input incorrect values in SharePoint column validation. It will only take values that meet the formula.
Ending Note
The column validation helps to input accurate values in a specific SharePoint list or library. You can avoid the wrong information and maintain the accuracy of your data by using column and list validation.
This article has explained the SharePoint validation, when, and how to create one for your list or library.
I hope you’ve found the article helpful and are using the formula to customize your SharePoint list.
Cheers!