When you install a new Windows, the default drive commonly starts with C. It’s a very common Windows term that didn’t change from the beginning of the Windows Operating system.
However, seeing the same drive C from your childhood must get boring now. That’s why I keep asking myself, can I change the name of the C drive to something better?

Well, yes, you can change it, and I suggest you do so.
Whether keeping things organized or giving a personal touch, changing the drive letter has its own benefit. But how to do it easily?
Don’t worry. In this article, I will show you the quickest way to rename your C drive. So, without further delay, let’s jump into the article and change your Drive C.
How to Change C Drive in your PC
You can change your C Drive’s name using 3 methods: File Explorer, Disk Management tool, and Command Prompt. If you want to change the driver letter, the Disk Management tool is your best approach. To change the name of the drive, you should use File Explorer and Windows Command Prompt.
In this part, I will give you a step-by-step guide for each method of changing the Drive C name. You can use any method you like. Let’s see how to do it.
Here are the methods to change C Drive on your PC:
1. Form File Explorer
Changing your C drive name from the file explorer is a very task. You just need to select a suitable name and input it in the editable section.
Here are the steps to change the C Drive name from File Explorer:
- Go to File Explorer and click This PC.
- Right-click on the Local Disk (C:) drive.
- Choose Rename from the drop-down menu.
- Insert the chosen name and hit the Enter button.
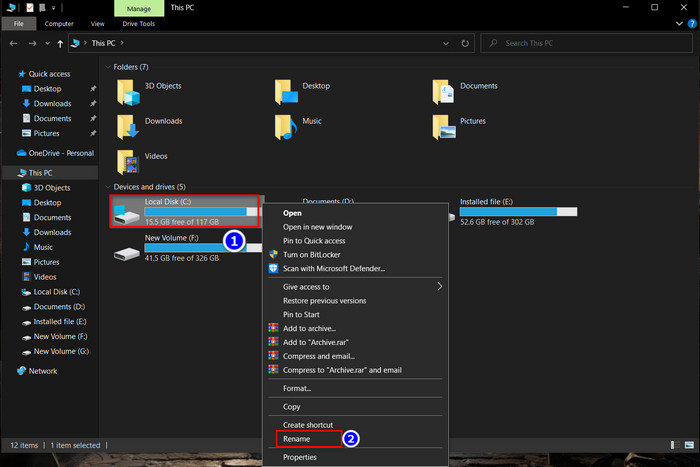
- Click Continue to provide administrator permission.
After you complete the steps, you will see the name you imputed.
You can check out our separate post about difference between C and D drive.
2. Use the Disk Management tool
The Disk management tool is the best application to change the letter of any local drive. Generally, the HDD partition starts with C because it is the first available drive letter. But with the help of a Disk Management tool, you can easily change it.
Here are the steps to change Drive C using the disk management tool:
- Right-click the Start icon and select Disk Management.
- Right-click the Local Disk (C:) option and select Change Drive Letter and Paths.
- Click Change and then select a different letter for the drive.
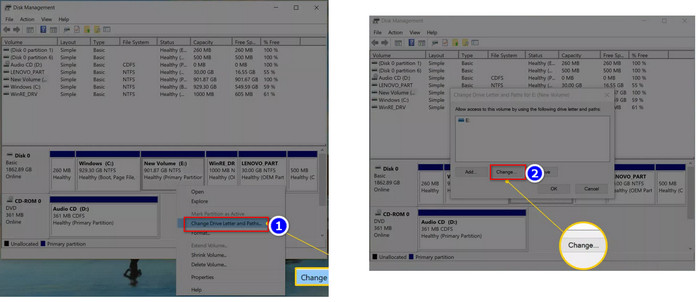
- Hit OK, then Yes.
After you click yes, the drive letter (C:) changes permanently. When you open your PC, you will find the changes. You can also change the drive name from Disk Management.
Here are the steps to change the Drive C name using the disk management tool:
- Right-click on This PC icon.
- Choose Manage from the drop-down menu.
- Click on Disk Management.
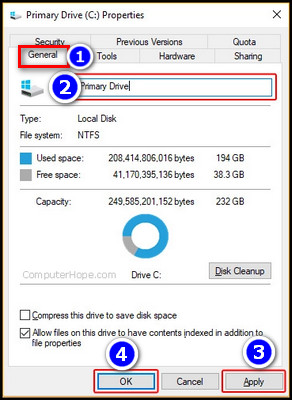
- Right-click on the Local Disk (C:) name and select Properties.
- Navigate to the General tab in the Properties section.
- Insert the chosen name next to the disk icon, then click OK.
And you will see the changed display name of your C Drive in the My PC interface.
3. Use Command Prompt
Command Prompt is an interface where you can enter a command, and Windows executes it. You can use a short command to change your C drive’s name from CMD. But the command will only work on CMD (Admin).
Here are the steps to change the Drive C name using the command Prompt:
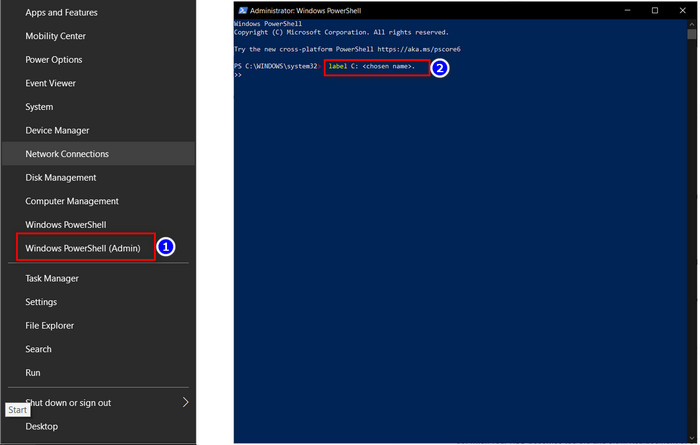
- Right-click the Start button and select Command Prompt (Admin) or Windows PowerShell (Admin).
- Insert the following command, label C: <chosen name>.
- Hit Enter.
After pressing the Enter key, the C drive’s name will change to your selected name.
These are the three ways to change Drive C name. But among the methods, the Disk Management tool only lets you change the letter of the drive along with the drive name.
When Should you Replace the C Drive?
C Drive needs to be fast and defragged to launch Windows quickly. So you need to replace Drive C when the HDD becomes too old, slow or gets too many bad sectors. Also, if you want to shift your OS from HDD to SSD, you should replace the C drive.
Typically, the C drive is the primary hard disk partition that stores the operating system and all necessary system files. It also stores other applications and related files needed to run Windows.
So, when your HDD becomes too old and slow, Replacement of Drive C is mandatory. In this section, I will tell you about the time when you need to change your drive to new hardware.
Here are the situations when you should replace the C drive:
- Your current C Drive has a hardware issue that you can’t repair.
- Your C drive is on an HDD, and you want to move it to SSD for faster loading.
- The C drive is running out of space, so you need to move it into a bigger drive for capacity increase.
These are some of the main reasons behind replacing the C drive with newer hardware. Replacing the C drive will describe the window’s loading time and make your Windows faster.
How to Change C Drive to New SSD
You can move your Drive C to the new SSD by performing a clean boot and installing the OS in the new SSD or using any third-party software. 3rd party software moves your OS directly to the SSD without installation. Using 3rd party software is faster but Installing Windows from BIOS is better.
In this part, I will discuss all the methods to move your drive C into an SSD without any hassle. Let’s see how to do it.
Here are the methods to Change C Drive to New SSD:
1. Perform a Clean Boot
Performing a clean boot means installing a fresh copy of Windows into the new SSD using the boot menu. But, you will need to completely reinstall all applications and move any important data to the new drive before using your computer normally.
To execute this method, you need a USB drive with 8Gb+ storage and boot software. In this section, I will show you the quickest way to perform a clean boot.
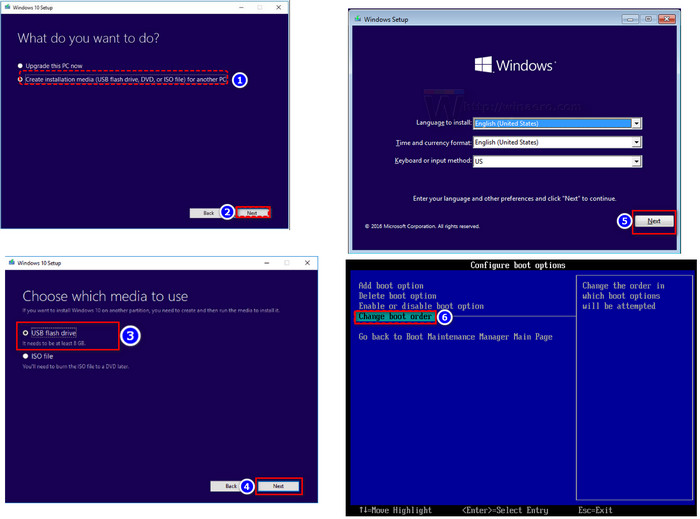
Here are the steps to perform a clean boot:
- Download Windows Media Creation Tool and launch it.
- Choose Create installation media (USB flash drive, DVD, or ISO file) for another PC and Select Next.
- Insert the empty USB drive, and create a bootable USB drive for installation.
- Remove the old HDD, and insert the SSD and the bootable USB into your computer.
- Restart the PC.
- Go to BIOS and change the boot priority.
- Boot your computer from the installation media. (Once the PC boots from the USB drive, Windows 10 will automatically enter setup mode.)
- Choose your desired option, then click Next.
- Select Install now.
- Input the license key, or skip it.
- Click Custom: Install Windows only (advanced) and select your new drive in the Where do you want to install Windows screen.
- Click Next to install the OS.
- Restart your PC after the installation, and go to BIOS to change the boot drive to SSD.
After you have installed your Windows, you need to install the related application and driver to run your computer smoothly.
2. Migrate the OS using 3rd Party App
You can also move your drive C to an SSD with the help of a 3rd party application. When you use any 3rd party application, you don’t need to install the OS again. It will save you a lot of time.
At this point in the article, I will show you how you can move your C drive using an application named AOMEI Partition Assistant Professional.
All applications of this segment use a similar process to moving OS. So you can use the steps on other applications.
Here are the steps to migrate the OS using 3rd party app
- Install and open AOMEI Partition Assistant Professional.
- Click Migrate OS to SSD option.
- Select an unallocated drive on your disk and click Next two times.
- Read the note carefully if necessary, then click Finish.
- Click Apply to start OS migration.

After the process finishes, you will see the OS in your SSD. And you can now enjoy a stable and fast operating system.
FAQs
Does Adding an SSD Make My Laptop Faster?
Yes, any SSD can speed up your everyday tasks by up to 6 times. They use flash memory to eliminate the moving disk HDD, helping the computer to find files faster.
Is the boot drive always C?
Windows OS always uses the default letter C for the primary hard drive because C is the first available drive letter for hard drives.
What is the C drive used for?
C drive is used as a data storage or backup drive. It also stores your Windows operating system and installed programs.
Conclusion
Long story short, you can change your C drive name using File Explorer, Disk Management tool and Command Prompt. Among the methods, the Disk Management tool lets you change both the letter and the name.
After reading the article, I’m sure you now know how you can change your Drive C name. Which one of the following methods seems easier?
Comment below.