You have recently brought a new graphics card, well congratulations on getting one in this unstable market; the problem is your windows is not detecting it.
Or, you were getting low FPS on a game and realized your Windows PC doesn’t have the driver of your graphics card. It is missing all of a sudden.
What do you do when your GPU driver is not showing up? In this guideline, I am going to write all the possible fixes for your GPU driver not being detected in windows 10.
So keep reading till the end to get your desired fix!
Check out our separate post to NVIDIA graphics card not detected in Windows 11.
Why is my GPU not being detected?
Your Graphics Card is not being detected because of a mismatch between the windows and GPU versions. Also, if your GPU driver is disabled from the Device Manager, it won’t appear as a graphics driver. On the other hand, if your BIOS is outdated, you might also face the same issue.
The common mistake you would make after installing a new GPU into your PC is that you will not change your graphics card output from integrated to dedicated GPU you have bought.
As many processors come with an APU in-built, you have to change it if you have bought or installed a new graphics card. At the same time, if you have bought a new GPU, it has to match your BIOS firmware. For that, you have to update it. Or your GPU will not appear in the Windows driver list.
Also, check out our separate post on can i use a freesync monitor with an Nvidia Card.
How To Fix Nvidia Graphics Card Not Detected In Windows 10
You can fix your NVIDIA GPU not showing up by enabling it from the Device Manager. Also, you have to update your Windows version & GPU driver to the latest version to be able to detect it. Using CMD to detect your NVIDIA GPU will also fix the issue.
You are in a situation where you see that your GPU fan is spinning, but your GPU driver is not opening, or you cannot locate it.
Or, you have bought a GPU, but your APU is still in use rather than your dedicated GPU! I have been in a similar situation in the past, and there are some easy fixes for that.
So let’s dive straight into the troubleshooting steps.
Follow the steps to fix Nvidia GPU not detected in windows 10:
1. Disable Integrated GPU
As I have said earlier, many processors come with an integrated GPU. And if you have bought and installed a dedicated GPU in your PCI slot, you have to disable the APU or integrated GPU from your BIOS settings.
Follow the steps to disable integrated GPU from BIOS:
- Restart your PC.
- Press F2, DEL or ESC buttons on the keyboard to enter BIOS Settings.
- Click on Advance Mode.
- Select settings.
- Go to Internal Graphics.
- Select Disable.
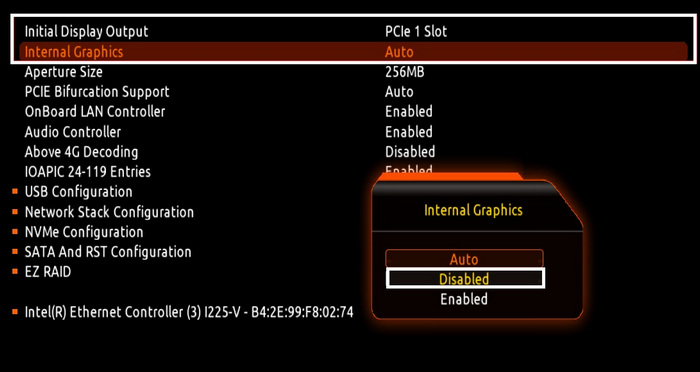
- Set Initial Display Output to PCEI-Slot 1.
BIOS settings on your motherboard may vary depending on the manufacturer of your motherboard. However, you will find the relative settings there and modify them from your BIOS settings. Also, if you have installed the graphics card on your PCEI Slot 1, select slot 1; if you installed it on Slot 2, then select slot 2.
Check our epic post on how to access advanced startup options on Windows 10.
2. Enable GPU Driver From Device Manager
If your GPU driver is disabled from the Device Manager, then you won’t be able to detect your NVIDIA GPU.
Follow the steps to enable the GPU driver from the device manager:
- Press CTRL+X on your keyboard.
- Select Device Manager.
- Go to Display Adapter.
- Right-click on your GPU from the drop-down menu.
- Select Enable.
If you see the disable option instead of enabling, then go to the next method. But if you see the enable option, then it is more likely that your GPU driver was disabled. Enabling it would fix the issue with your graphics card.
Also read how to update drivers on Windows 11.
3. Update Windows
If you have installed the latest version of the driver in your GPU, but your windows version is way outdated, it won’t detect your GPU. So before you jump into updating your graphics card driver, you should update your windows.
Follow the steps to update windows:
- Click on Settings.
- Choose Updates and Security.
- Click Check for Updates.
- Download and install the new version.
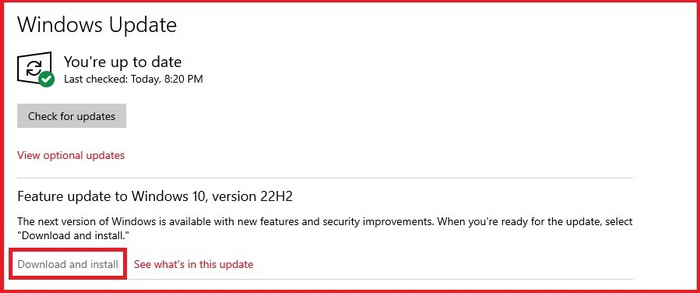
Let your PC download the update, and while installing the update, your windows pc will reboot and continue installing it after the restart.
Follow our easy step-by-step guide to adjust page file in Windows 10.
4. Download The Latest NVIDIA GPU Driver
The same logic that dictates that you should always use the most recent version of Windows also applies to your graphics card drivers. Regular updates to GPU drivers are released to address performance issues in specific software, most notably PC games. It’s not a little thing, especially when these tweaks may increase performance by a big margin of percentages.
These driver upgrades further comprise bug fixes in the underlying software. There have been enhancements and fixes made in sync with updates from the game’s developers, such as fewer crashes and fewer graphical errors. A Software issue might be the reason why your GPU is not detecting by windows. So update your GPU to the latest driver.
Follow the step to update the NVIDIA GPU driver:
- Go to NVIDIA Driver Downloads.
- Select your product type.
- Choose your GPU Model.
- Select your Operating System. In this case, Windows 10.
- Set Download Type to Game Ready Driver.
- Search for your driver.
- Download and Install it.
Your screen will flash a few times when installing the update, so don’t worry about it. After the update, reboot your PC, and hopefully, your windows PC will detect the Nvidia GPU driver.
5. Disable PCI Express Native Control Using CMD Prompt
If you are still unable to detect the GPU, then you should use the command prompt to Disable PCI Express Native Control. All you have to do is open the command prompt as Administrator and type in a command.
Follow the steps to detect Nvidia GPU using the command prompt:
- Run Command Prompt as Administrator.
- Type in bcdedit /set pciexpress forcedisable.
- Hit Enter.
After you do that, give your PC a clean boot and install the graphics driver again. Hopefully, this will fix the issue.
6. Update The BIOS
Let’s say you’ve recently invested in a high-end Nvidia graphics card from the RTX 40 series. If your motherboard’s BIOS is outdated, you should install the most recent version. Or, your GPU will not be detected by your motherboard.
Various Motherboards require different keys to access the BIOS menu. For instance, I can access the ASRock Motherboard’s BIOS by pressing F2 during boot-up. It’s also possible to use other keys, including (F12, ESC & Delete).
Follow the steps to update BIS:
- Download the latest BIOS update from your manufacturer.
- Put the files on a USB drive that is formatted in FAT32.
- Start your computer.
- Plug the FAT32 USB drive in.
- Press F2 or whatever key you need to press to get into the boot settings for your Motherboard.
- Choose the UEFI update utility.
- Pick the version of the BIOS.
- Choose YES to update the BIOS.
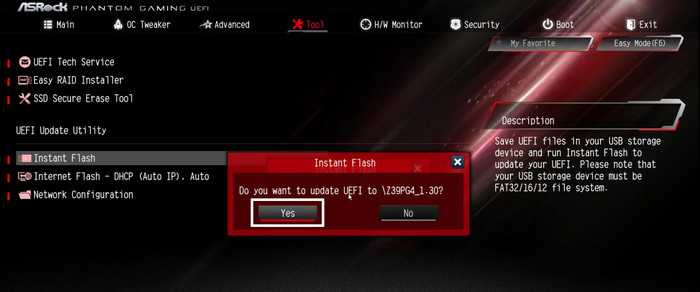
The BIOS on your motherboard will automatically be updated. A system restart is required after installing an update. Be cautious to keep the power on during the procedure since turning it off might cause your Motherboard to become useless and bricked.
Hopefully, after the reboot, your windows will be able to detect the GPU!
Final Thoughts
If you installed a new graphics card on your PC, you have to disable your onboard APU. Or, your Windows PC will not detect the GPU.
Try updating the windows version along with your NVIDIA GPU driver so that your windows PC can detect the graphics card. On the other hand, if your GPU unit is disabled from the Device Manager, then enable it from the device manager settings. Also, check your PCI-E Slot if you are unable to detect your GPU.