You have created a SharePoint list. Now you want the list to be up-to-date when you add or update some data or information in an MS Excel file for managing properly.
Typing the same data twice isn’t a pleasant experience. So how about an automatic process to do the job?
In this article, you are about to know how you can update your SharePoint list from your Microsoft Excel file stepwise. Let’s dive in.
Back in the days, when I managed my SharePoint list, I started to exercise with MS Excel. In the beginning, the data amount was comparatively lower. So, it wasn’t a headache for me to enter double data.
It didn’t start eating my brain initially, but it initiated when I had to input much data twice in my Excel & SharePoint list, and I was losing track of updating data.
But every problem has a solution to escape. Eventually, I found an automated process by which I added or updated data in Excel & it updates SharePoint list from Excel automatically. Not to say that it rains in my heart & I’m sure after reading this article, it will on yours too.
To automatically update a SharePoint list from Excel, we have to create a flow in Power Automate. I have an Excel file in my OneDrive folder & when I edit the Excel file, I want to update the same modification in my SharePoint list also.
Below is the Excel data I want to import or update in my SharePoint list. Ensure you have selected a table design & give a table name. In my Excel file, you will find that I have set my table design & give the table name to Table1. You will also find that I have Title, User Name, Department & Status column header. This information will be needed later.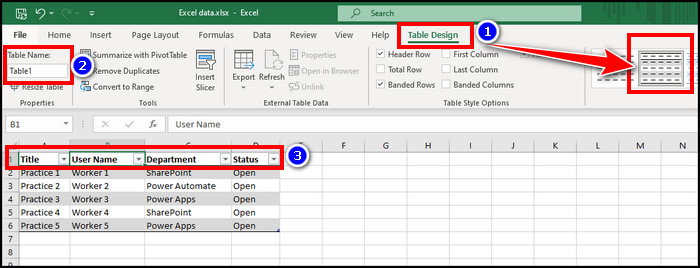
Follow the steps below to update a SharePoint list from Excel using Power Automate flow:
- Go to Power Automate from Microsoft 365 App launcher.
- Click on +Create from the left & select Instant cloud flow from the middle.
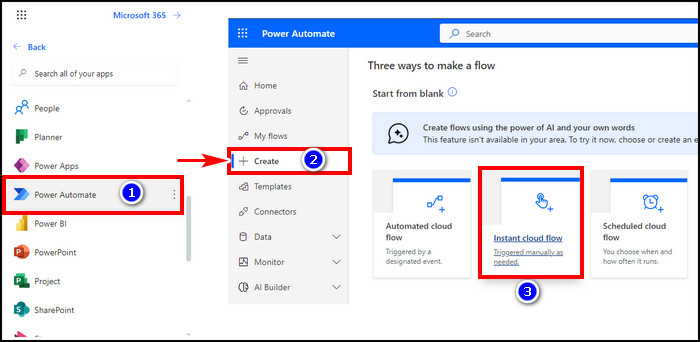
- Hit Skip as we will make our own flow.
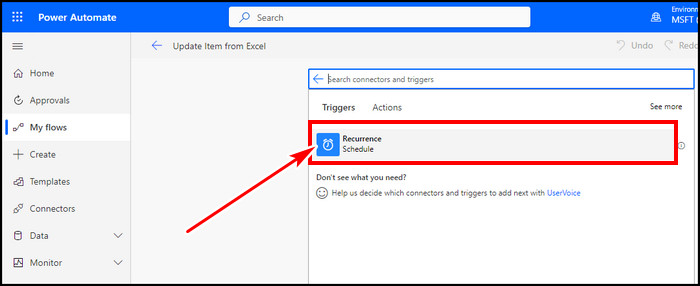
- Give a name to your flow & search Schedule in the middle search box.
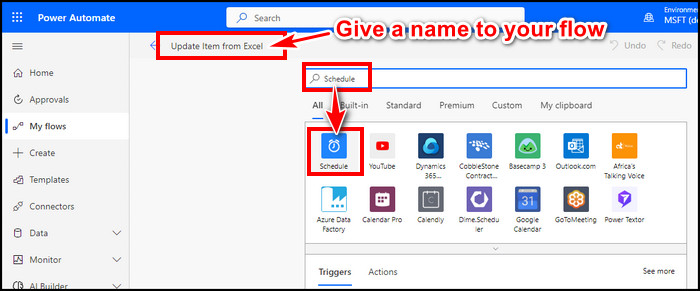
- Hit Schedule from the list & then Recurrence.
- Set an interval time as you need & click + New step from below.
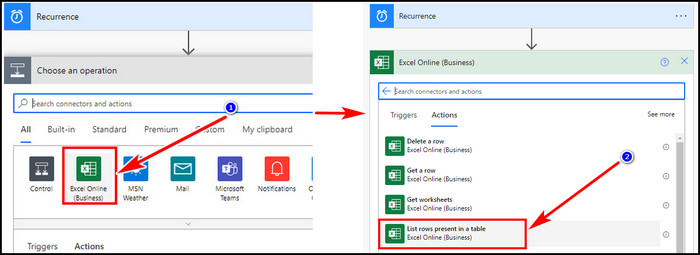
- Select Excel Online (Business) & then List rows present in a table.
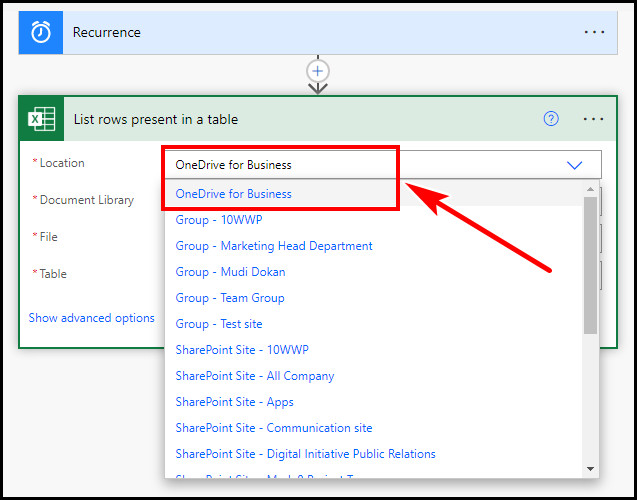
- Select OneDrive for Business from the Location drop-down box, as my Excel file is in the OneDrive folder.
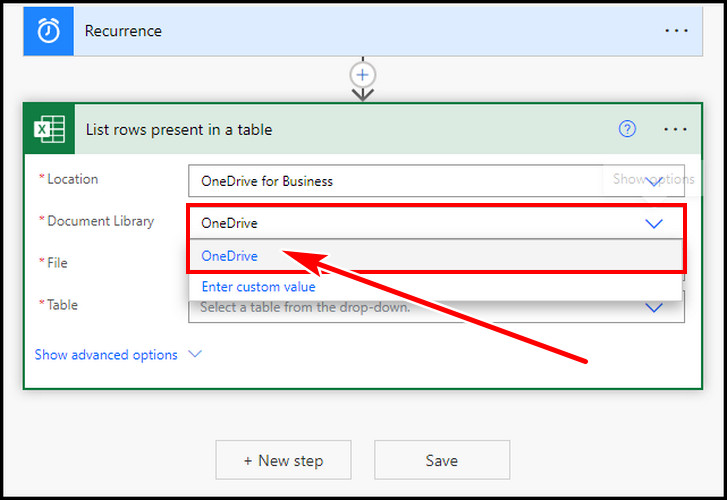
- Choose OneDrive from the Document Library.
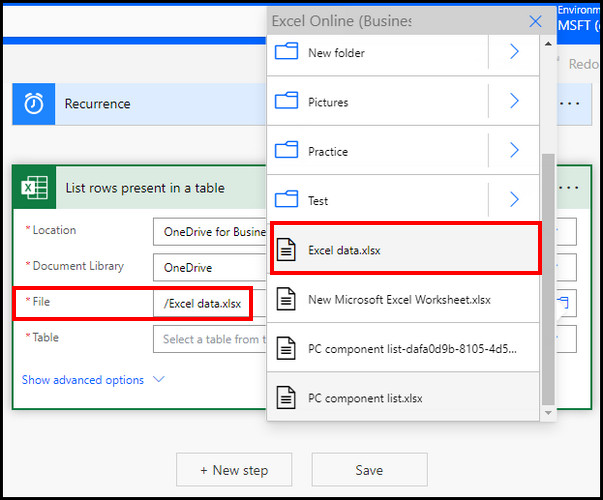
- Pick your Excel file from the File section.
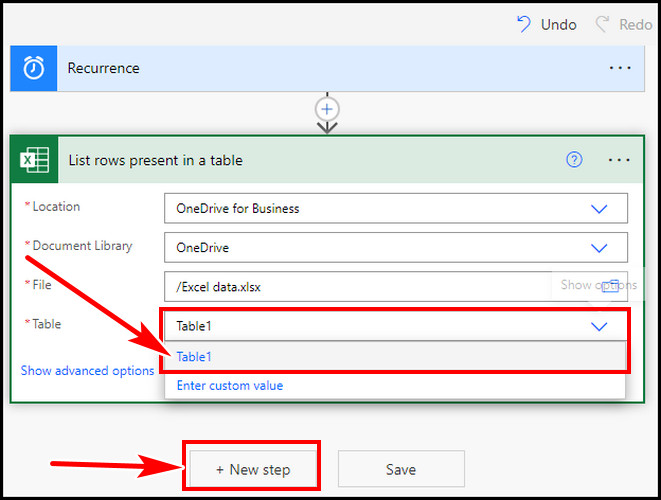
- Select your table from the dropdown list in the Table section & hit + New step.
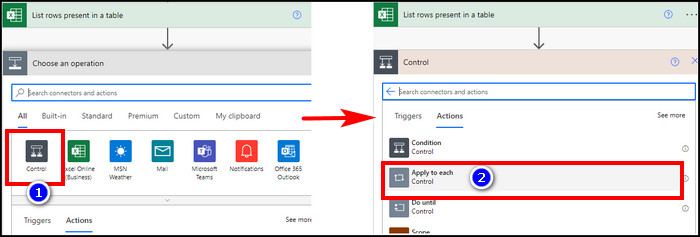
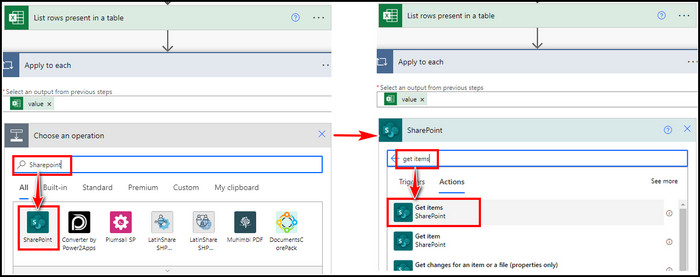
- Choose Control & then Apply to each.
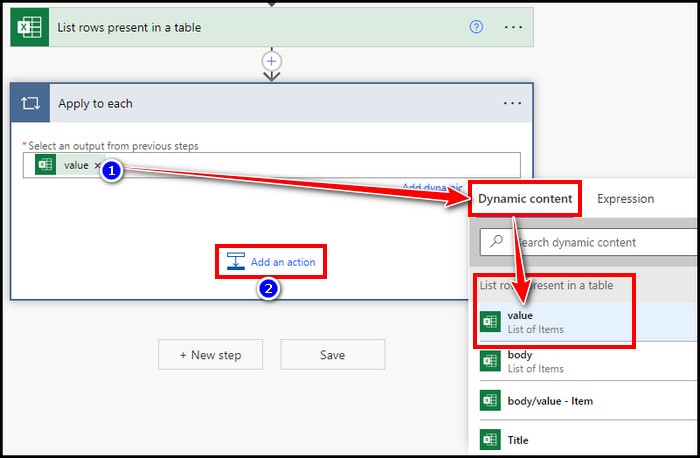
- Select value under List rows present in a table from the Dynamic content tab in the blank box. Click on Add an action.
- Search sharepoint & select Sharepoint from the list. After that, search get items & click on the first result.
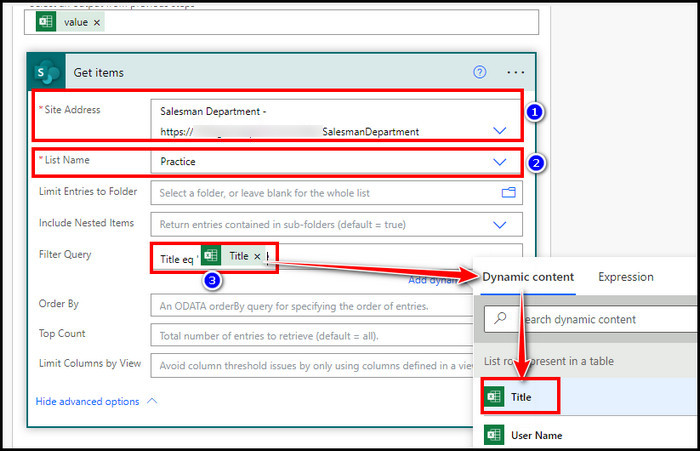
- Pick your site from the Side Address drop-down & your list from the List Name. Hit Show advanced options.
- Type Title eq ” in the Filter Query & in the middle of the citation mark click on Title from the Dynamic content.
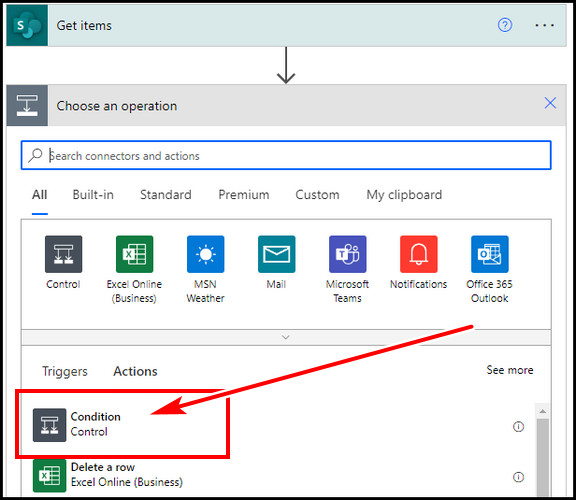
- Click on Add an action & select Condition.
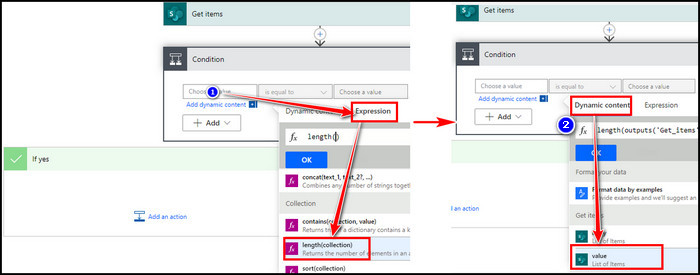
- Click on the Choose a value box & then the Expression tab.
- Select length(collection), go back to the Dynamic content tab & select value under Get items. Hit OK.
- Pick is not equal to from the is equal to drop-down.
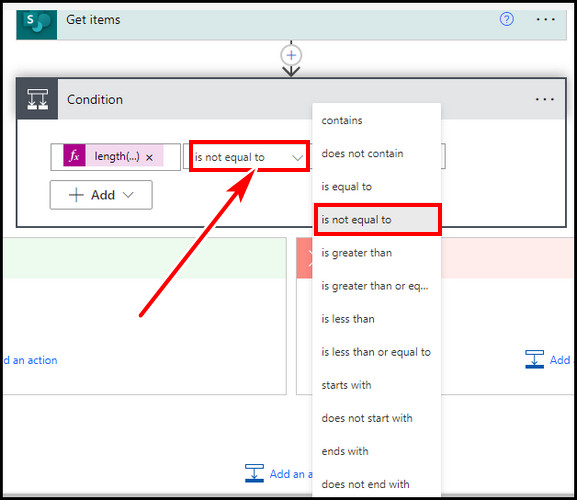
- Put 0 in the Choose a value box.
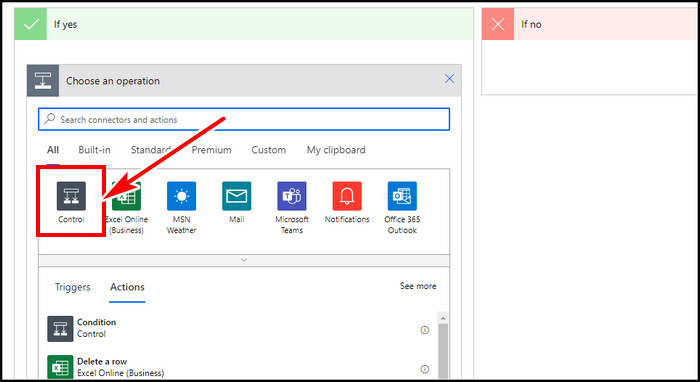
- Click on Add an action under If yes section.
- Select Control & then Apply to each.
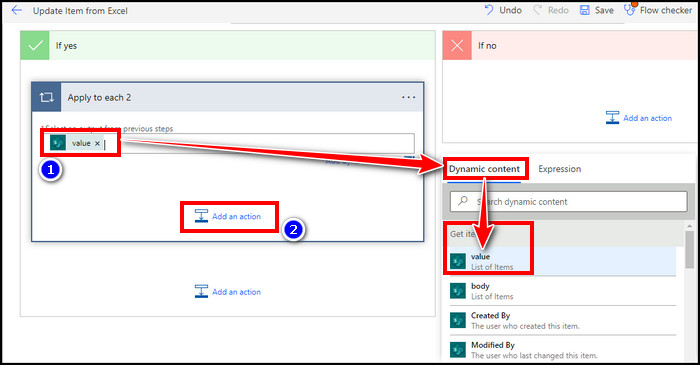
- Pick value under Get items from the Dynamic content in the blank box. After that, hit Add an action.
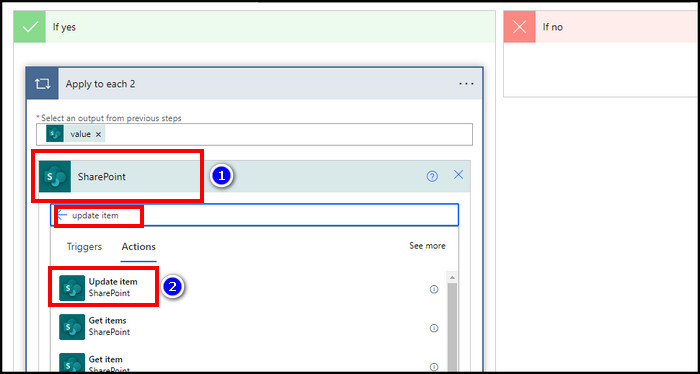
- Choose SharePoint, search update item in the search box & click on the Update item.
- Pick your site address & list name from the list.
- Select ID under Get items from the Dynamic content.
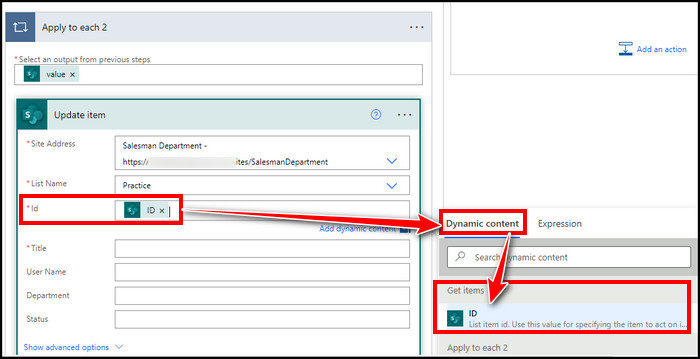
- Pick Title under List rows present in a table for the Title blank box.
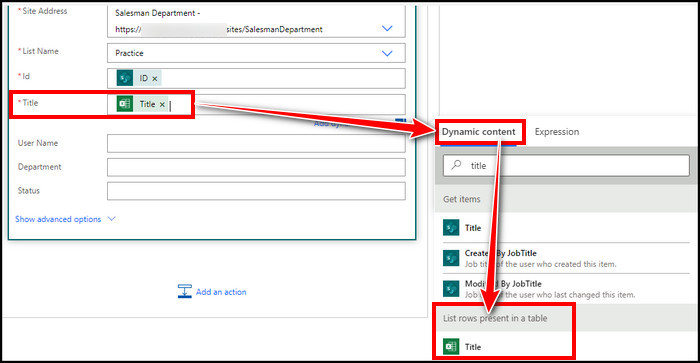
- Pick User Name, Department & Status in the same way as Title.
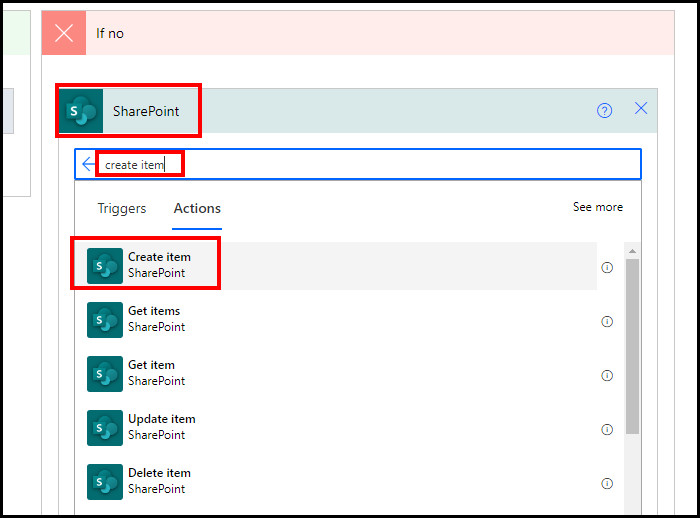
- Click on Add an action under If no section, search sharepoint, select SharePoint & then Create item.
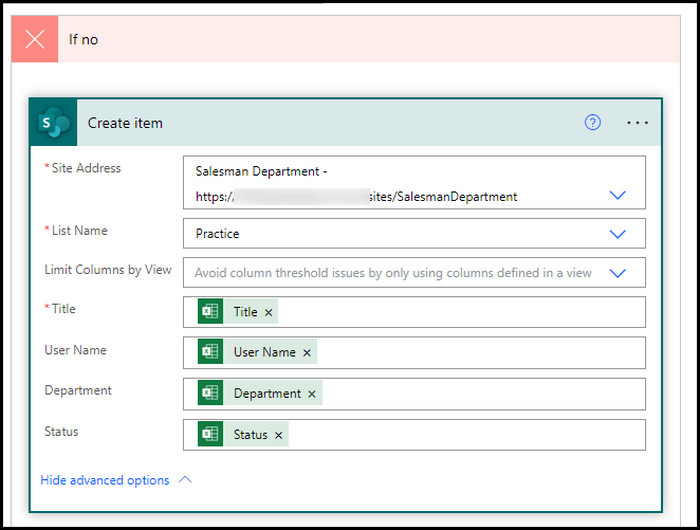
- Click on Show advanced options & put your site name & list name.
- Pick Title, User Name, Department & Status like the if yes section. Make sure they are from List rows present in a table.

- Hit Save from the bottom.
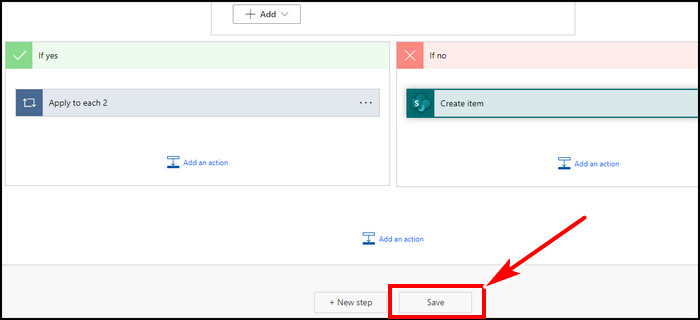
Your Power Automation flow is ready. After you click on save, go back to your SharePoint list, & you will see, the data has already been synced from Excel. The flow will ensure, if the condition is matched, it will update the data. If not, then it will add the items to the SharePoint list.
Now if you edit some data in the Excel file, after your set interval, it will continue to update or add data to your SharePoint list. If you need to instantly update, go to your SharePoint list > click on Integrate > Power Automate > See your flows > select your flow > hit run from the top.
FAQs
Can I edit SharePoint lists from Excel?
Yes, it is possible to modify a SharePoint list with the Power Automation flow from Microsoft Excel.
Final Thought
Updating automatically the SharePoint list from Excel is a great relief. You have to use Power Automate to do the process.
In this article, I guided you thoroughly on how you can keep up-to-date SharePoint list info from Excel. If you have any further queries, please leave a comment.