SharePoint recycle bin is the trash bin where a document ended up when you mistakenly deleted the item you were working on. It can be obviously essential & needs to recover.
The recycle bin will help prevent such accidental items’ removal with a recovery option.
In this article, you are about to learn where this recycle bin is located in SharePoint, how to access it & how to restore the deleted items. Let’s jump in.
SharePoint recycle bin saves deleted documents, pages, news, etc., so you can restore the items when required. Additionally, you can clear the items from the online recycle bin too. Well, the items go into a second recycle bin for further security & recovery.
The main intention of the recycle bin is to protect the data which is deleted intentionally or accidentally. It is there so that you get a chance to retain the deleted data.
But the retention period is limited.
The deleted items are kept for 93 days from the time of deletion. Initially, it stays in the First-stage recycle bin, from where the user can restore the items if necessary. After that, it moves to the Second-stage recycle bin & remains there for 93 days. As a site admin can modify the time period, the retention period is variable.
But only the site admin has access here & they can restore or remove the files from the recycle bin. Additionally, if the recycle bin capacity gets full, it starts to remove the oldest files.
So, how to go to recycle bin in SharePoint online? Read along to know about it.
On Windows, there is a recycle bin on your desktop. Plain in sight, right? But, that recycle bin & SharePoint recycle bin is not the same & unlike Windows, SharePoint doesn’t have it in plain view.
As MS Teams, OneDrive & SharePoint are linked with your MS account; it heads to the SharePoint recycle bin if you delete items from those.
When my younger sibling unknowingly deleted a doc file I was working on a few months ago, I got furious as it was too important. I knew the deleted file would go to the SharePoint recycle bin. But at that time, I was unfamiliar with it.
So, I asked one of my friends how do I find the recycle bin in Microsoft SharePoint. Luckily, he knew about it & I got back my files. Later, I explored other ways to access the recycling bin. So, if you are in my position & wonder where the recycle bin is in SharePoint, follow the steps below.
If you delete the items from MS Teams, Go to the Teams channel from where the item is deleted & then the Files tab from the top. Click on the three dots (…) & select Open in SharePoint.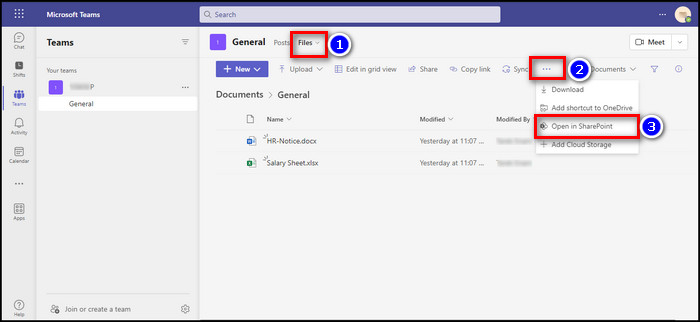
It will move you to SharePoint. From the left quick navigation, click on Recycle bin to access.![sharepoint-recycle-bin]](https://10pcg.com/wp-content/uploads/sharepoint-recycle-bin-1.jpg)
If somehow you don’t see the Recycle bin option in the navigation, don’t fear. There are other ways to access the recycle bin & save your files.
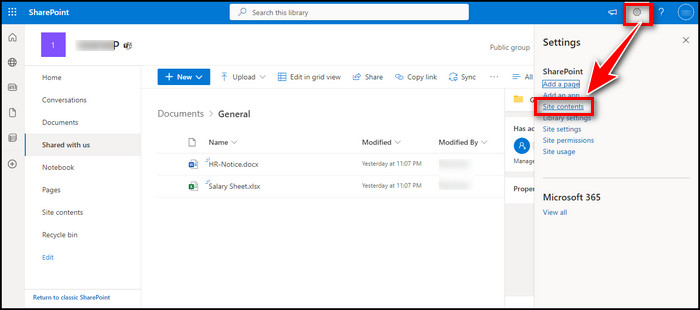
- Click on the gear icon (Settings) from the top right corner.
- Select Site contents.
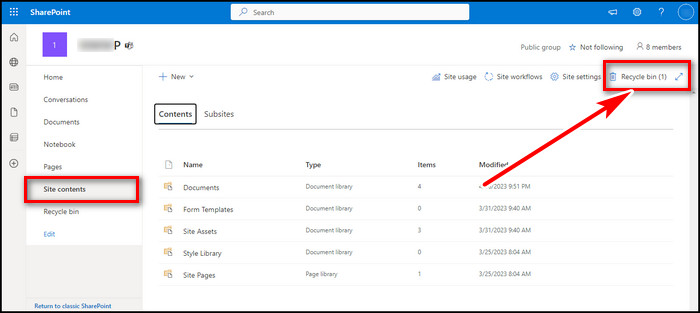
- Click on the Recycle bin below the top right corner.
If you want another approach, continue reading.
To follow this method, you will require site admin access. Go to the SharePoint site. Click on the gear icon & go to the Site settings.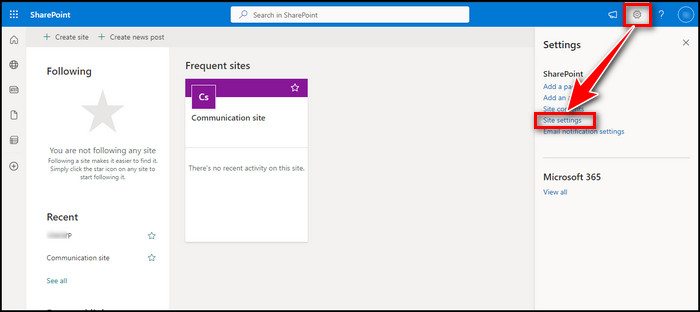
Under Site Collection Administration, select Recycle bin.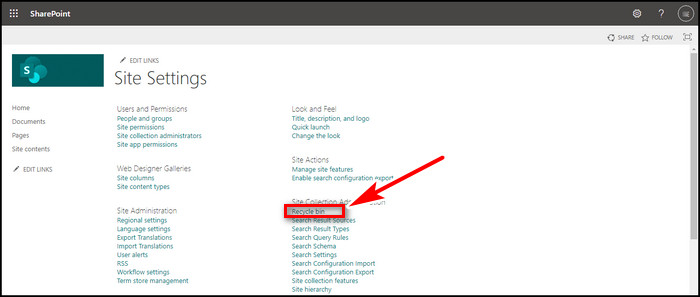
If you want to use another method, then follow as below.
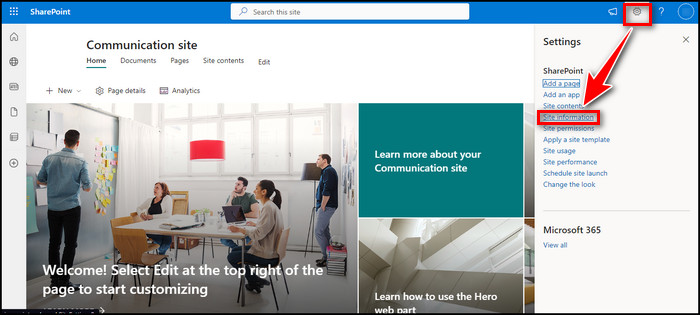
- Click on the gear icon.
- Choose Site information from the list.
- Select View all site settings.
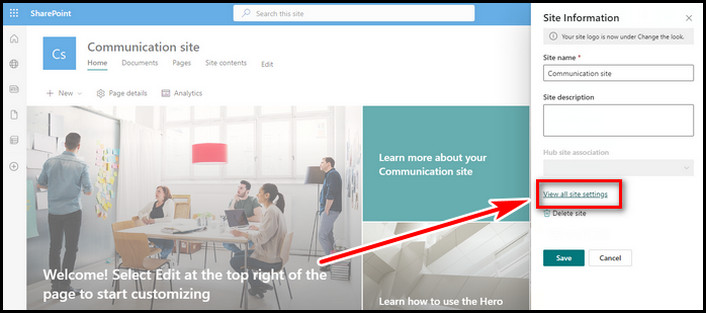
- Click on Recycle bin under Site Collection Administration.

With these methods, you can easily access the SharePoint Recycle bin.
After accessing the SharePoint Recycle bin, you will have two options. You can retain the files which are mistakenly or accidentally deleted, or you can intentionally remove the items from the First-stage recycle bin.
To remove specific files, select the files & hit Delete from the top left side. If you want to format the recycle bin, then click on Empty recycle bin. The files will go to the Second-stage recycle bin.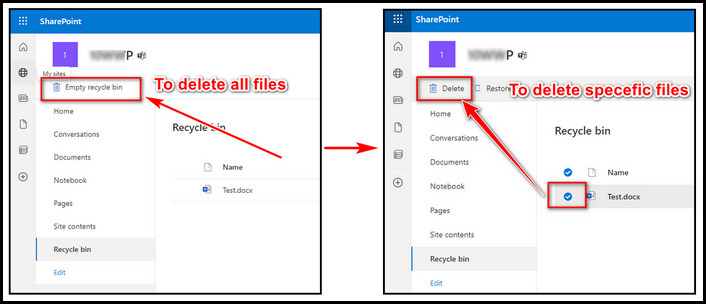
If you want to retain the files from the SharePoint recycle bin, select the files & click Restore from the top left side.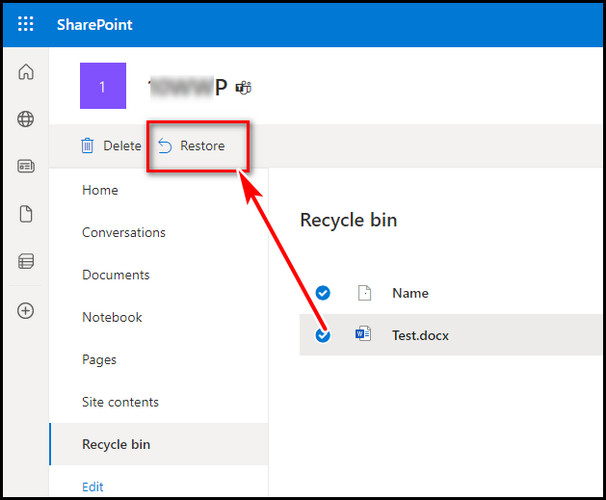
As mentioned earlier, if the files are not in your recycle bin or were manually removed some days ago, you must go to the Second-stage recycle bin to recover the files. From there, you can retrieve the specific files if you are a site admin or have access. A site member will not see the Second-stage recycle bin link.
To go to the Second-stage recycle bin, access the First-stage recycle bin & scroll down to the bottom. There you will see the Second-stage recycle bin link.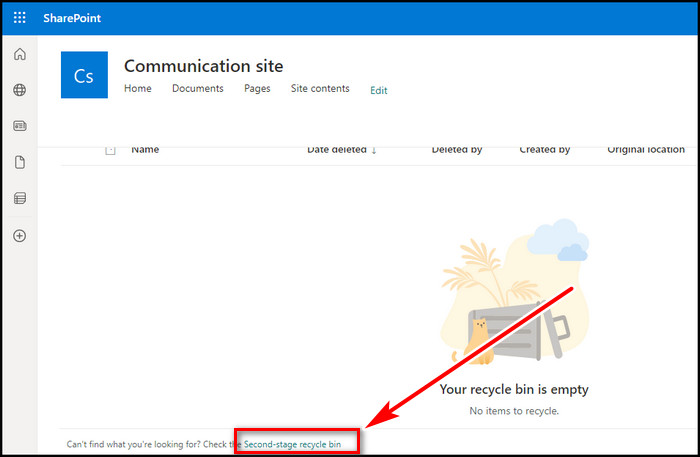
Click on the link to redirect you to the Second-stage recycle bin. You can choose Empty recycle bin to clear all files permanently. Alternatively, you can also restore or delete the specific files from here.
A few months back, I deleted many small files all at once. And guess what? I needed one single file from those & when I went to the recycle bin, I was upset after seeing no search option.
Among those huge numbers of files, it was like a needle in a haystack. But I used a very simple solution that helped to find my file. So if you are in my position & ask how to search in the SharePoint Recycle bin? Well, when you are on the browser, press Ctrl+F to use the browser’s search option to find your specific files.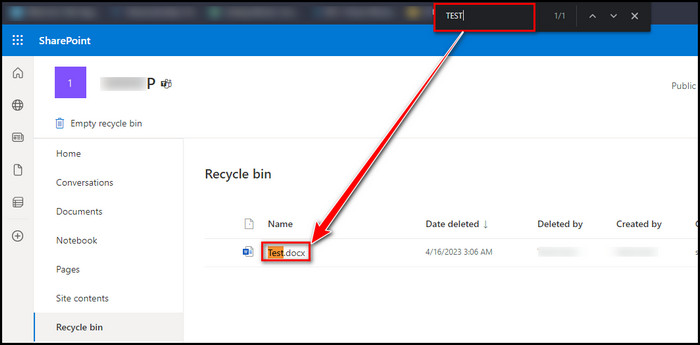
Final Thought
In this article, I have discussed why SharePoint recycle bin is necessary to save your day.
I have presented to you how you can access the SharePoint online recycle bin in four different ways, along with how to use the options to reclaim your lost files or delete files permanently for your safety.
If you have any further queries, please leave a message.