The NST file makes Outlook run faster by loading your emails, events, and other items quicker. It also allows you to use the app without an internet connection.
But, even though .nst files are helpful if Outlook keeps generating them whenever you launch the app, it becomes a huge problem. It clutters your mailbox, and Outlook becomes slow.
That’s why, in this article, I’ll provide the methods to stop Outlook from creating multiple NST files and make sure the app uses only one .nst file.
Let’s begin!
Why Does Outlook Create New NST Files Every Time It is Opened?
Outlook keeps creating .nst files whenever a user logs in due to a corrupted user profile or data file. It stores information about your mailbox and email account settings. When this file becomes damaged, Outlook attempts to rebuild it upon each launch, resulting in multiple NST files.
Additionally, add-ins or third-party plugins can sometimes interfere with Outlook’s regular operation and generate new NST files.
The .nst files are supposed to improve Outlook’s performance. It allows Outlook to quickly retrieve data files instead of from the server, enhancing responsiveness. These files also let you work offline.
So, even though NST files are helpful if you have multiple Outlook data files, it is a problem that you have to fix ASAP!
How to Fix Outlook Keeps Generating Lots of NST Files Issue
To resolve Outlook continuously generating NST files, update Outlook to the latest version to eliminate bugs and glitches. If the problem persists, try repairing the Office applications through the Office Repair Tool to fix any corrupted files or settings.
Creating a new profile in Outlook can also help, as the old one can get damaged and cause the issue. Also, rebuild the OST (Offline Storage Table) file, which stores mailbox data.
Keep in mind that deleting the NST files won’t help, as Outlook will create new files when you open the app.
However, following the methods below and combining them will help you resolve the issue of unwanted NST file creation in Outlook.
Here are the methods to fix Outlook keeps generating lots of .nst files issue:
1. Update Outlook to the Latest Version
Microsoft released a new Outlook version of 2304 (build 16327.20214) on April 25, 2023, to address the multiple creation of NST files. So, if your Outlook is not up-to-date, make sure to upgrade it to the latest edition.
Here are the steps to update Outlook to the latest version:
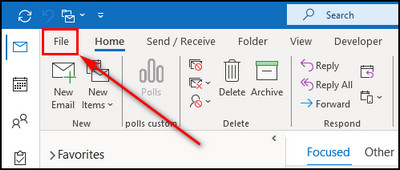
- Open the Outlook app and click on File from the top-right.
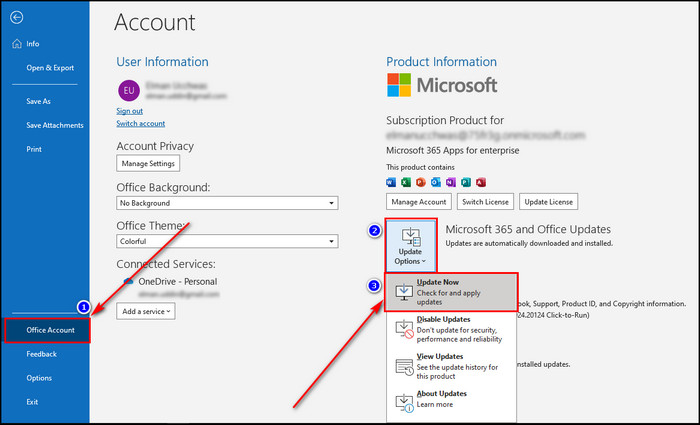
- Select the Office Account option in the left menu bar.
- Choose Update Options.
- Select Update Now from the dropdown.
2. Open Outlook in Safe Mode and Disable Add-Ins
In case an unofficial add-in is causing Outlook to generate multiple data files on Windows 10 & 11 or other versions, try opening Outlook in safe mode. It will allow you to launch Outlook without running any of the installed plug-ins.
Now, if Outlook operates normally and doesn’t produce a new .nst file, the issue occurs due to third-party plug-ins.
Here’s how to open Outlook in safe mode and disable add-ins:
Open Outlook in Safe Mode
- Close Outlook if it’s running.
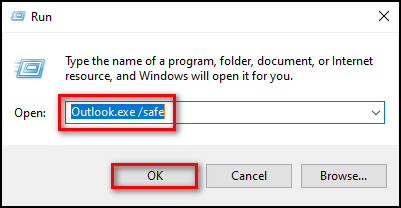
- Right-click on the Start icon on the taskbar and choose Run.
- Enter Outlook.exe /safe in the text field.
- Click OK, and Outlook will open in safe mode.
Check If You Have Multiple NST Files
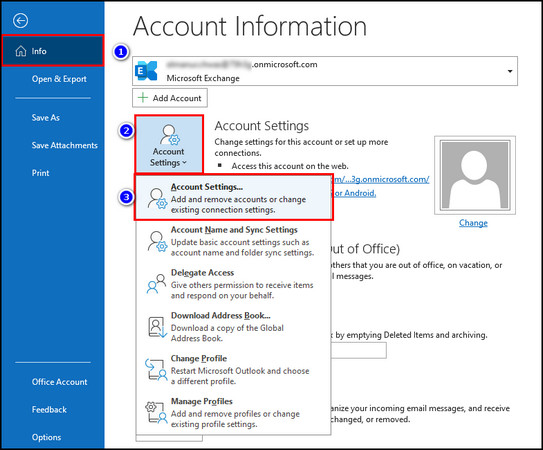
- Click on the File option.

- Select Account Settings > Account Settings from the Info tab.
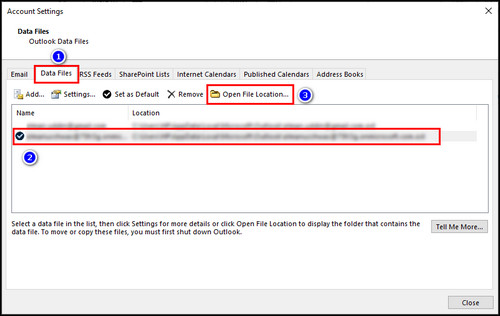
- Go to the Data Files tab, select the data file for your profile, and click the Open File Location button.
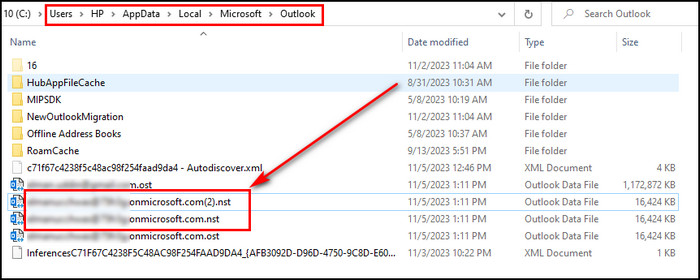
- Verify if you have several .nst files.
Remove Third-Party Add-Ins
- Return to the Outlook app.
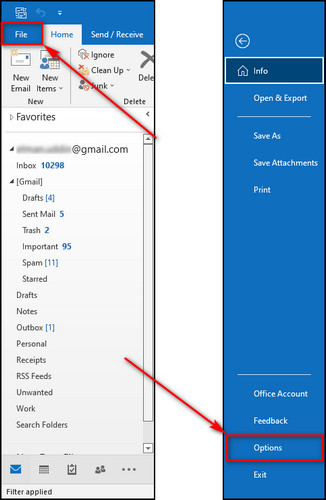
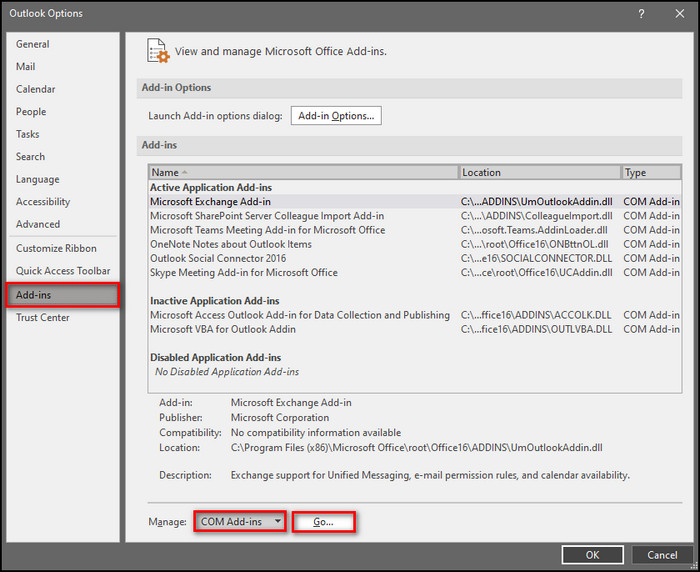
- Select File > Options.
- Proceed to the Add-ins tab.
- Set Com add-ins for the Manage field and click on Go.
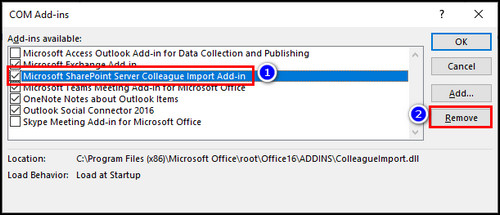
- Select the add-in that’s causing the issue and click the Remove button.
3. Switch to Exchange Online Mode
Outlook can start generating lots of .nst files if it has problems retrieving information from the saved data file. In that case, enable the Exchange Online mode, so Outlook fetches data directly from the server rather than from the cached NST file.
Here’s the process to switch to Exchange Online mode:
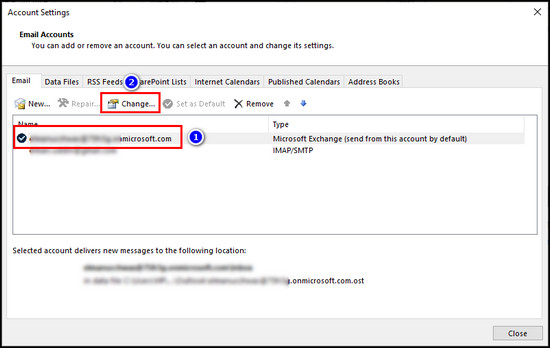
- Select File > Account Settings > Account Settings in Outlook.

- Choose your profile and click on Change.
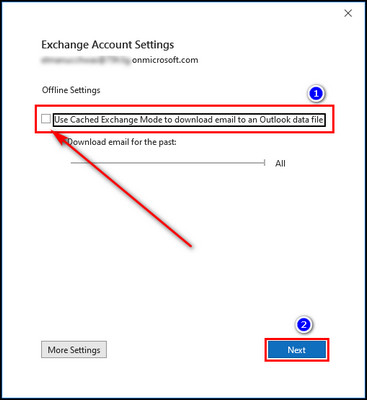
- Remove the checkmark from the Use Cached Exchange Mode option and click on Next.
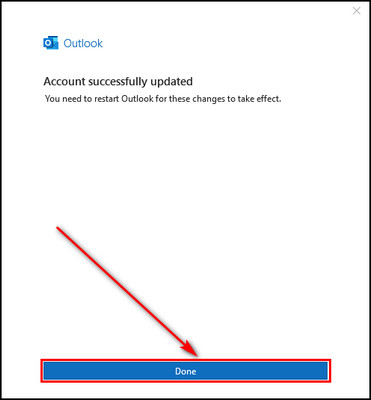
- Click the Done button and restart the Outlook application.
4. Repair Office Applications & Outlook Data
Repairing the Office 365 programs using the Microsoft Repair Tool and Outlook data using the Outlook Inbox Repair Tool can help fix any corrupted files or settings that might be causing the app to produce several NST files.
Follow the steps below to repair Office applications and Outlook data:
Repair Office Application
- Open the Control Panel on your Windows device.
- Select Programs > Programs and Features.
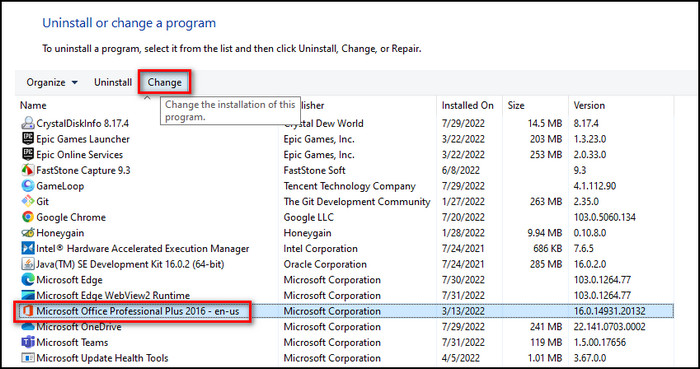
- Choose Microsoft Office Professional Plus or Microsoft 365 Apps for enterprise and click the Change button.
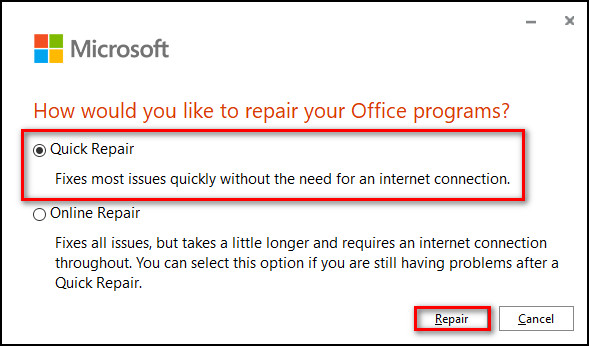
- Select the Quick Repair option and click on Repair.
Repair Outlook Data
- Close Outlook if it’s running.
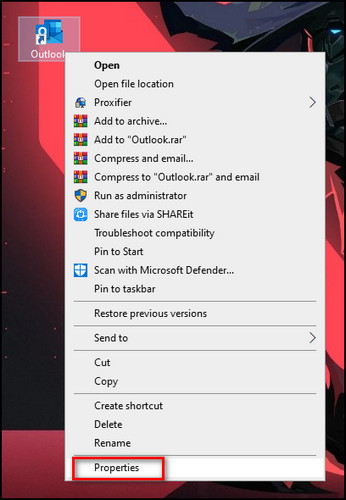
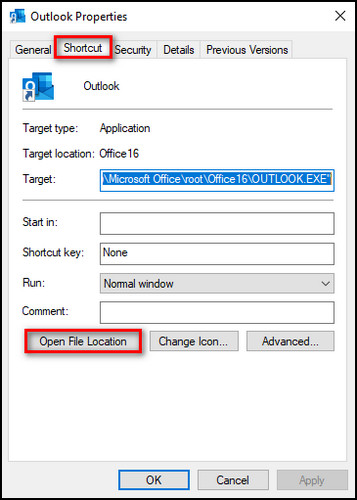
- Right-click on the Outlook shortcut and choose the Properties option.
- Go to the Shortcut tab and click the Open File Location button.
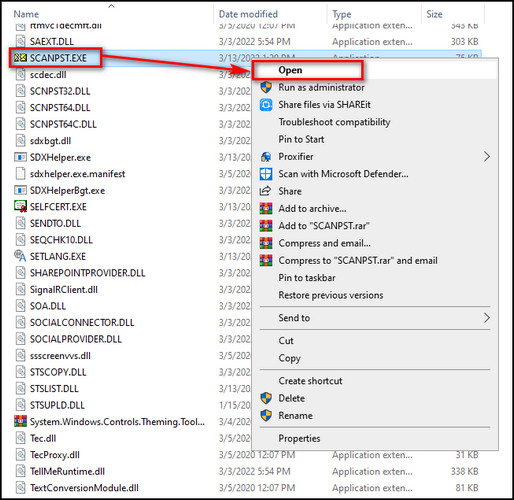
- Double-click the SCANPST.EXE executable file and the Microsoft Outlook Inbox Repair Tool will open.
- Click the Browse button and proceed to the following directory:
C:\Users\*yourusername*\AppData\Local\Microsoft\Outlook.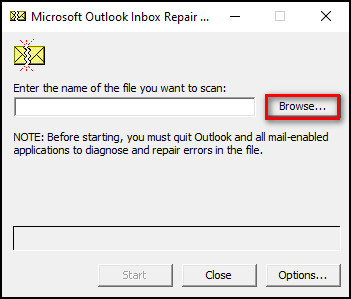
- Choose your profile and select the Start option.
- Click on OK when the repair process is done.
5. Create a New Outlook Profile
Sometimes, Outlook keeps creating NST files every time you use it because of a corrupt Outlook profile. To troubleshoot this issue, make a new profile.
Here are the steps to create a new Outlook profile:
- Open the Control Panel.
- Enter Mail in the Search box and open it.
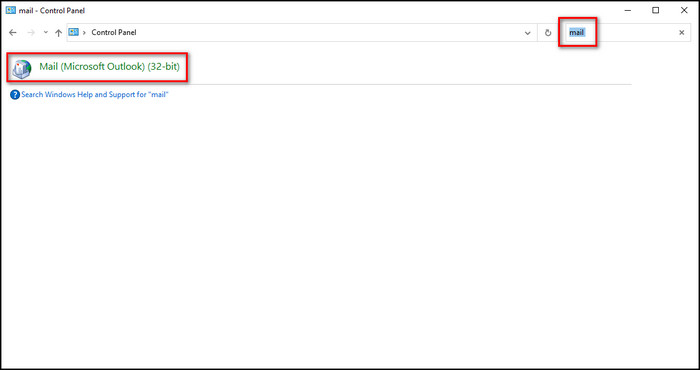
- Choose the Show Profiles option and click the Add button.

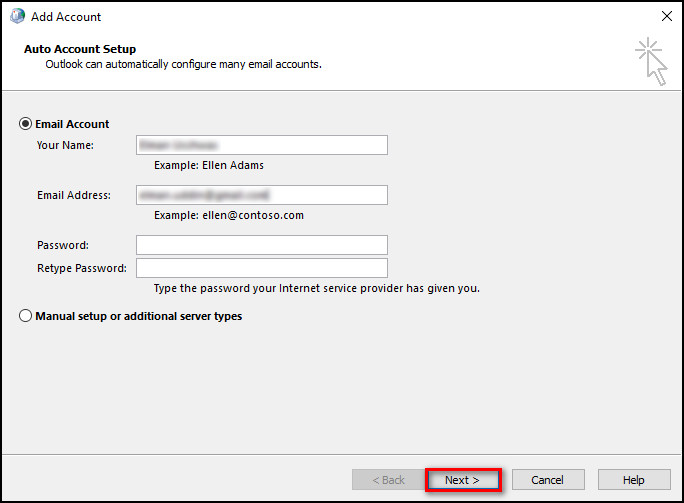
- Enter your name, email address & password, and click on Next.
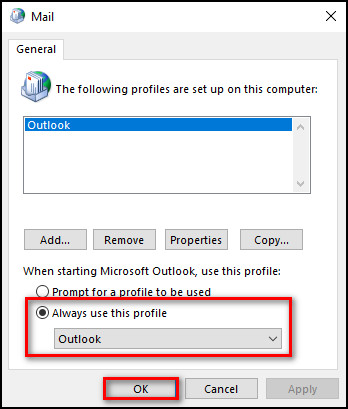
- Select Outlook, put a checkmark on the Always use this profile option, and click on OK.
6. Rebuild Outlook OST File
OST files are a local copy of your mailbox data. If the NST file issue persists, try rebuilding the .ost file. It will resolve synchronization and corruption problems.
Here’s how to rebuild Outlook OST file:
- Open Outlook Account Settings.

- Move to the Data Files tab.
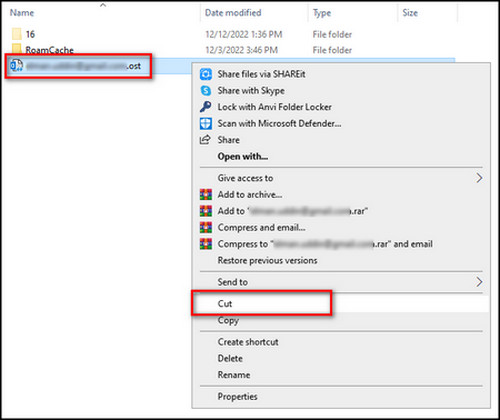
- Select the .ost file for your profile and select Open File Location.

- Move the OST file to a different folder on your computer.
- Quit the Outlook app and restart it.
When Outlook reopens, it’ll create a new OST file automatically.
Final Thoughts
Now, you can effectively troubleshoot the issue of Outlook continuously creating new NST files. So, the Outlook application will function efficiently without generating unnecessary NST files.
Comment below if you have further questions, and we’ll get back to you.