Family is like a human tree—connected by blood and love. The relationship between the members is very touching and sentimental.
Generation after generation, the bonding gets bigger and becomes challenging to remember for a person. Therefore, people use various ways to pass the history to the next generation.
In this modern era, using the family tree in MS Word is the easiest way to preserve the record. And here I’ll show you how you can do it.
So, let’s begin.
How to Make Family Tree in Microsoft Word
To make a family tree in Microsoft Word, you need to use the Hierarchy SmartArt. It will add a box for a person where you can insert members’ names, details, and images. You can include more shapes to before, after, above, and below to make family branching.
The family diagram is used to show relationships between family members. It contains the list of several generations. Therefore, it’s also known as a genealogical tree.
The family tree includes the parent’s and children’s connection to a family. The following procedures will describe the ways to add and edit the family tree in MS Word.
Here are the steps to make a family tree in Microsoft Word:
Step 1: Insert SmartArt
First, you need to create a blank MS Word document to insert the SmartArt. There are various types of SmartArt, but the Hierarchy is the most suitable for the family tree.
Here is the way to insert SmartArt:
- Go to the Insert tab and press on SmartArt.
- Click on Hierarchy and select Circle Picture Hierarchy.
- Press on OK.
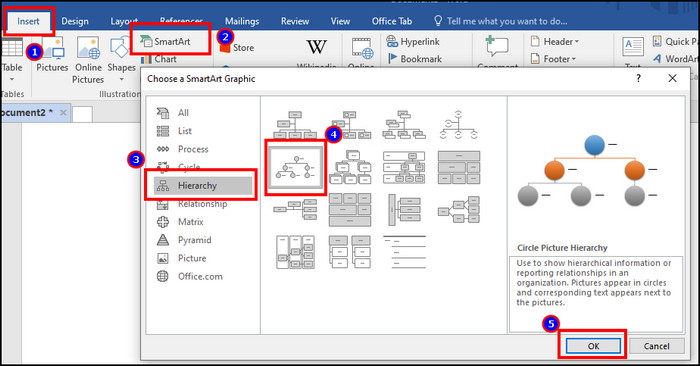
There are other Hierarchy SmartArt, Name and Title Organization Chart, Half Circle Organization Chart, Labeled Hierarchy. But Circle Picture stands on top because it looks exquisite and has a picture-adding option.
Step 2: Enter Family Members Name
The SmartArt will show a hierarchy manager tab and text box for typing the family members name. You can enter the family member’s name using the box.
Follow the process below to add family member names:
- Click on the text box.
- Type the family member’s name.
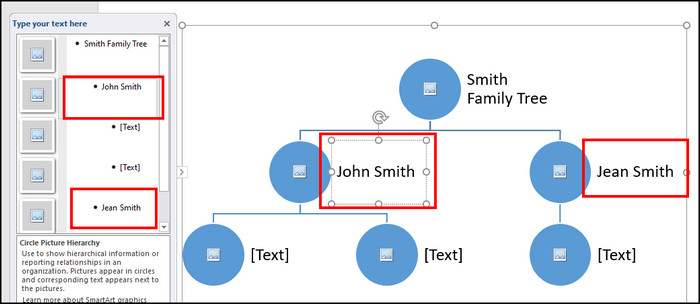
You can write names from the hierarchy manager tab and the text box beside the SmartArt.
Step 3: Add New Family Members
When adding several generations, you must include new members in your family tree. You can add shapes from a box to accomplish it.
For example, you can use the Add shapes below to include children from a parent. Similarly, Add shapes before or after to include siblings.
Read the following procedure to add a new family member:
- Right-click on the box from where you want to add a branch.
- Press on Add Shape.
- Select Add Shape After/ Before/ Above/ Below.
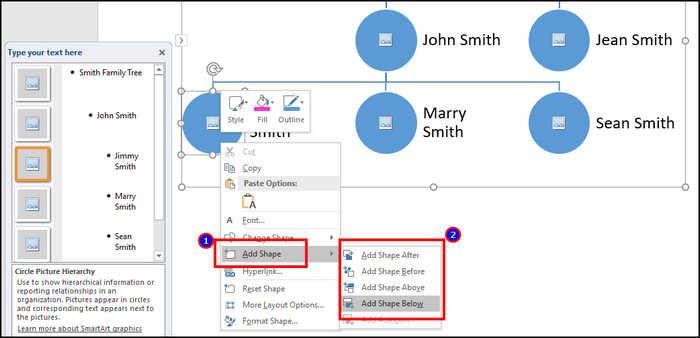
- Type the family member’s name.
Continue the above process to add family members and complete the family tree.
Step 4: Include Members Details
In a family tree, a common detail everyone uses is the member’s birth and death year. You can edit the text box and insert the desired information.
Here is the process to add members details:
- Press on the text box.
- Click the Enter button and type the information.
- Select the line and reduce the font size.
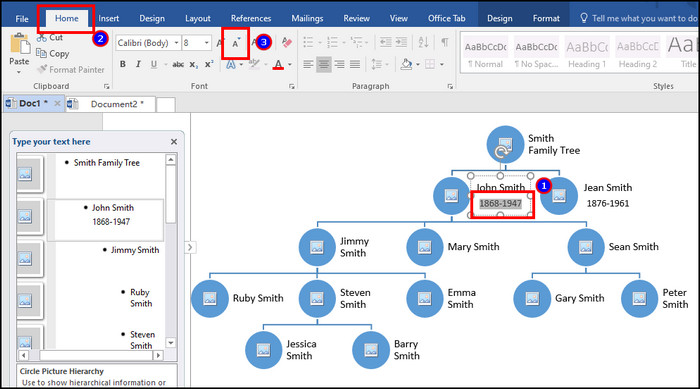
It’s not compulsory to add DOB as the members’ details. You can include their birthplace or other piece of information there.
Step 5: Add Family Members Image
Without an image, the family tree feels incomplete. The Circle Picture Hierarchy allows you to make a family tree on Word with pictures.
Follow the procedure below to add a family member image:
- Press on the image box.
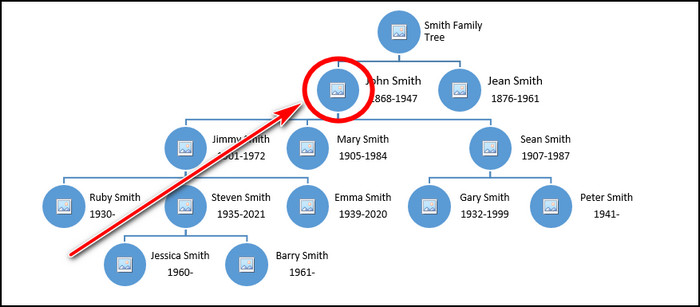
- Choose the image from file or online.

Insert all the members’ images, and it will finish the hierarchy or family tree.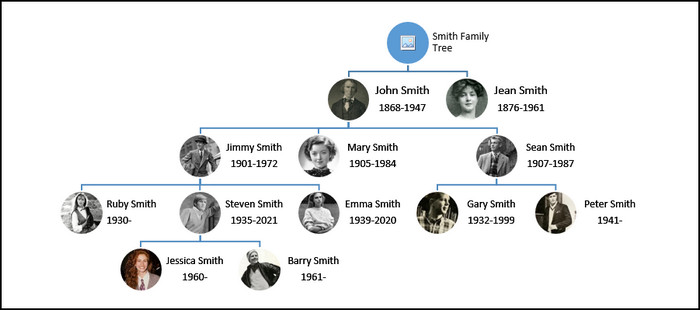
To save your time, you can just download the free family tree template from below.
Download Family Tree Template »Concluding Word
The family tree is a great way to show the history of your predecessors to your friends and kids. Making the tree digital increases its longevity and keeps your history safe.
You can make the family tree using Microsoft Word, as shown in this article. You can make it more charming and informative by modifying SmartArt and adding images.
Goodbye!