Even though Microsoft Outlook has become an indispensable tool for managing emails, calendars, and tasks, it can sometimes encounter registry issues that disrupt its seamless operation.
If your Outlook app has produced an error message saying that the attempted operation has failed when you try to use the rules & alerts feature, it’s because of incorrect registry settings.
That’s why, in this article, I’ll provide the methods to resolve registry issues in Outlook.
Let’s begin!
How to Fix Outlook Operation Failed Due to a Registry Or Installation Problem
To resolve the attempted operation failed when opening rules & alerts in Outlook, first, restart Outlook to eliminate any temporary glitches. Then, update Microsoft Office to the latest version and re-create your Outlook profile to resolve profile corruption.
If the issue persists, try repairing Microsoft Office, and to troubleshoot data corruption, use the built-in Microsoft Outlook Registry Repair Tool (scanpst.exe).
For more details, check out the methods below to solve the registry problems in Outlook.
Here’s how to fix an Outlook operation that failed due to a registry or installation problem:
1. Restart Outlook
Before performing any advanced solution and modifying the registry keys, let’s try the solution Microsoft has recommended: closing and re-opening the Outlook app. Sometimes, Outlook encounters temporary glitches that you can resolve simply by restarting the application.
Just quit Outlook, open the Task Manager, and make sure it’s not running in the background. Then, re-launch the app and check if the issue persists.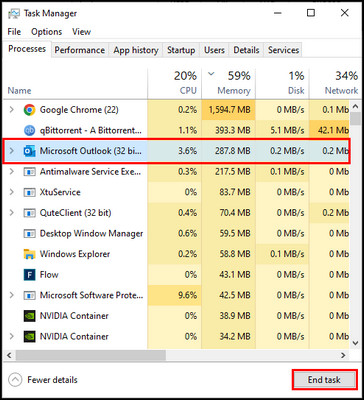
2. Reinstall MS Office
Outdated or corrupted Office installations can lead to compatibility issues with Outlook and cause registry or installation issues.
Removing and then Updating Microsoft Outlook along with Office 365 products can troubleshoot these problems and ensure you have the latest bug fixes and security patches.
Here are the steps to reinstall Microsoft Office:
Uninstall Office
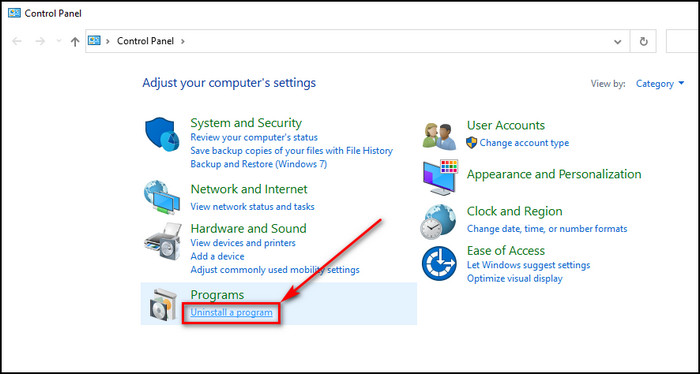
- Search for Control Panel and open it on your desktop.
- Set View by to Category and click the Uninstall a program option.
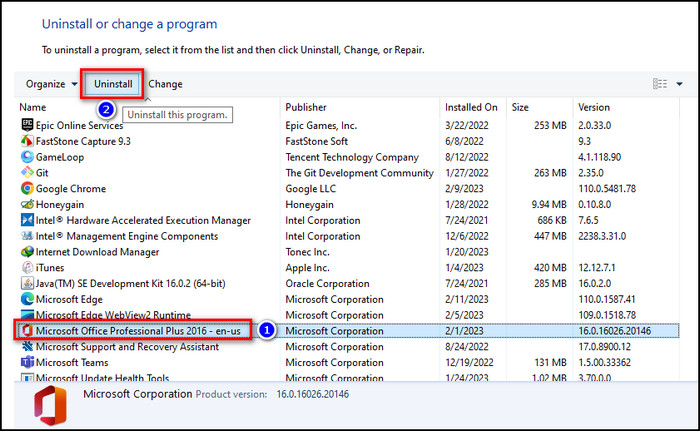
- Choose Microsoft 365 Apps for enterprise or Microsoft Office and click on Uninstall.
Delete MS Office Registry Files
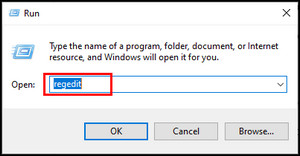
- Press Windows + R on the keyboard to start the Run program.
- Enter regedit in the text box and press click OK.
- Remove all the subfolders in ClickToRun from the directory:
Computer\HKEY_LOCAL_MACHINE\SOFTWARE\Microsoft\Office\ClickToRun.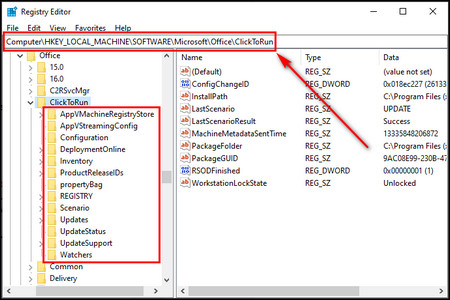
- Erase all the subfolders in the Office folder from the directory below:
Computer\HKEY_CURRENT_USER\SOFTWARE\Microsoft\Office.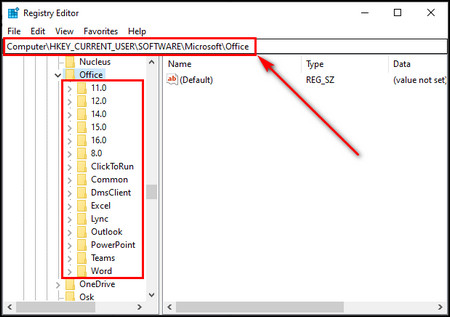
- Delete the items in AppVISV from the following location:
Computer\HKEY_LOCAL_MACHINE\SOFTWARE\Microsoft\AppVISV.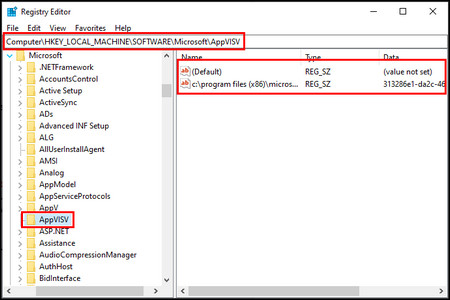
- Restart your PC.
Install Microsoft Office
- Go to the official Microsoft Office 365 website and log into your account.
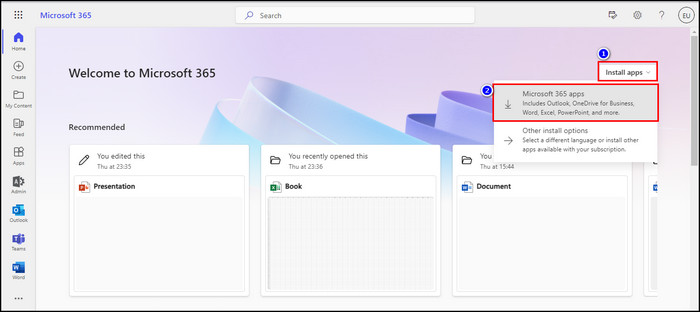
- Click on Install apps from the upper right.
- Select Microsoft 365 apps from the dropdown to download the Office installation file.
- Double-click on the downloaded .exe file. Then, follow the on-screen prompt to install MS Office.
3. Repair Microsoft Office
If reinstalling Office doesn’t solve the issue, repairing the Office installation can fix corrupted or missing files that may be causing the problem. It ensures that all components of Office, including Outlook, are working correctly.
Here’s the process to repair MS Office:
- Go to Control Panel > Programs > Uninstall a program.
- Right-click on Microsoft Office or Microsoft 365 Apps, and choose Change.
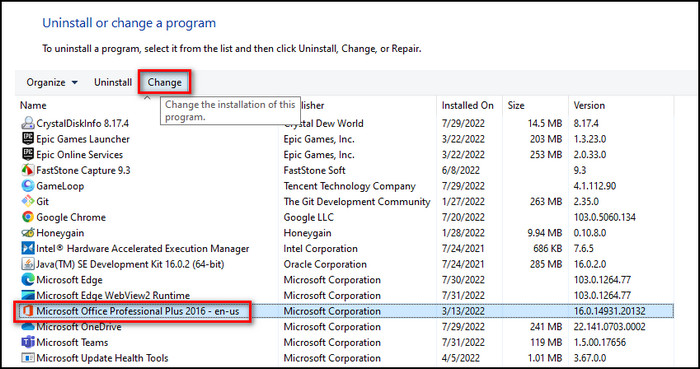
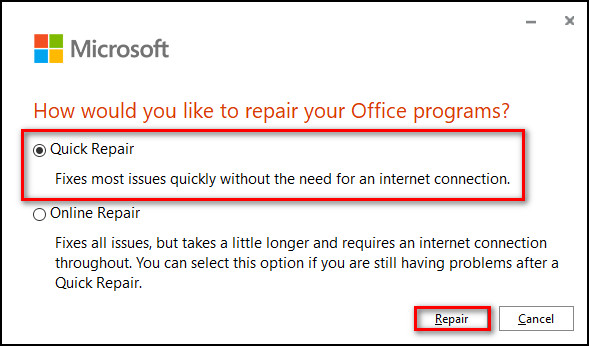
- Select the Quick Repair option and click on Repair.
4. Delete and Re-create Your Outlook Profile
Corrupted profiles can lead to errors in Outlook. By removing and creating a new profile, you can start with a fresh configuration and resolve registry or installation-related issues.
Here’s how to delete and re-create your Outlook profile:
Delete Outlook Profiles from the Registry
- Open the Registry Editor on your Windows device.
- Select Computer > HKEY_CURRENT_USER > SOFTWARE > Microsoft > Office > 16.0 > Outlook.
- Right-click on Profiles and choose Delete.
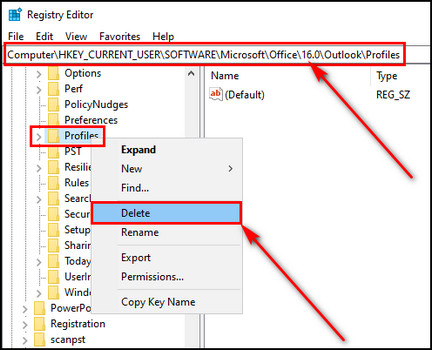
- Select Yes to confirm the removal process.
Add a New Outlook Profile
- Search for the Control Panel and launch it on your device.
- Input Mail in the Search field on the top right.
- Select Mail (Microsoft Outlook) (32-bit).
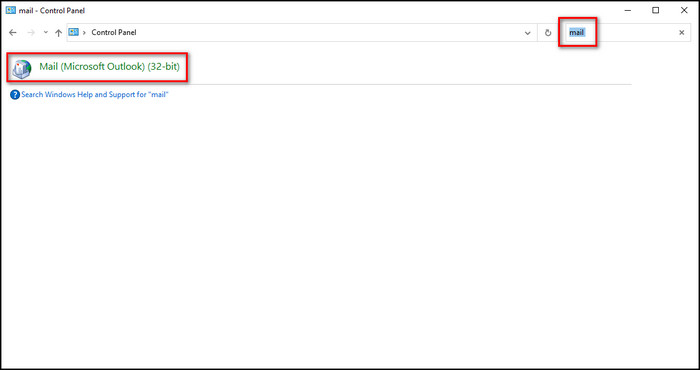
- Click the Show Profiles button and select Add.
- Provide a name for the new profile.

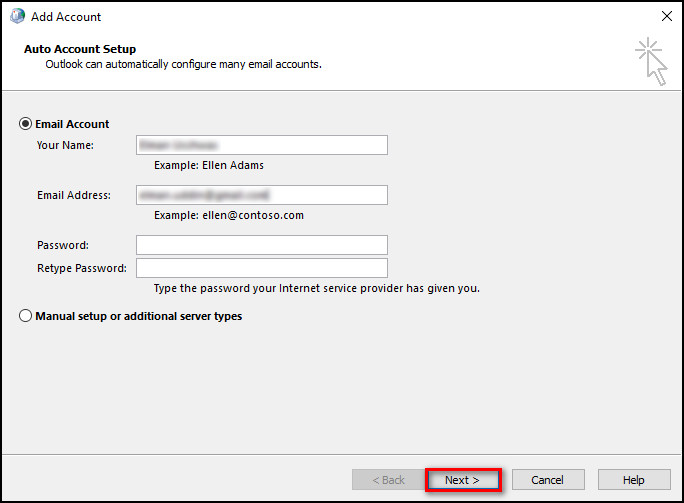
- Enter your first & last name, email address, and password. Then, click Next.
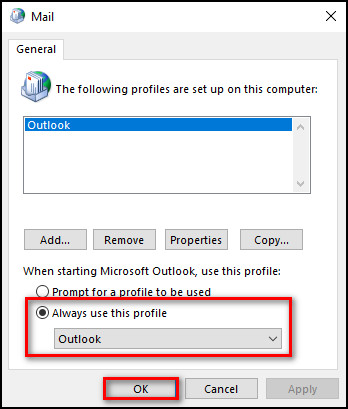
- Choose Outlook, make sure the Always use this profile option is selected, and click OK.
5. Repair Outlook Data
Outlook stores email data in PST (Personal Storage Table) or OST (Offline Storage Table) files. These files can become corrupted over time. Repairing the PST file and deleting Outlook OST, then rebuilding it, can resolve issues related to data integrity, which is causing registry problems.
Follow the steps below to repair Outlook data:
Repair Outlook PST Files
- Quit Outlook and make sure it’s not running in the background.
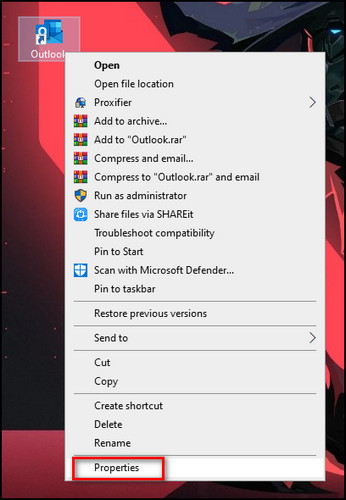
- Open the additional options for the Outlook shortcut and select Properties.
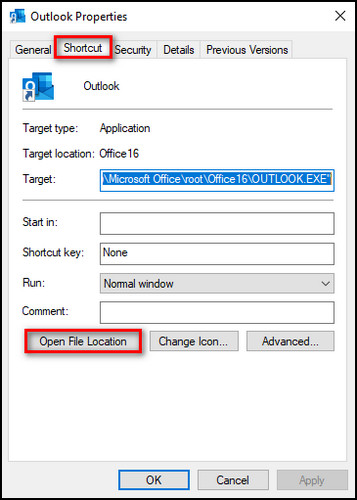
- Click on Open File Location from the Shortcut tab.
- Locate and run the SCANPST.EXE program.
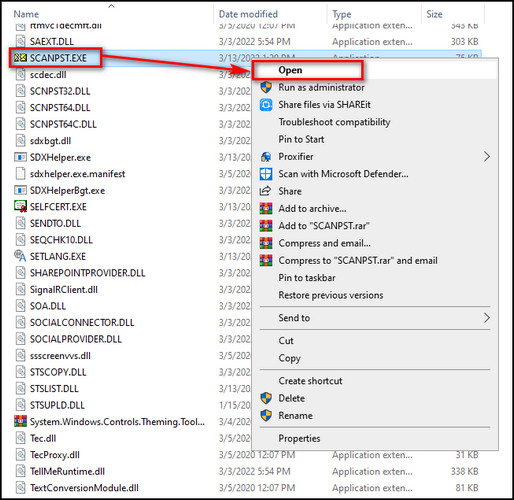
- Browse to the following location:
C:\Users\*yourusername*\AppData\Local\Microsoft\Outlook. - Select the Outlook profile causing registry issues, and click on Start.
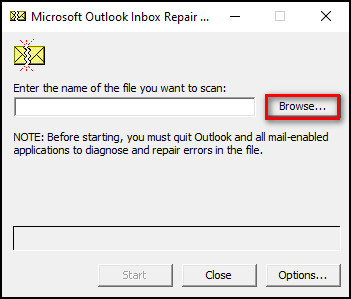
- Click OK after completing the repair process and close the Microsoft Outlook Inbox Repair Tool.
Rebuild Outlook OST File
- Open the Outlook app on your device.
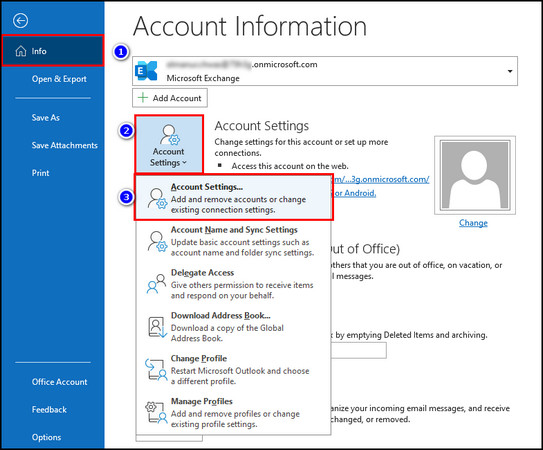
- Choose the File option from the upper left corner.
- Select Account Setting > Account Settings.
- Choose the .ost file you want to rebuild from the Data Files tab and click on Open File Location.
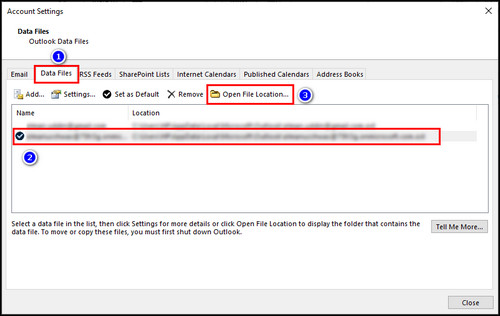
- Drag the OST file to another folder on the PC.
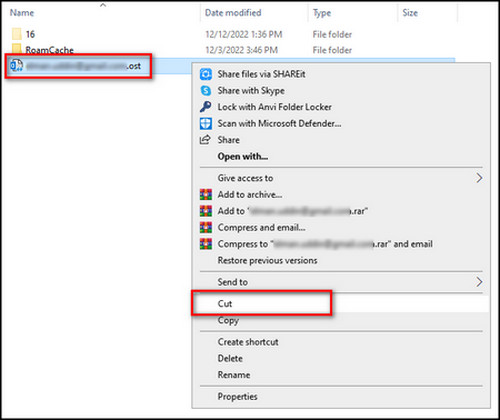
- Close Outlook and relaunch it. Then, the app will automatically create a new OST file.
6. Update Outlook Registry
If the Outlook installation or configuration is deeply corrupted, changing the Windows Registry may be necessary as a last resort to fix specific issues.
To back up your registry configurations:
- Press Windows + R on the keyboard to start the Run program.
- Enter regedit in the text box and press click OK.
- Select File from the top bar and choose Export.
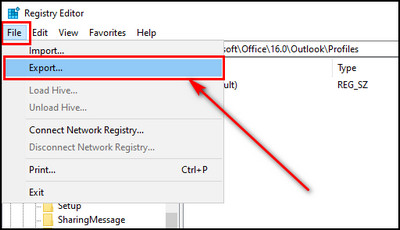
- Enter a name for the registry file, choose where to store the file, and click Save.
If anything goes out of control, just import this .reg file from the Registry Editor.
Now that you have blacked up your registry and prepared yourself for any unfortunate situation, let’s modify the new registry keys to troubleshoot the registry issues for Outlook.
Here are the steps to update the Outlook registry:
- Open the Registry Editor on your computer.
- Expand Computer > HKEY_CURRENT_USER > SOFTWARE > Microsoft > Office > 16.0 > Outlook > AutoDiscover.
- Right-click on the right panel and select New > DWORD (32-bit) Value.
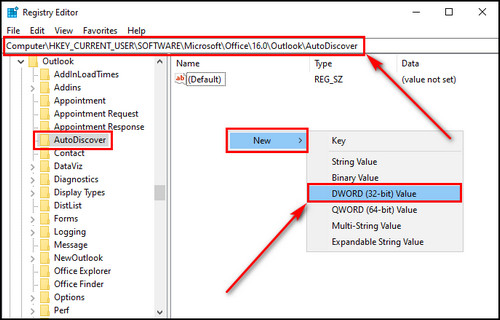
- Enter ExcludeHttpsRootDomain for the newly added registry key name and set its Value data to 1.
- Add two more DWORD Value registry keys similarly with labels ExcludeScpLookup and ExcludeExplicitO365Endpoint. Then, set their Value data to 1.
- Close the Registry Editor.
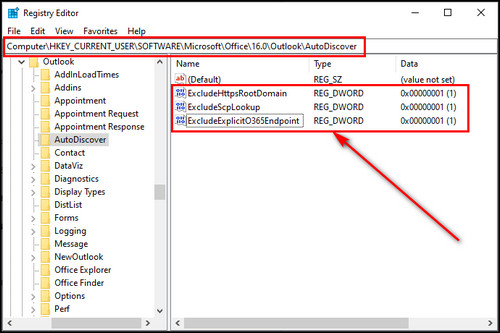
Now, open Outlook, and you’ll be able to log in without any registry or installation errors.
Final Thoughts
Now, you can successfully fix Outlook registry problems and ensure a smoother & more reliable email experience. Always be cautious when working with the Windows Registry, and back up your data before making any changes.
Comment below if you have further questions, and we’ll get back to you.